Windows 10 is notorious for poor privacy.
insert_linkYour Computer Has Just Finished Installing Windows 10…
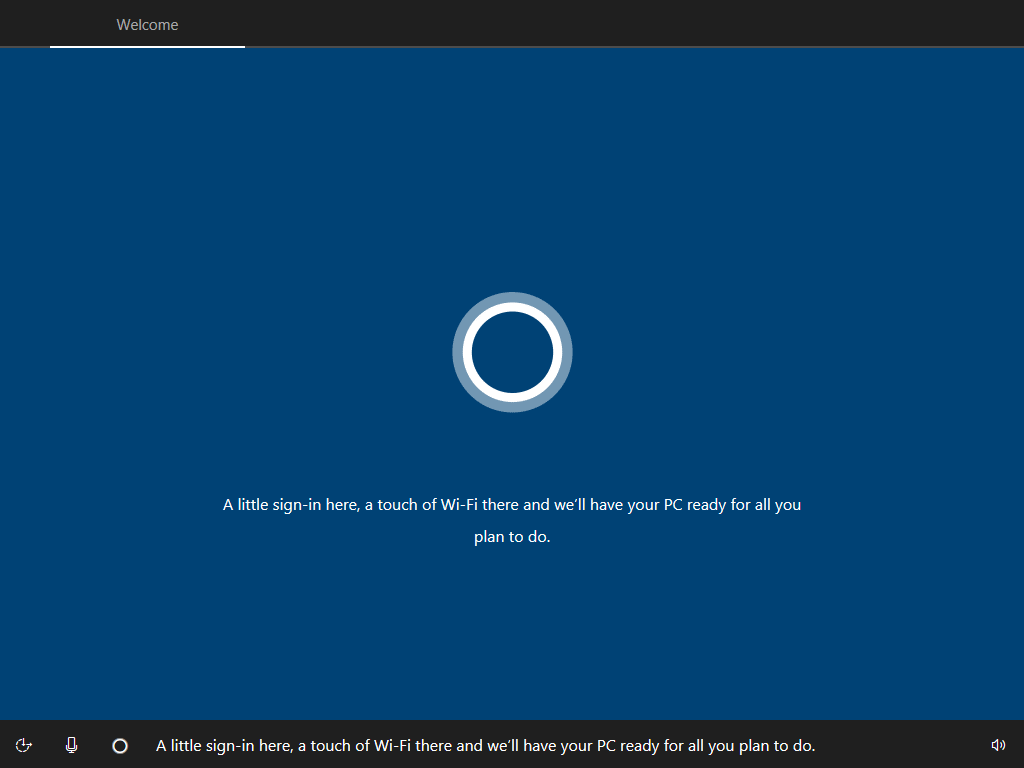
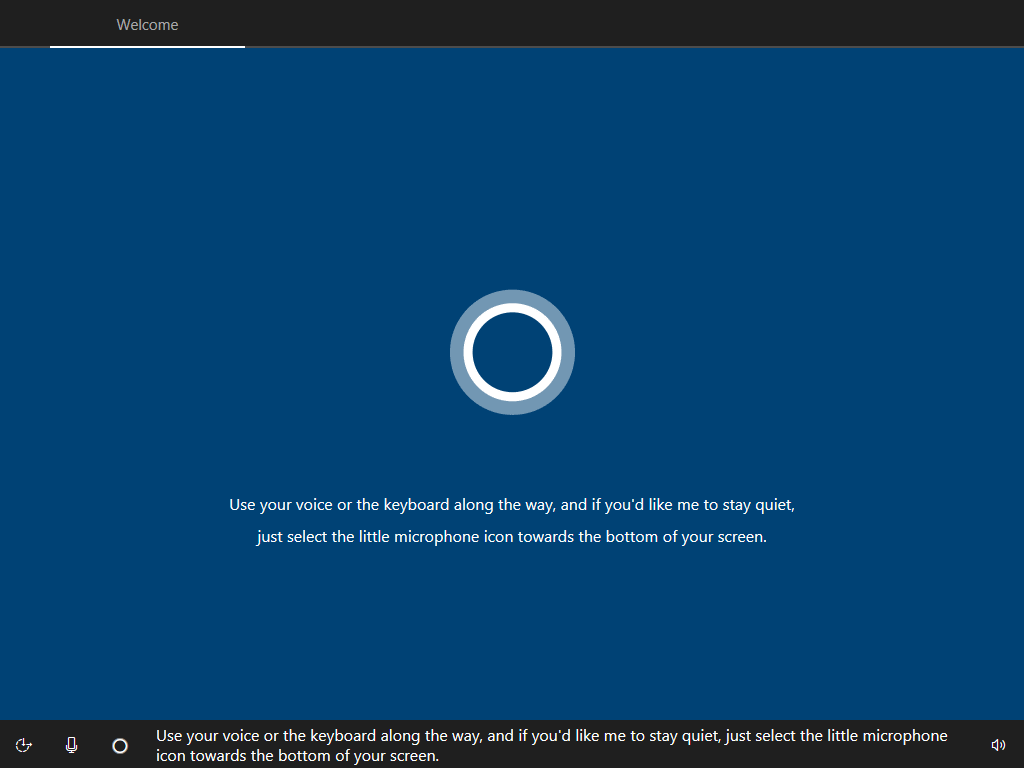
Okay, so you’ve waited and waited, and finally, you are at the stage of Windows 10 setup. That is to say, you’re probably looking at a bright blue screen with Cortana shouting down your ear.
However, you might already have Windows 10 setup, in which case, you can follow the later steps. We will cover what you can do after the initial Windows 10 setup wizard has completed, so don’t worry.
Ultimately, this is a guide for configuring your Windows 10 computer in the best way—for privacy and security. Therefore, even if you don’t think there’s work to be done, there’s likely something you need to do right now.

But why is it important to have a Windows 10 checklist to abide by? Well, this makes it super-easy to get up and running as soon as possible.
On top of that, these steps will guide you through the ways of giving Windows 10 some privacy and security. Unfortunately, Windows 10 is notorious for collecting swathes of potentially personally-identifying data.
This data is sufficiently bountiful such that it can reveal a scary and surprising amount about you. In fact, Microsoft is essentially building up their own, massive profile of you.
Do you really want this?
Also, it is a very good idea to configure Windows 10 for security. As a result, I promise you won’t have to worry nearly as much about being infected by malware; infections of any sort are astonishingly likely, no matter how careful you think you are online…
With that all in mind, let us subsequently, swiftly shuffle our way into the first step of many. This after Windows 10 has finished its installation, to clarify.
insert_link1A. Walkthrough of the Initial Windows 10 Setup Wizard
Skip ahead if you’ve already gone through the initial Windows 10 setup wizard.
Tip: use the enter and arrow keys to zip through the Windows 10 setup wizard like a wizard, Harry.
insert_linka. Shut Up Cortana
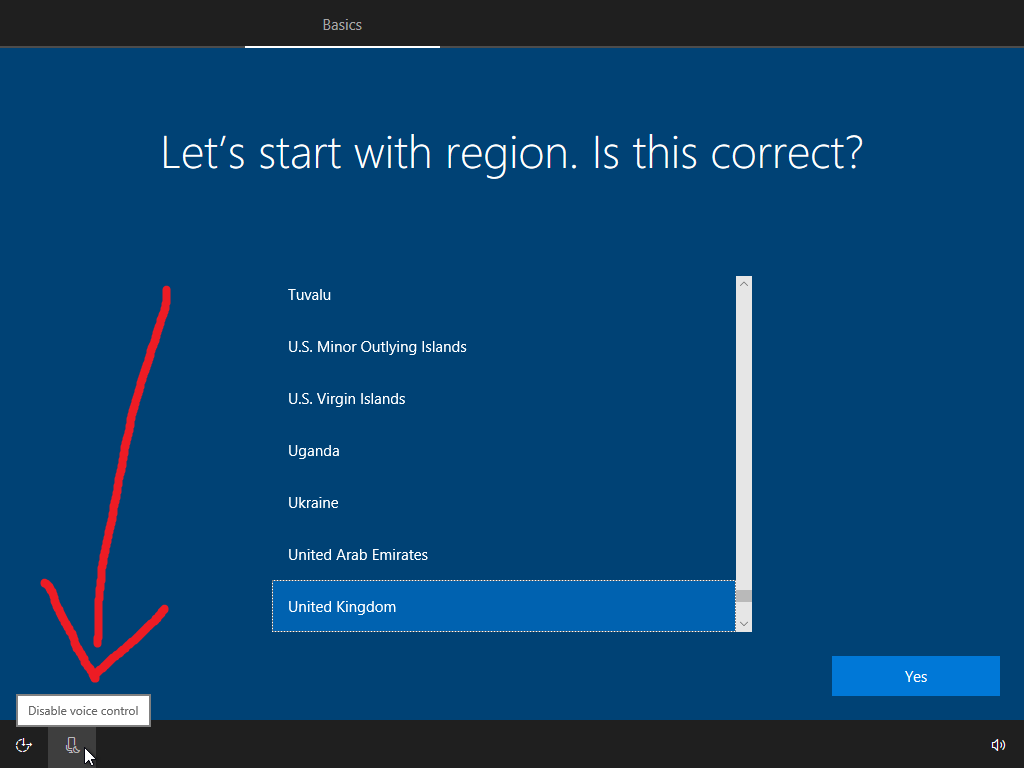
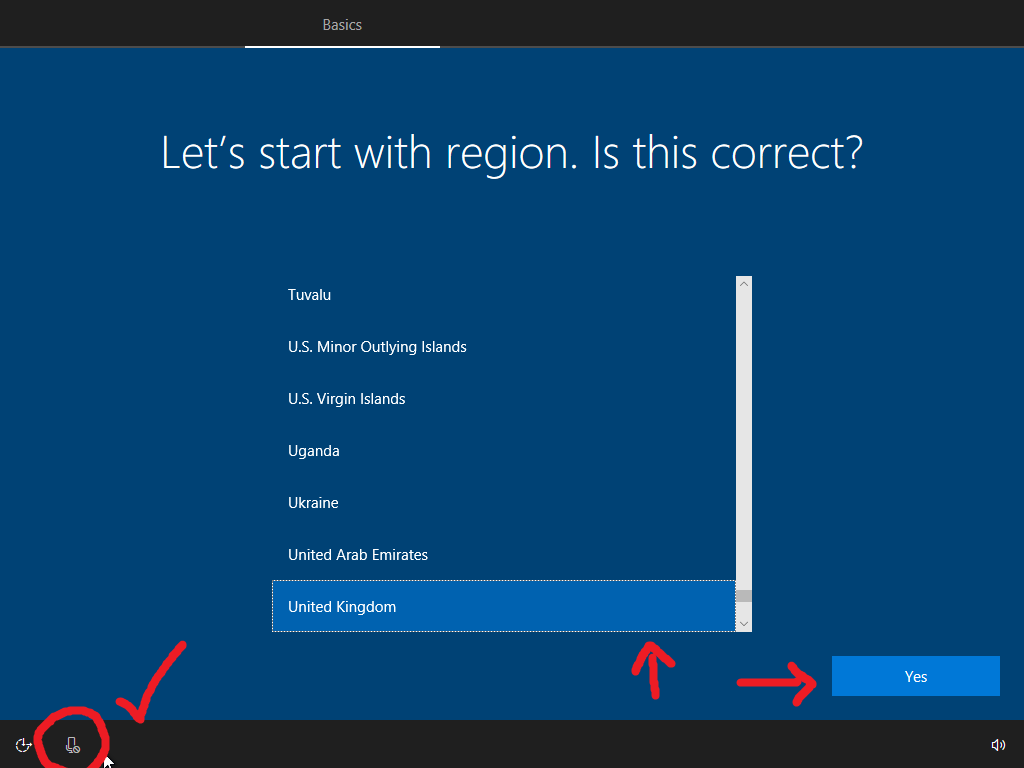
Ah, indeed, back to Cortana intimidating you with her rigorous data-collection techniques. Never mind, we can fix this effortlessly by pressing the microphone button at the bottom-left of the screen.
insert_linkb. Set Your Regional Settings
Secondly, select your region on the following screen:
In addition, set the keyboard layout that you wish to use.
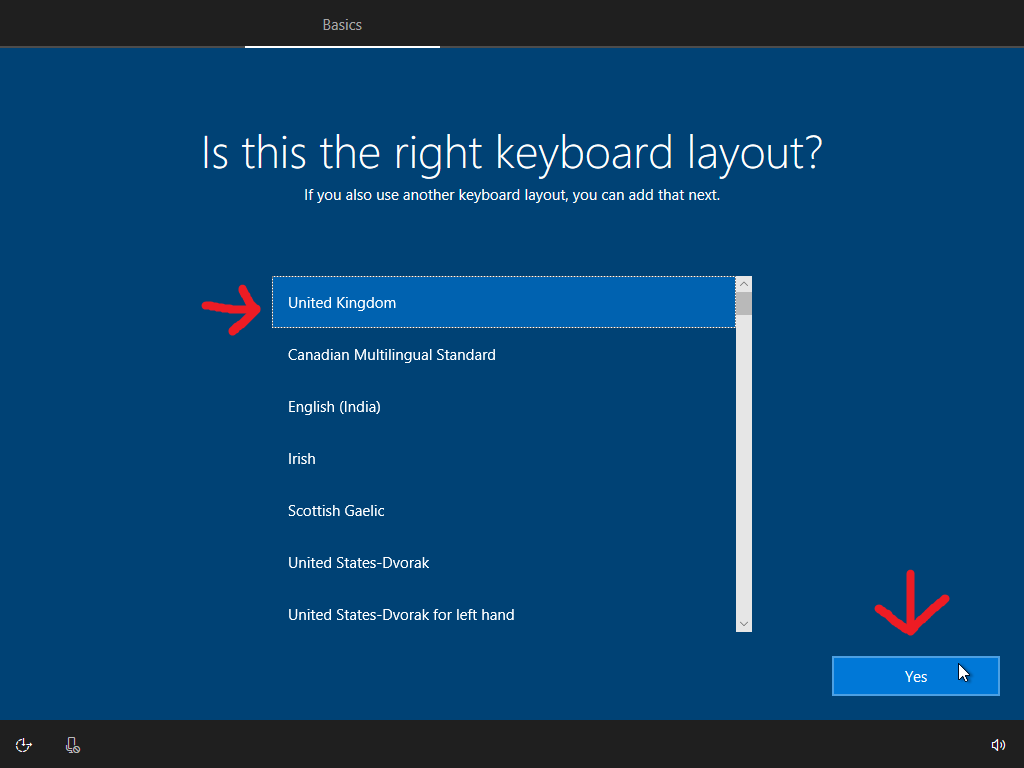
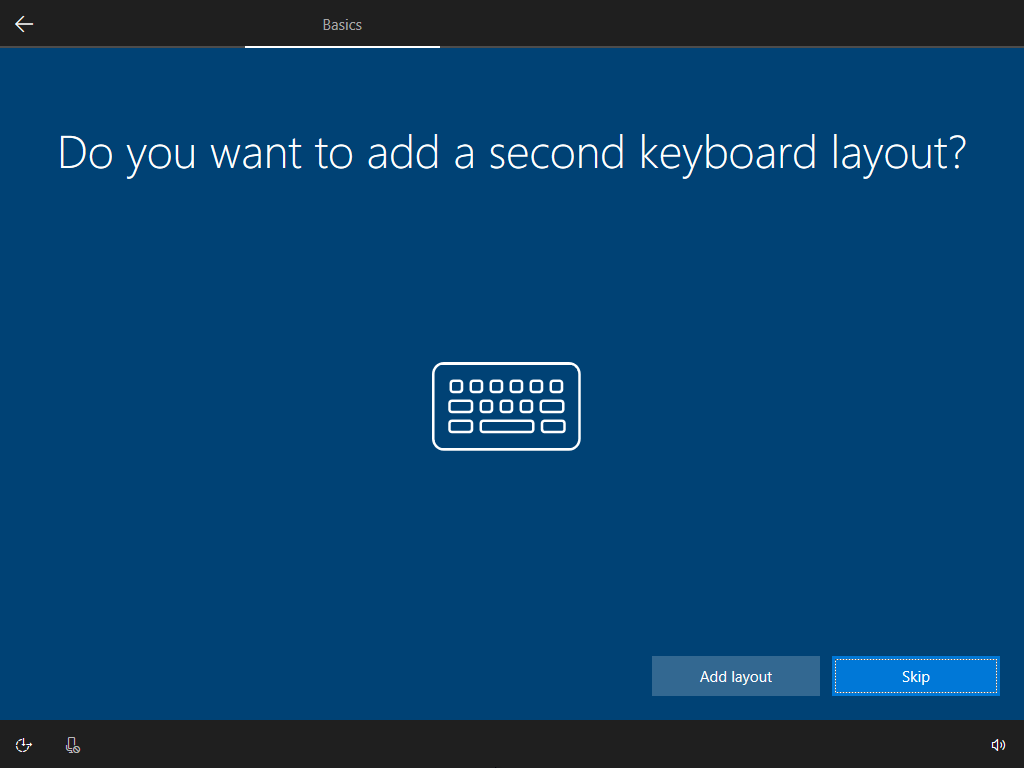
You can additionally set a second keyboard layout if you’re that type of person.
insert_linkc. Get Windows 10 Setup with a Secure, Private Account
Microsoft, being data-hungry, would love you to use a Microsoft account. However, this will compromise your privacy with all the data being sent to Microsoft.
That being said, feel free to use one if you’re going to want to sign into Microsoft Store apps etc. You can always switch to a Microsoft account at a later date—because Microsoft would want you to.
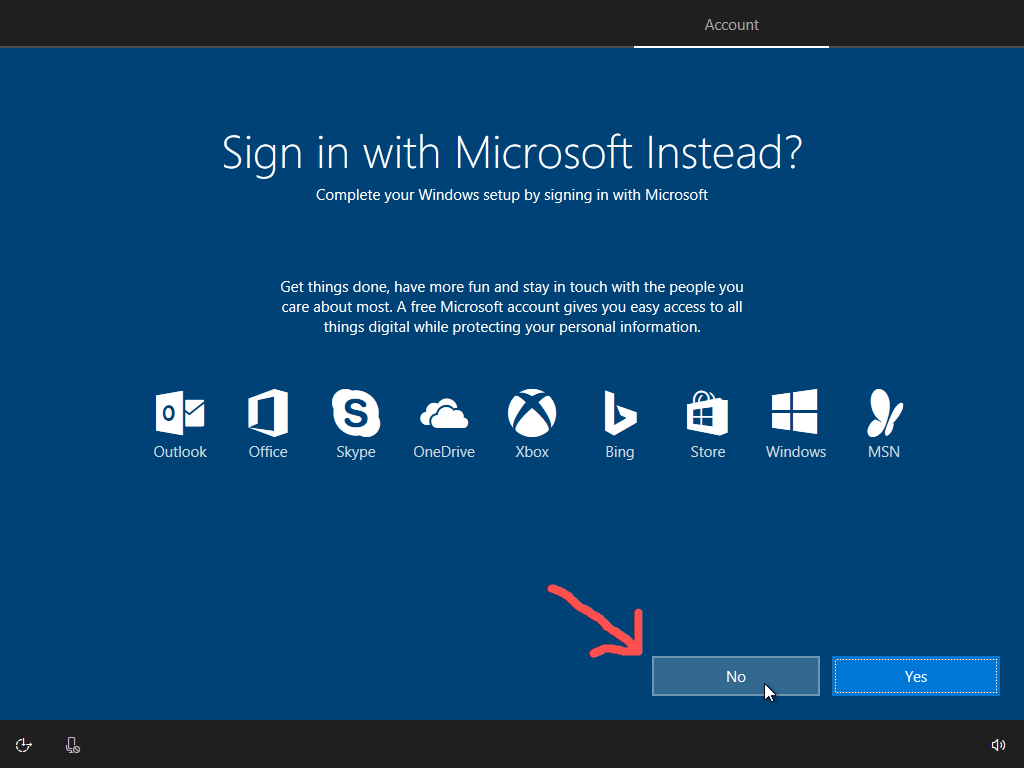
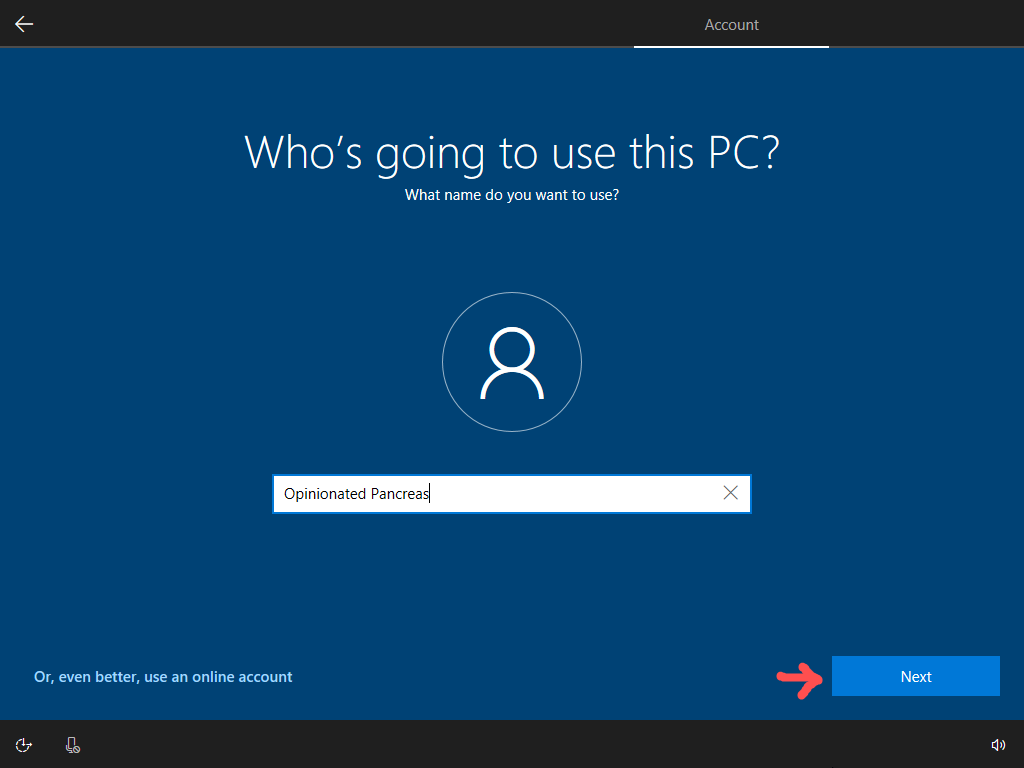
With that in mind, go ahead and press “Offline account” if you want to use a local account:
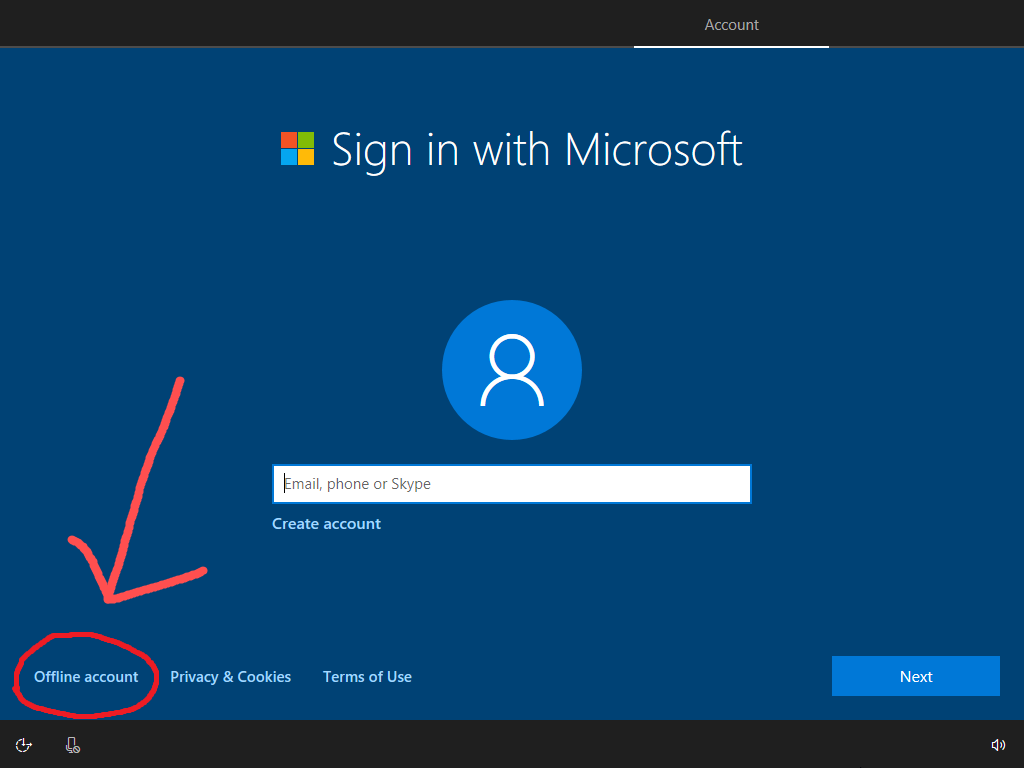
Indeed, Microsoft will try as hard as they can to squeeze out your data, like Zuck—so defy it.
Frosty tips: Little-Known Ways to Quickly and Effortlessly Edit Text
Insert your name in the subsequently appearing text box.
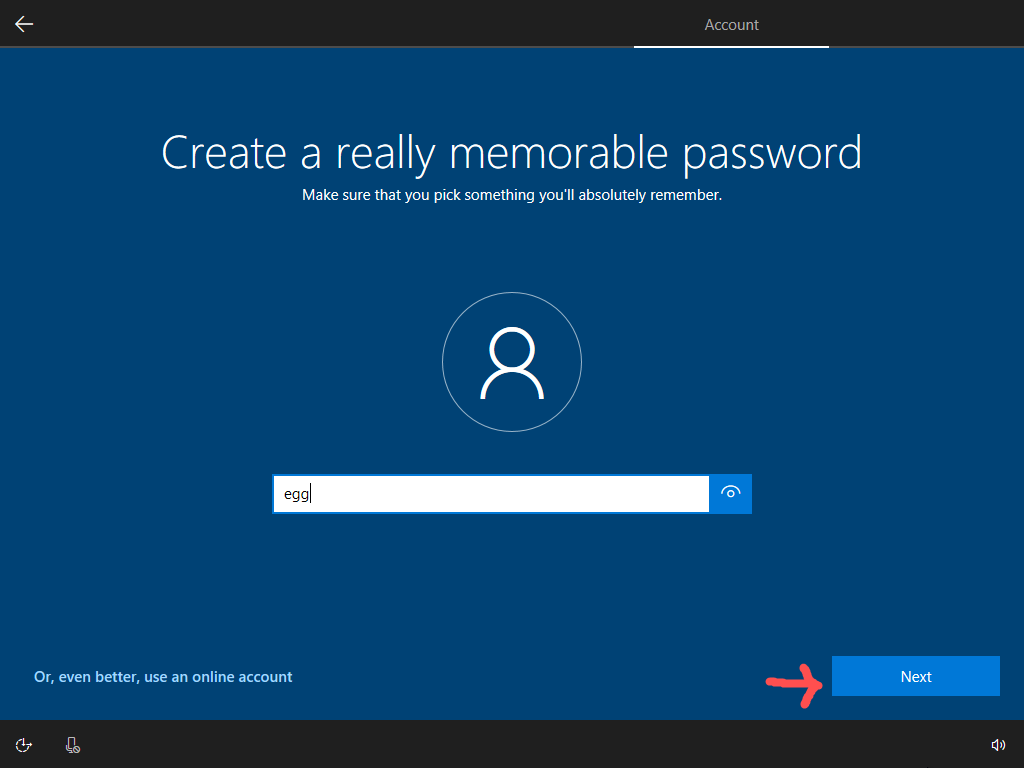
Then your password.
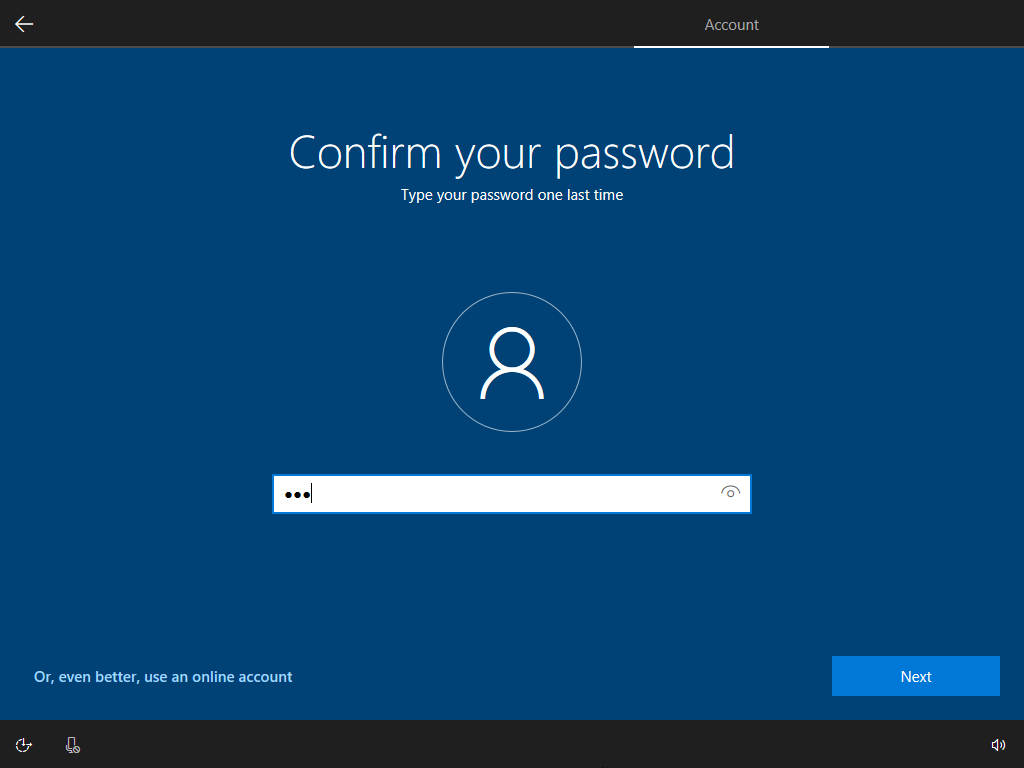
Then your password again.
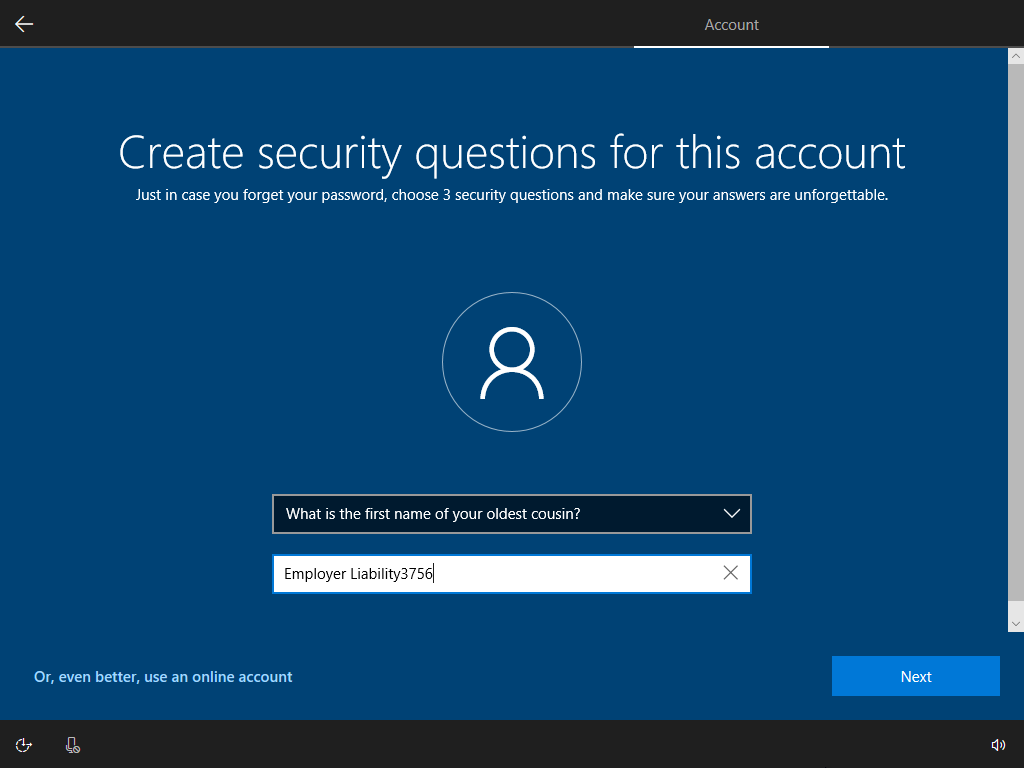
For the following steps, set up some security questions in case you forget your password. Utmost security dictates that you use a password unrelated to the security question as an answer. This is because nobody is going to know that your oldest cousin’s first name is Employer Liability3756.
insert_linkd. Setup (Some) Privacy in Windows 10
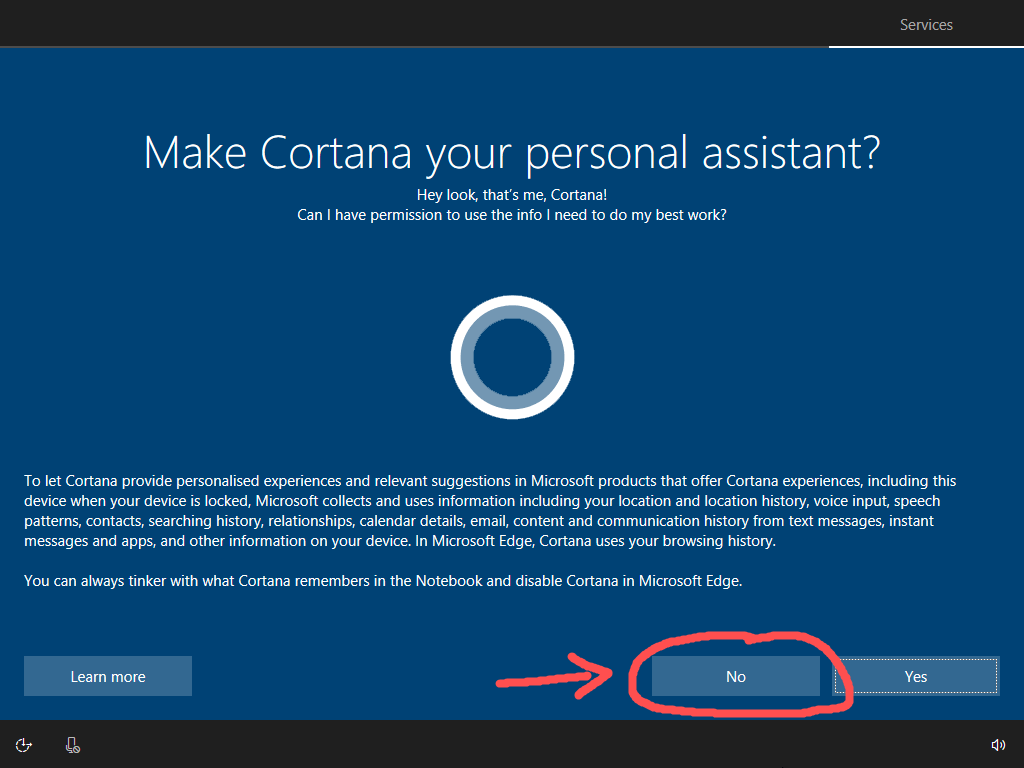
Say no to Cortana if privacy is genuinely what you are seeking today.
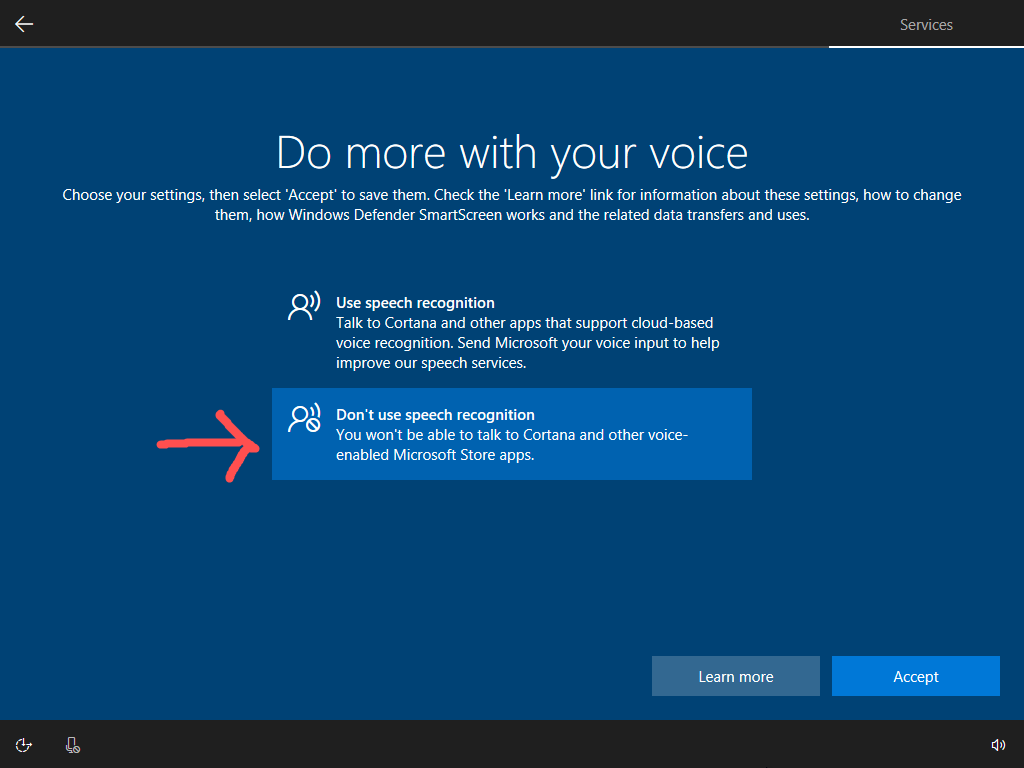
Again, unless necessary, disable speech recognition for privacy.
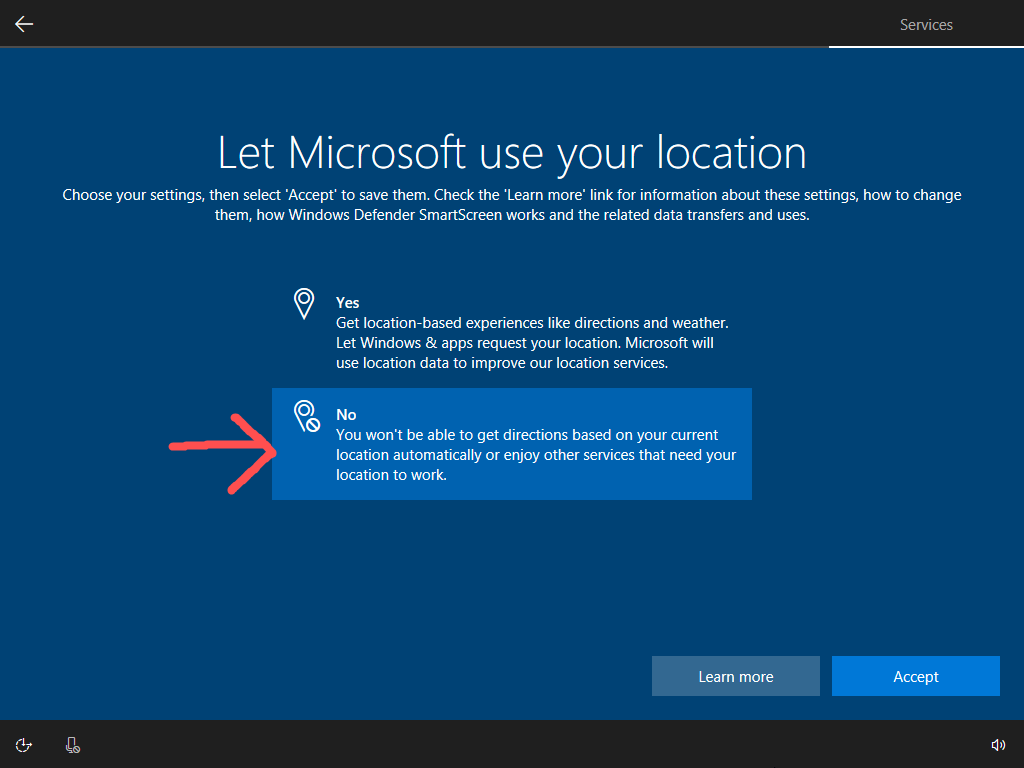
You also probably want to keep your location under your authority.
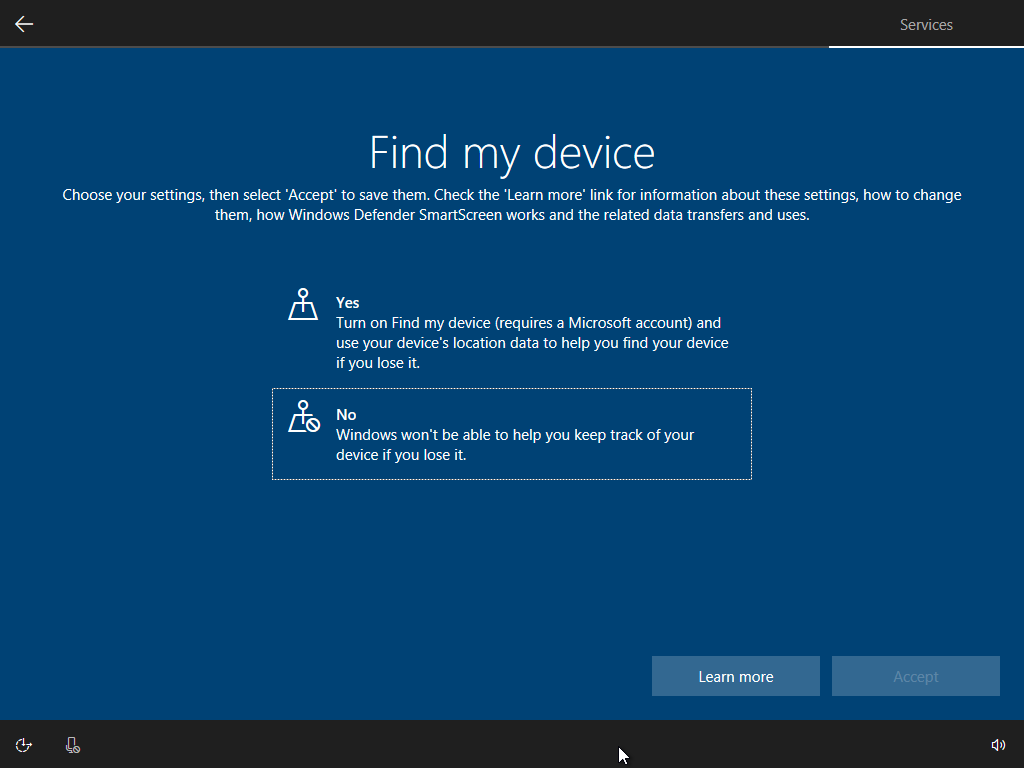
This setting is better left off for stationary devices, whereas it can be largely helpful if you’re likely to lose your device.
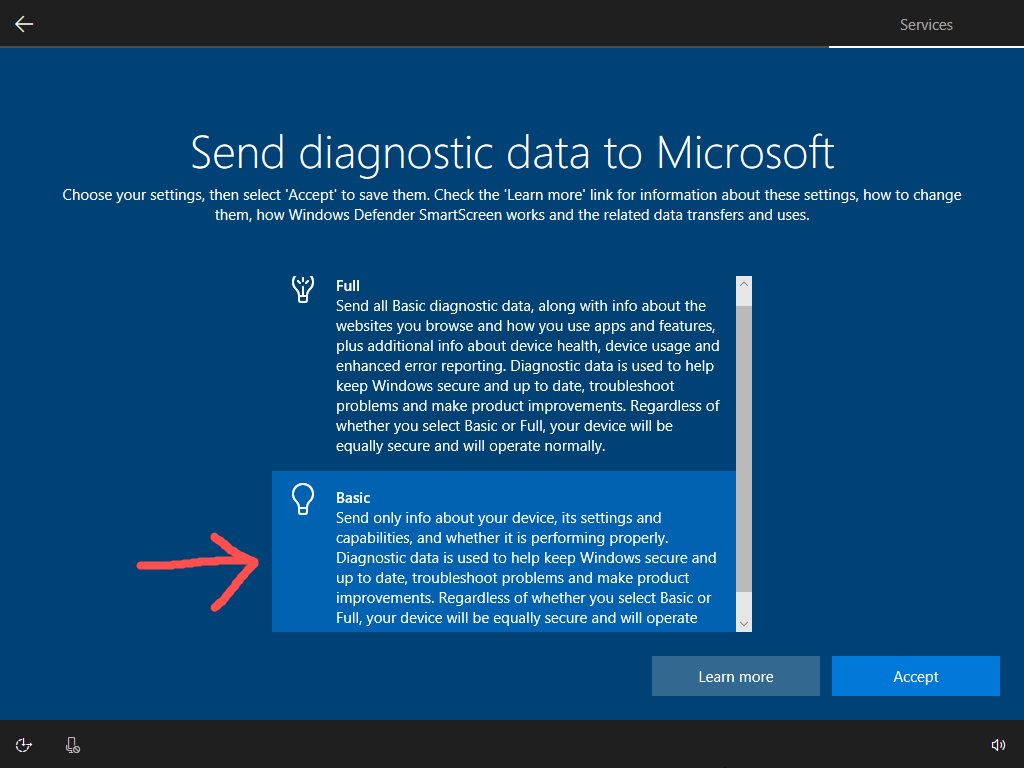
Even though the basic option collects a plethora of data, it is better than the full option.
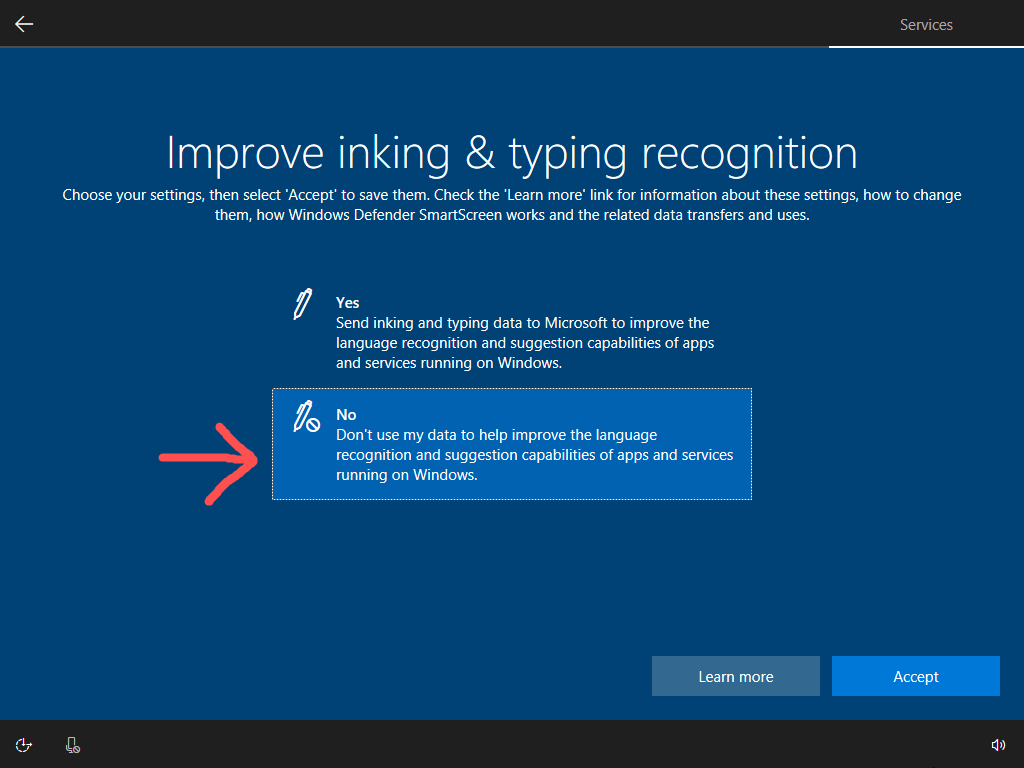
Moreover, no inking and typing, thanks.
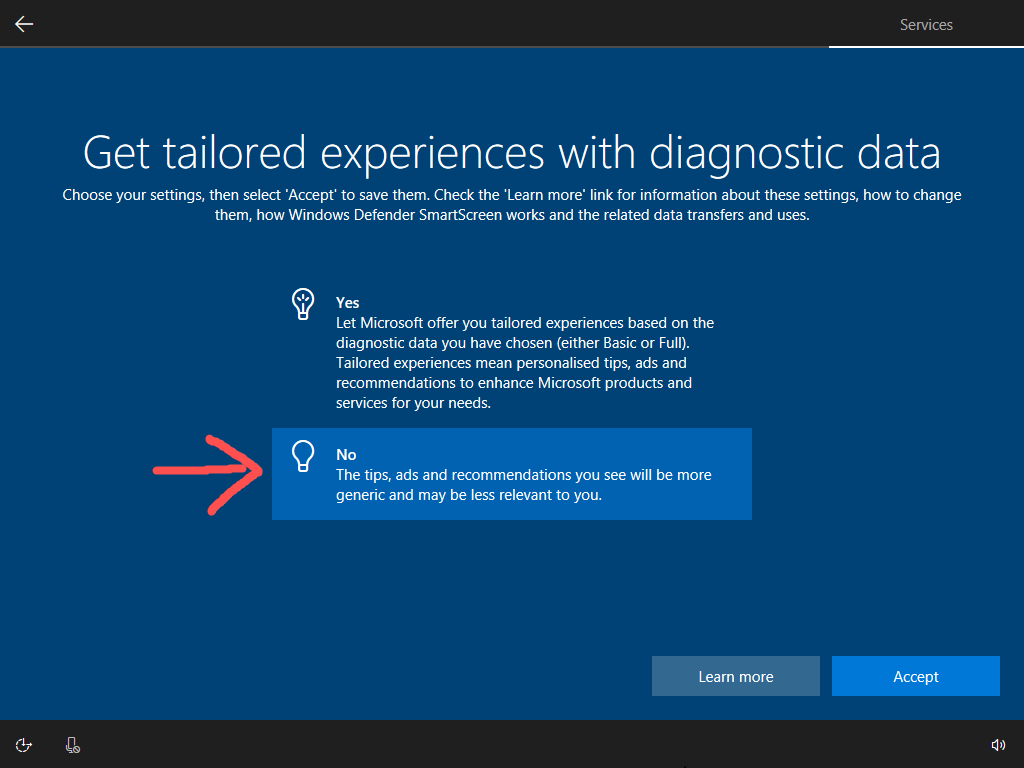
Neither do we want any tailored experiences with this Windows 10 setup, for privacy concerns.
Advertising ID is a definite no.

Now, wait for the Windows 10 setup machine-people to get your user account in a usable condition.
insert_linke. Get Set
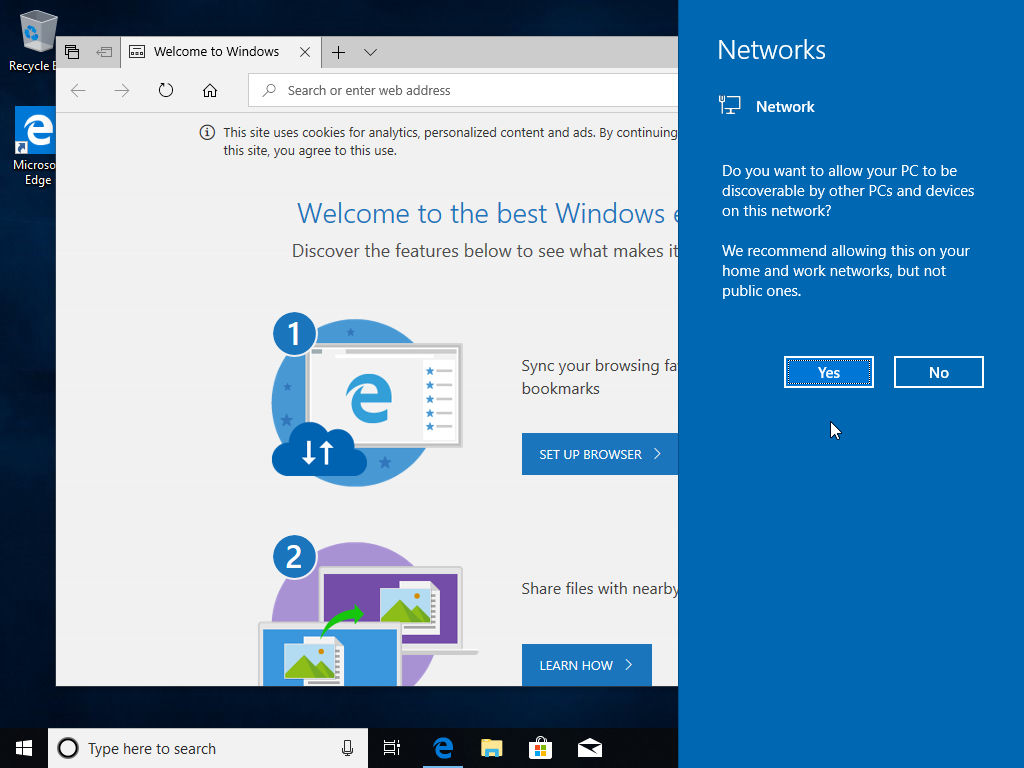
Once at the desktop of your fresh, new Windows 10 setup, you may have to set up the network. Keep this in mind for wireless Internet connections and say Yes to discoverability if you’re on a home network.
Next, feel completely free to move on to configuring the Settings after the initial Windows 10 Setup.
insert_link1B. Initial Windows 10 Setup: After Setup
All right, so you’ve already got Windows 10 setup, you just need some tips for privacy, speed, and security. No problem; while we could configure the above privacy settings in the Settings app, I have a better idea.
Later on, in this guide, we will be installing an authentically magical application. This will fix most of your Windows 10 privacy concerns without the need to touch the settings.
insert_link2. Into the Desktop: Configuring Windows 10’s Settings
insert_linka. Update Windows 10
The first thing you should invariably do after Windows 10 has set up for the first time: Windows Updates.
Unfortunately, Windows 10 never installs the most up-to-date version, hence the significance of this step; since the updates are one of the best ways to maintain security, you should never try to avoid them.
Trust me, you won’t regret it, even if you perceive them solely as an annoyance.
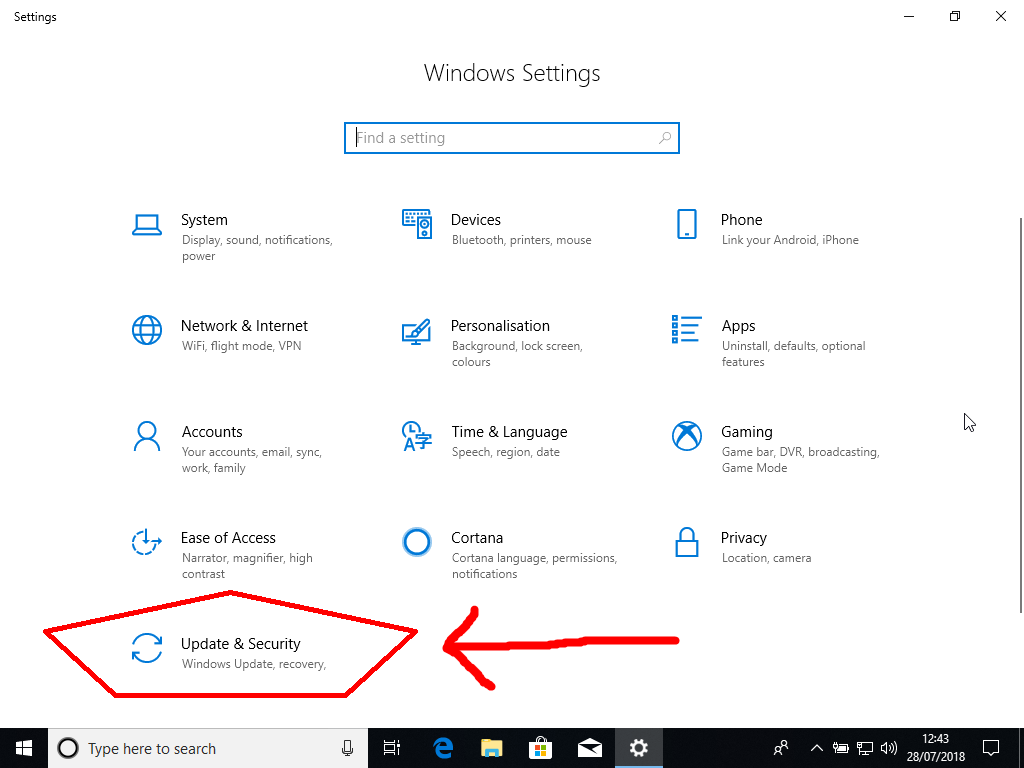
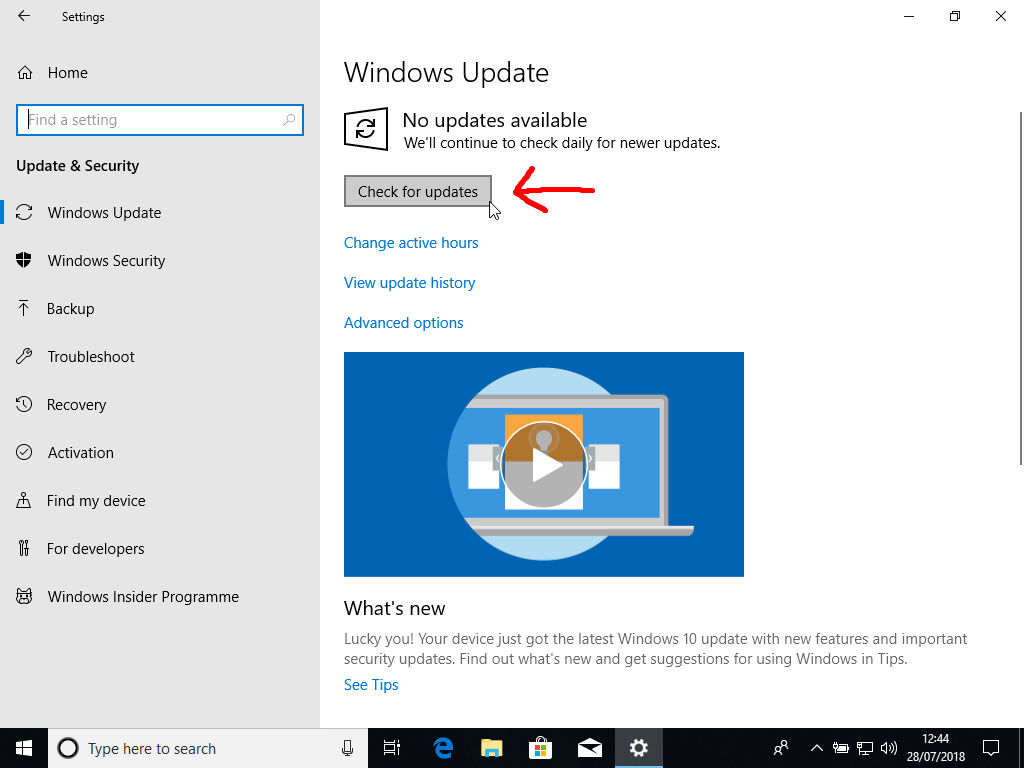
Press Windows Key + I to open Settings, go to Update and Security, then press Check for Updates.
Get super-proficient: These 15 Computer Shortcuts Explained Will Make Your Day
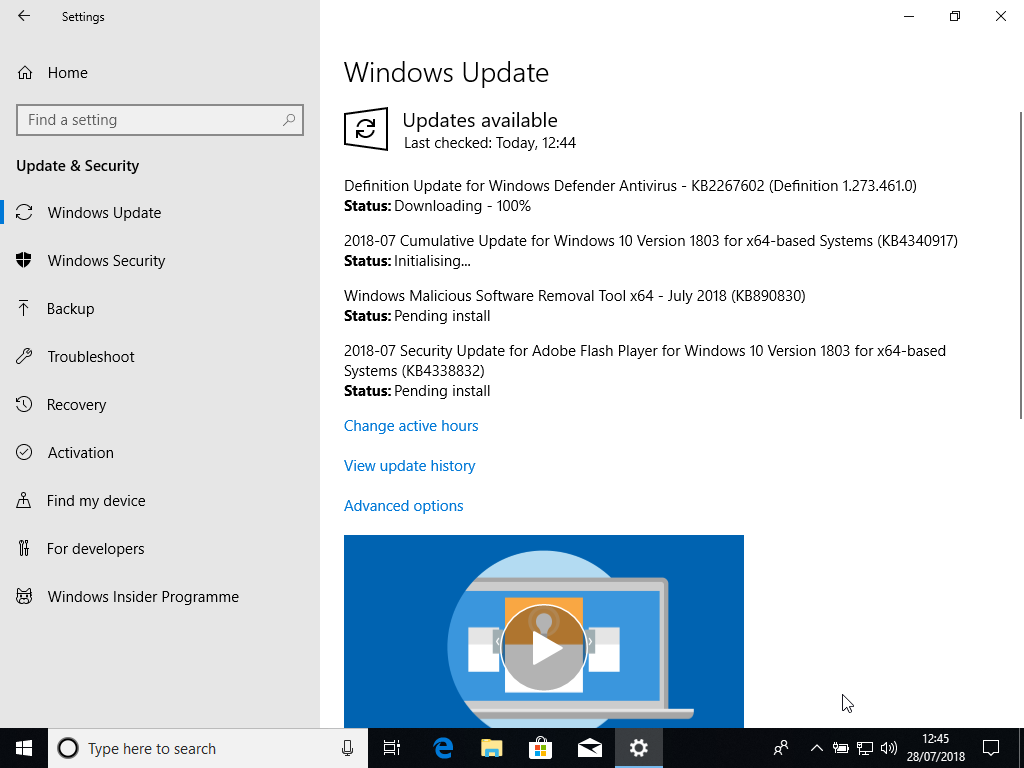
These plentiful updates will certainly take quite some time to download and install. Therefore, don’t hesitate to move on to the following steps while you are waiting grumpily.
Updates are paramount, especially in the initial Windows 10 setup—don’t let that go in one eye and out the other…
Updates are one of the best ways to maintain security.
insert_linkb. Stop Useless Applications from Installing Automatically
Do you ever notice how, after each major update, your Start Menu has taken the “Give Microsoft money!” injection? In other words, Windows 10 graciously installs some utterly useless Windows Store applications (all with in-app purchases, obviously).
While we are not going to be uninstalling any applications at this present moment, let us end this behaviour. Windows 10 will accordingly no longer install these apps after each setup succeeding an update.
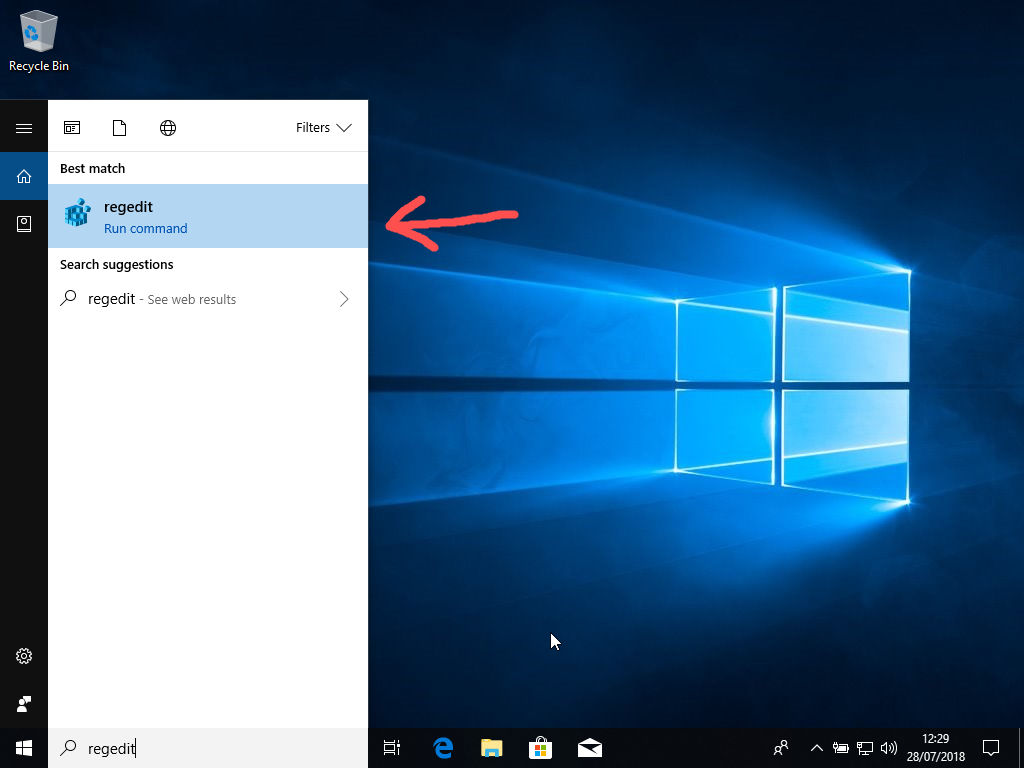
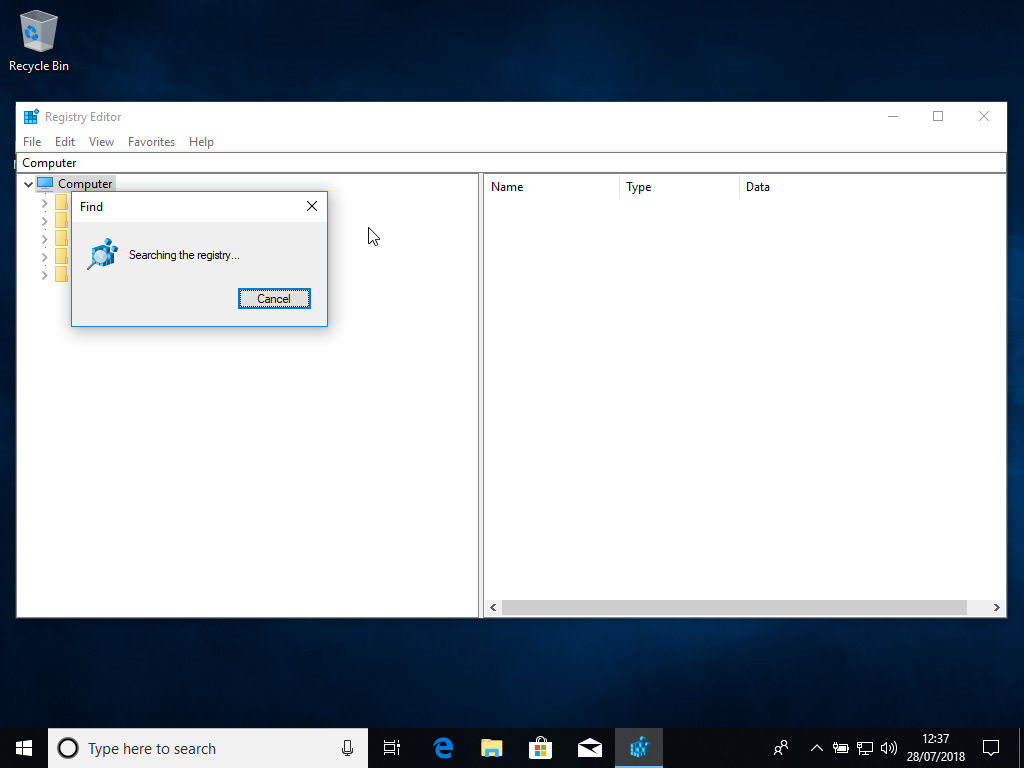
Firstly, in order to achieve this, open the Registry Editor by typing regedit into the taskbar’s search field. Next, press the enter key to run the command.
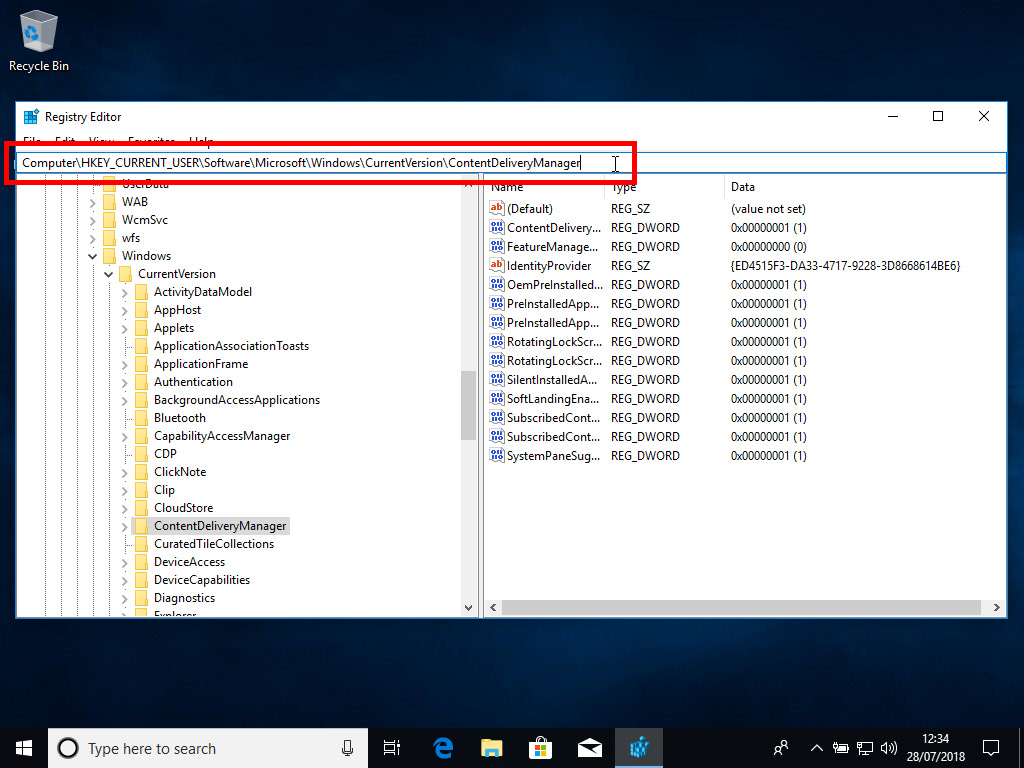
Once the window has opened, replace the entire contents of the text box at the top with this:
Computer\HKEY_CURRENT_USER\Software\Microsoft\Windows\CurrentVersion\ContentDeliveryManager
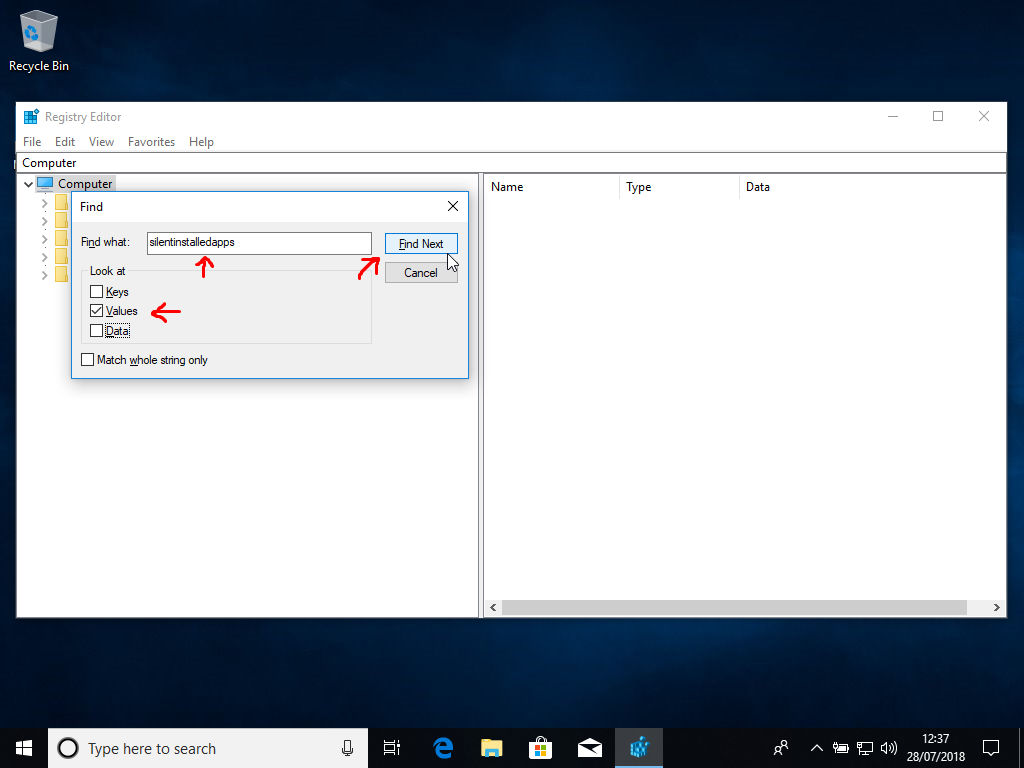
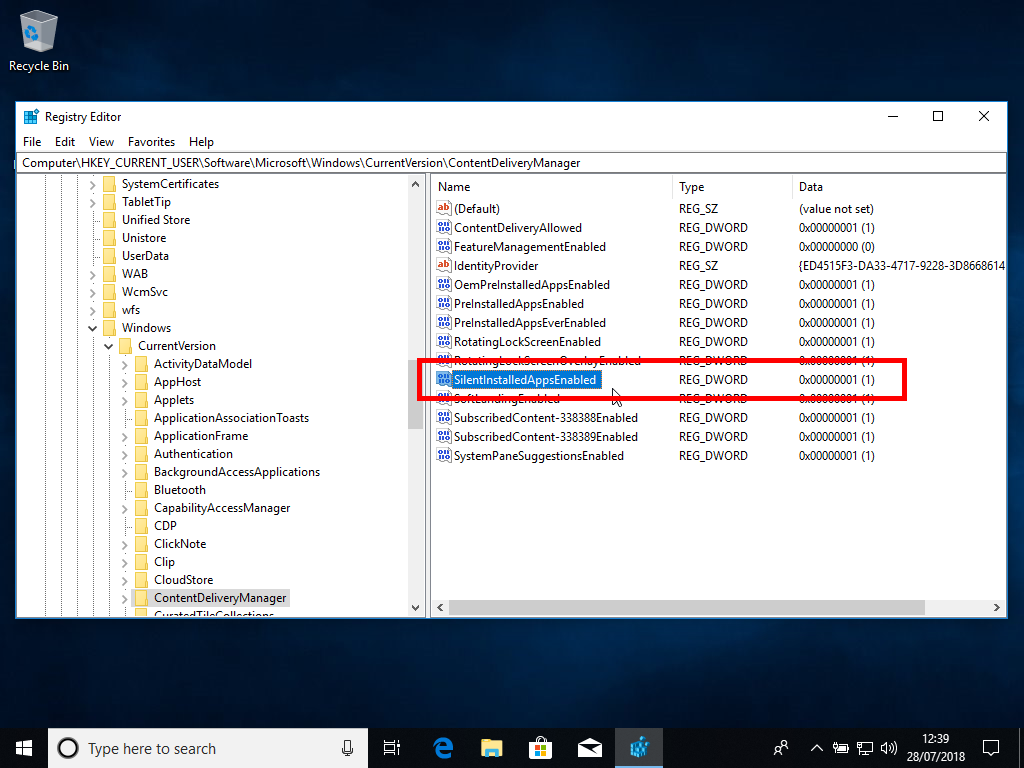
You could, as another option, navigate to that location using the tree view on the left pane. Furthermore, you could press Ctrl + F to find silentinstalledapps (albeit, this takes a considerable amount of time).
Afterwards, double-click to open SilentInstalledAppsEnabled in the right pane, change the value data from 1 to 0, and press “Okay”.
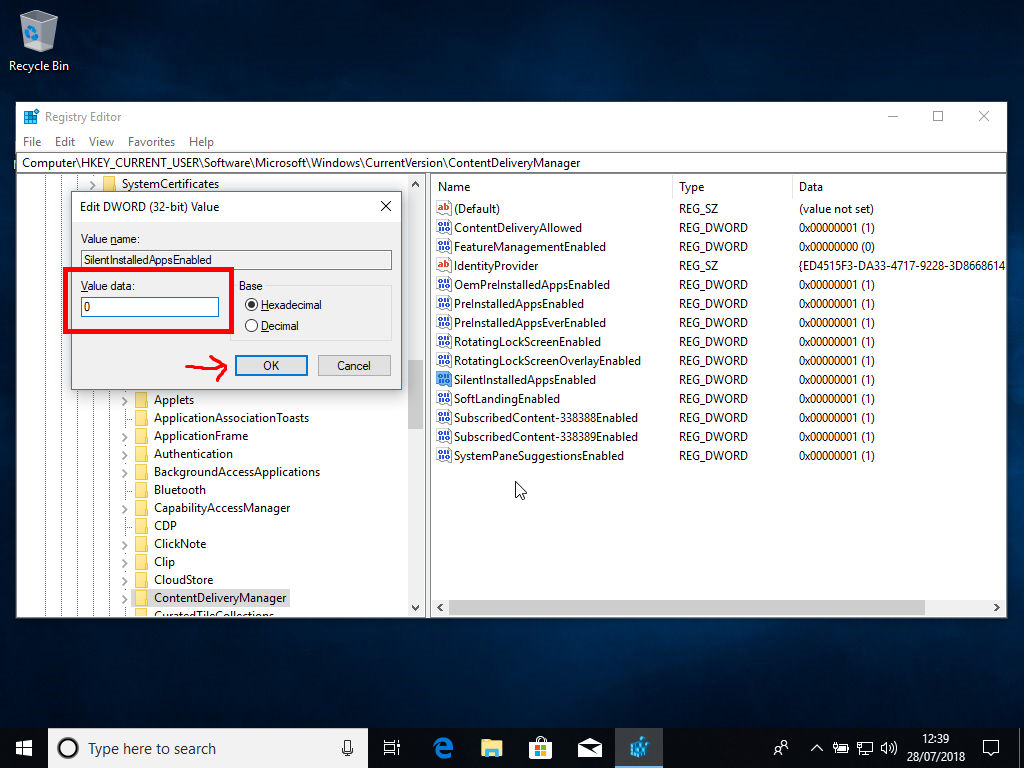
Spectacular! Now you can close the Registry Editor.
insert_linkc. Get Your Taskbar in Order for Productivity
By default, the taskbar seems rather cluttered with an assortment of items, though, this can be fixed if you wish.
To begin with, right-click on the taskbar to control features such as the search (Cortana) and the visibility of buttons.
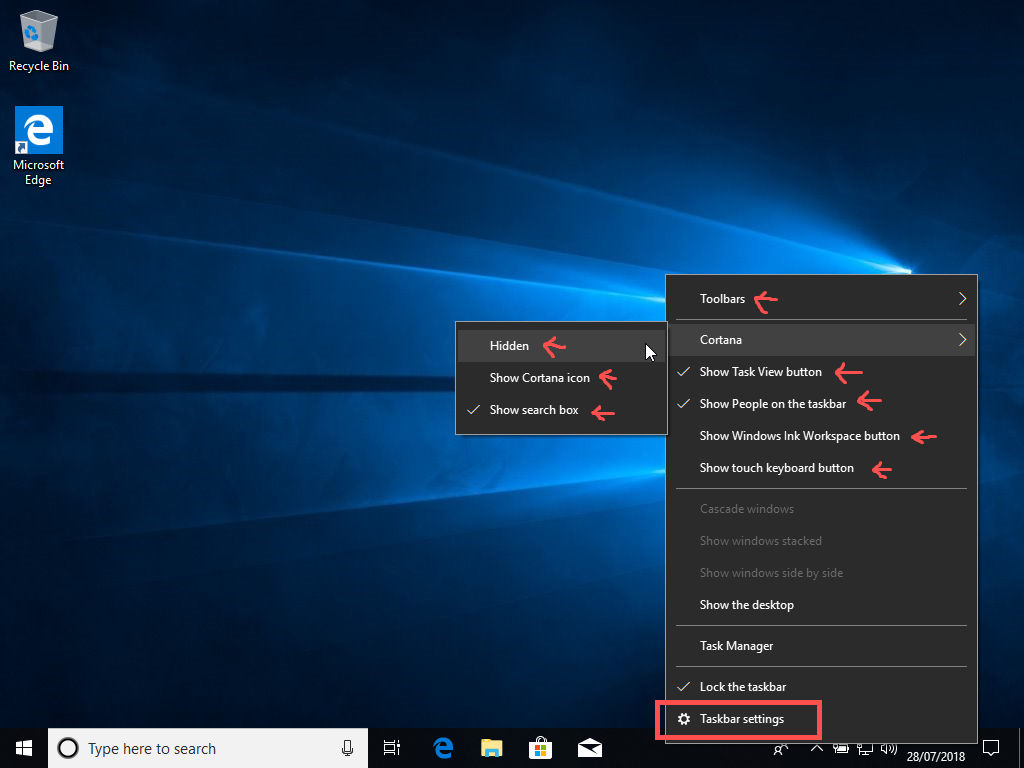
You can additionally go to the taskbar settings for more control. I recommend you visit this article as well as this one to create the ultimate taskbar for you. You may want to disable things like suggestions in the Start menu, exploring other areas.
More Juiciness: 4 Incredible Taskbar Customisation Tricks You Need to Know
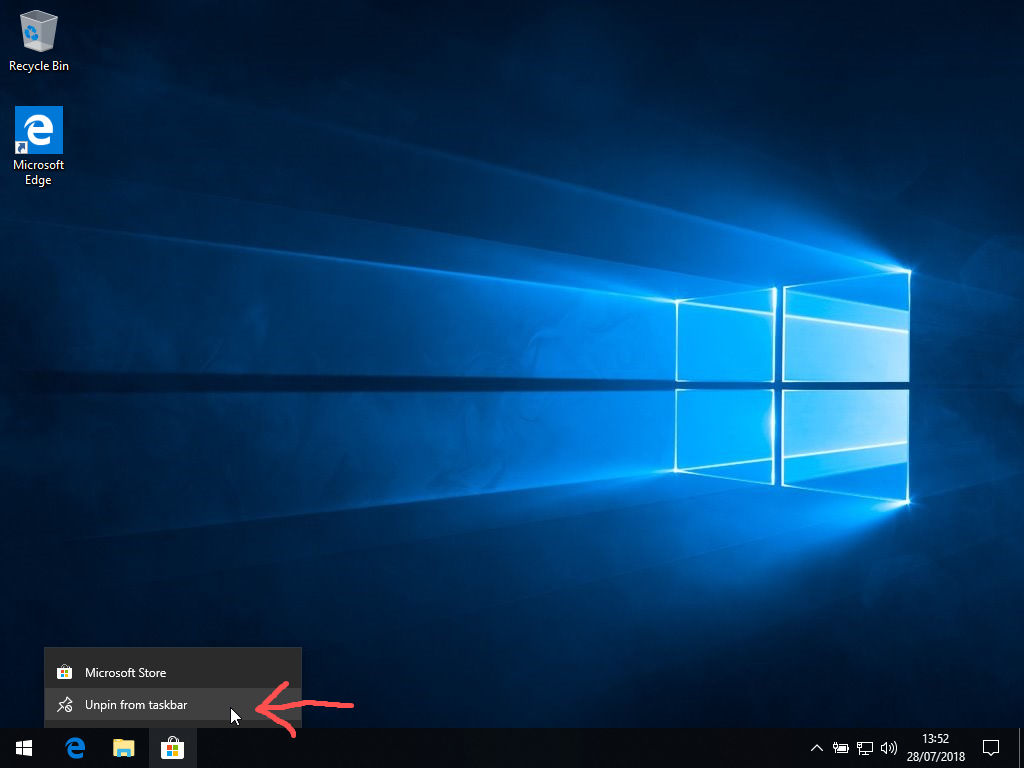
Lastly, unpin taskbar items like the Microsoft Store and Mail, unless you really want them there. At least unpin the Store—you definitely don’t need to use that often.
insert_linkd. Optimise the File Explorer for Productivity
In order to make the most out of File Explorer, press Windows Key + E, go to the View tab. If you’re a power user, you would probably want to enable the File name extensions and Hidden items check-boxes.
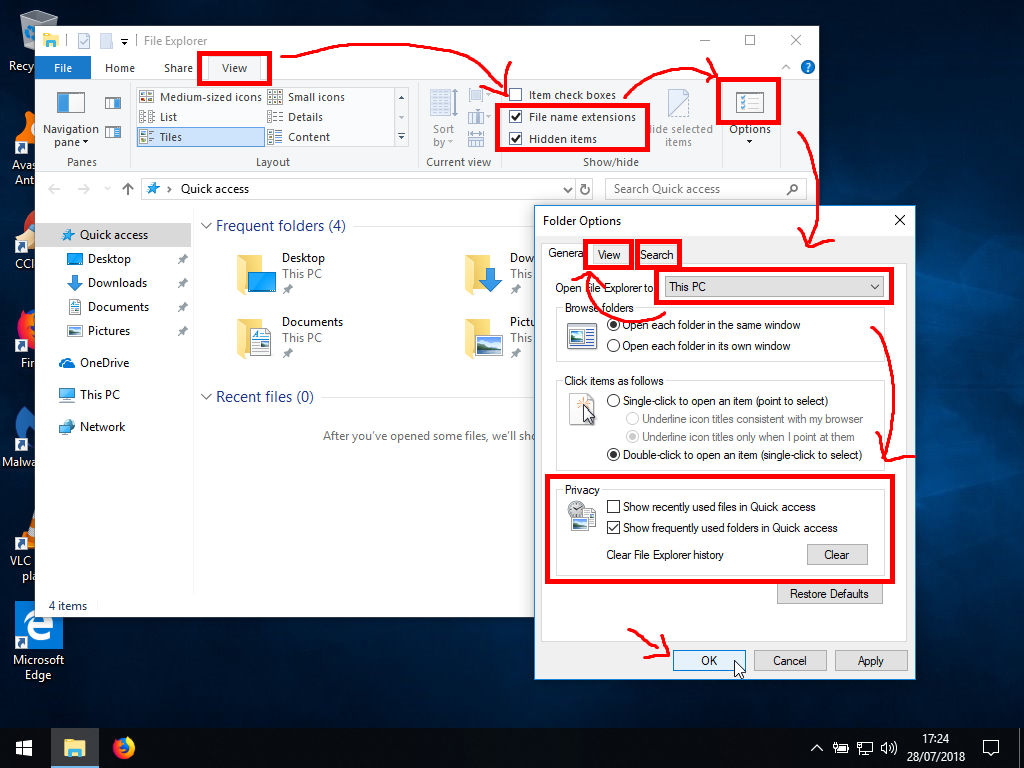
Another preference of mine is to set the default view to This PC, as opposed to Quick Access. This can be achieved by clicking the large icon above Options, so the Folder Options appears.
Furthermore, use the dropdown to select This PC. Also, as you’re there, you could disable recently and/or frequently used files/folders in Quick Access. The latter options can potentially address privacy concerns since your file browsing is tracked.
Finally, feel free to visit the View tab for more customisability.
insert_linke. Enable Storage Sense
“Storage Sense” is a hidden feature embedded within the gargantuan Windows 10 operating system. In spite of this, it is an essential feature if you want to keep Windows 10 from getting overly fat.
So, open Settings (Windows Key + I), go to System and down to Storage in the left sidebar. Following that, glance over to the right and make sure storage sense is turned on:
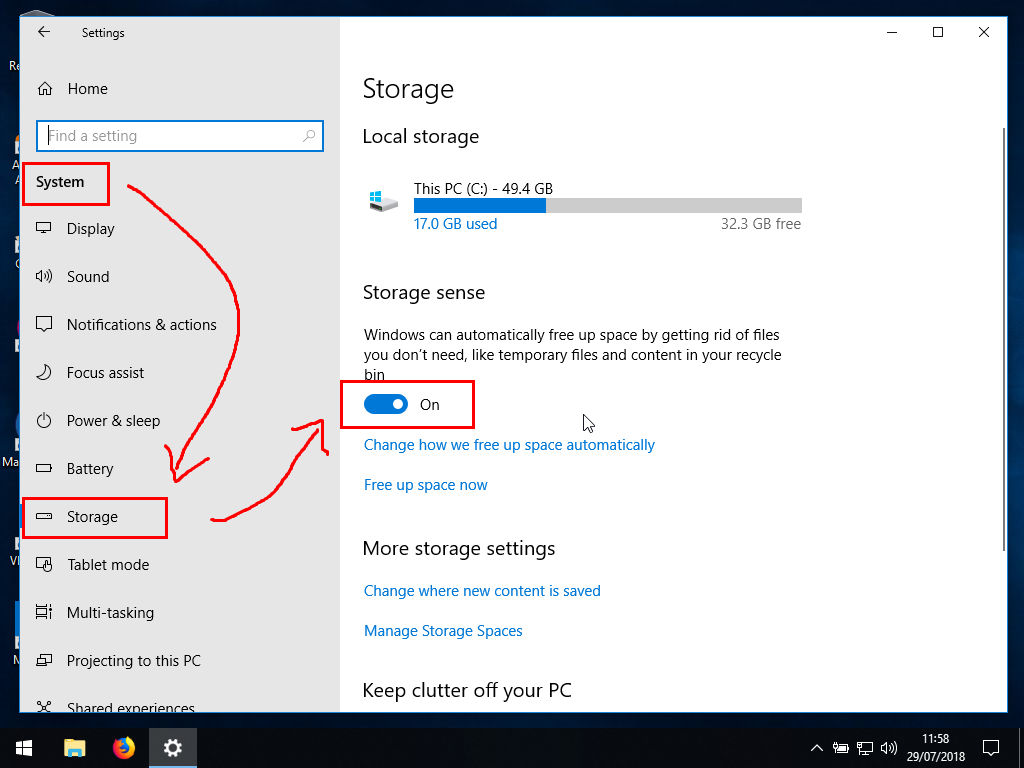
In brief, this automatically deletes temporary files, hence reduces the rate at which Windows 10 slows down.
insert_link3. Installing the Best Applications
insert_linka. Acquiring Most Applications—All in One Bite
What good is a barebones Windows 10 setup without any applications to add some cool jazz?
It turns out that the likely chance that you’re not a boring salad bowl implies you need quality software. But, usually, the process of installing all of your wanted applications can throw you over the roof, due to:
- An immense quantity of time spent downloading installers from all over the web
- An immense quantity of time spent clicking through said installers.
- You knowing you could be doing something better with your time.
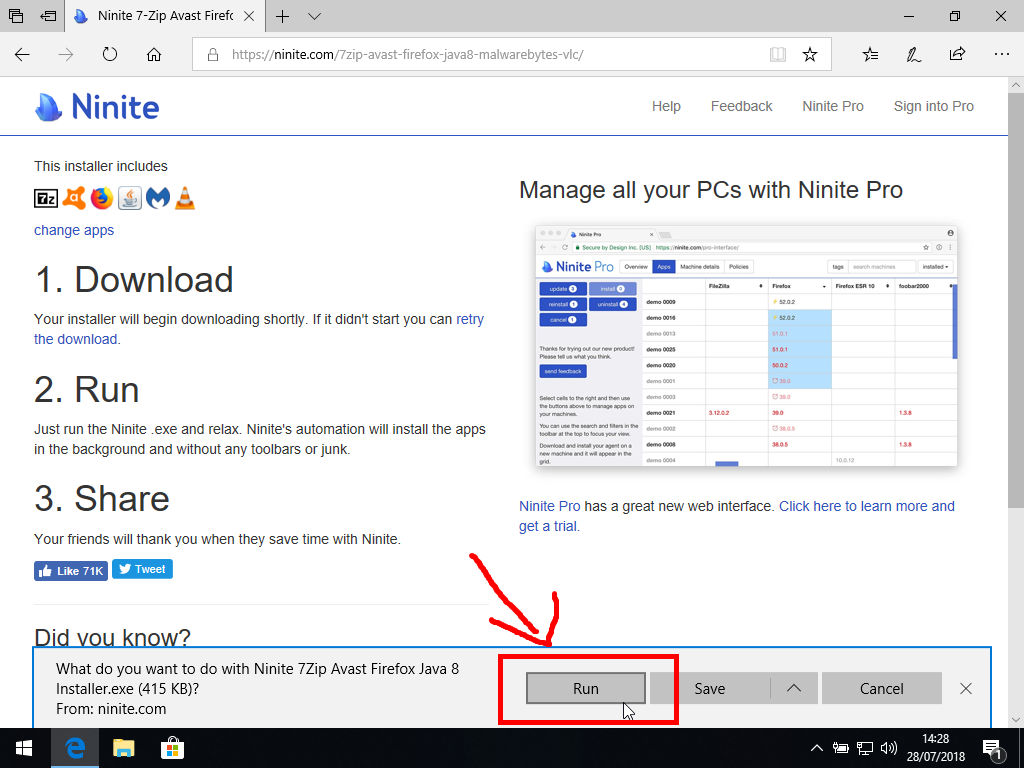
Luckily—however—there is a solution to this inconvenience. Before doing anything else, head over to ninite.com.
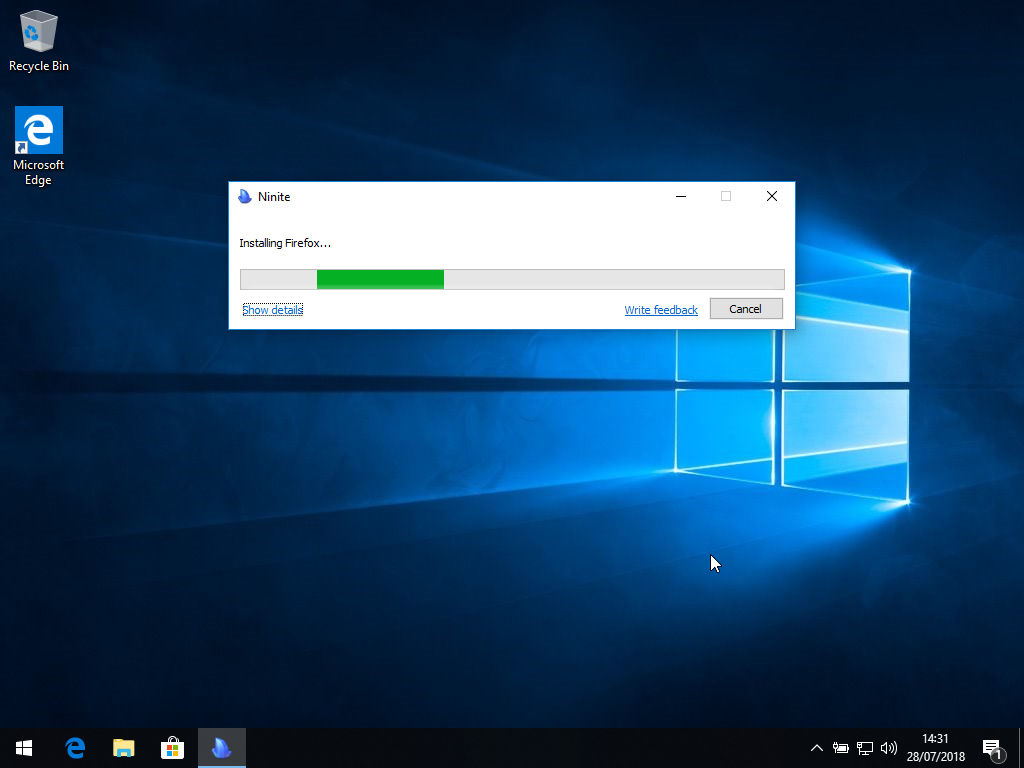
Packing a multiplicity of apps you might want, this nifty website enables you to download a custom installer with ease. Simply select the applications you want to install from the website and click “Get Your Ninite” at the bottom!
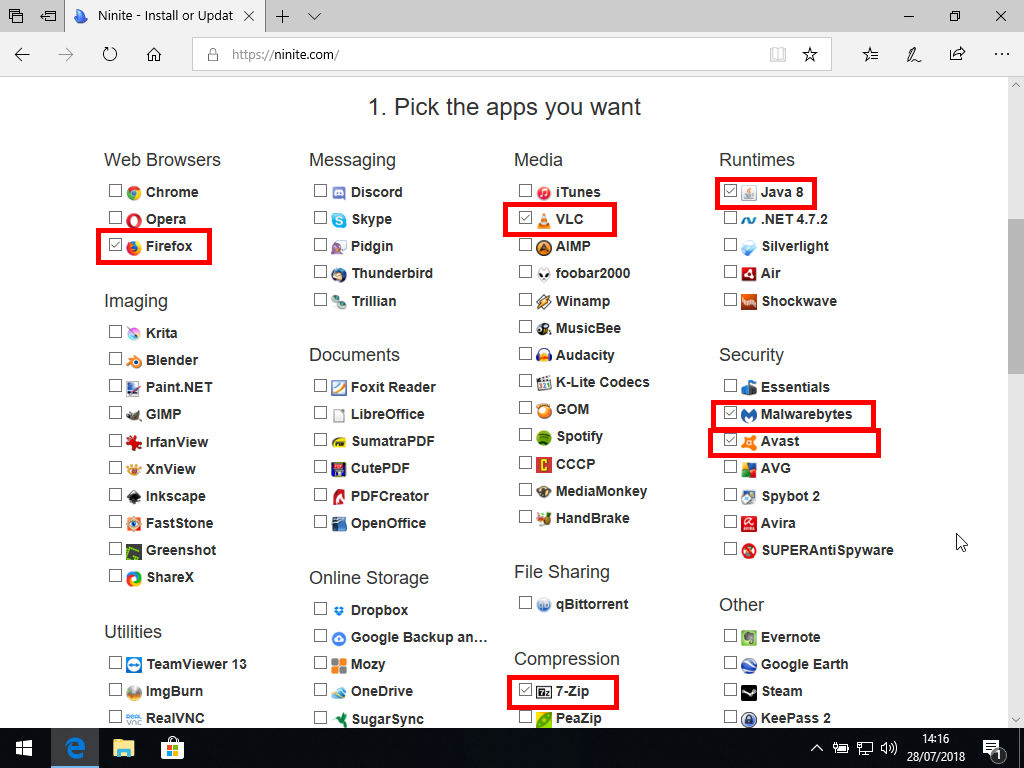
My recommendations for the essential applications are as follows:
- Firefox (the best web browser ever with privacy included). If you want even more privacy in a browser, download Tor.
- VLC (a superb, feature-rich media player)
- Java 8 (useful here and there for applications you might install)
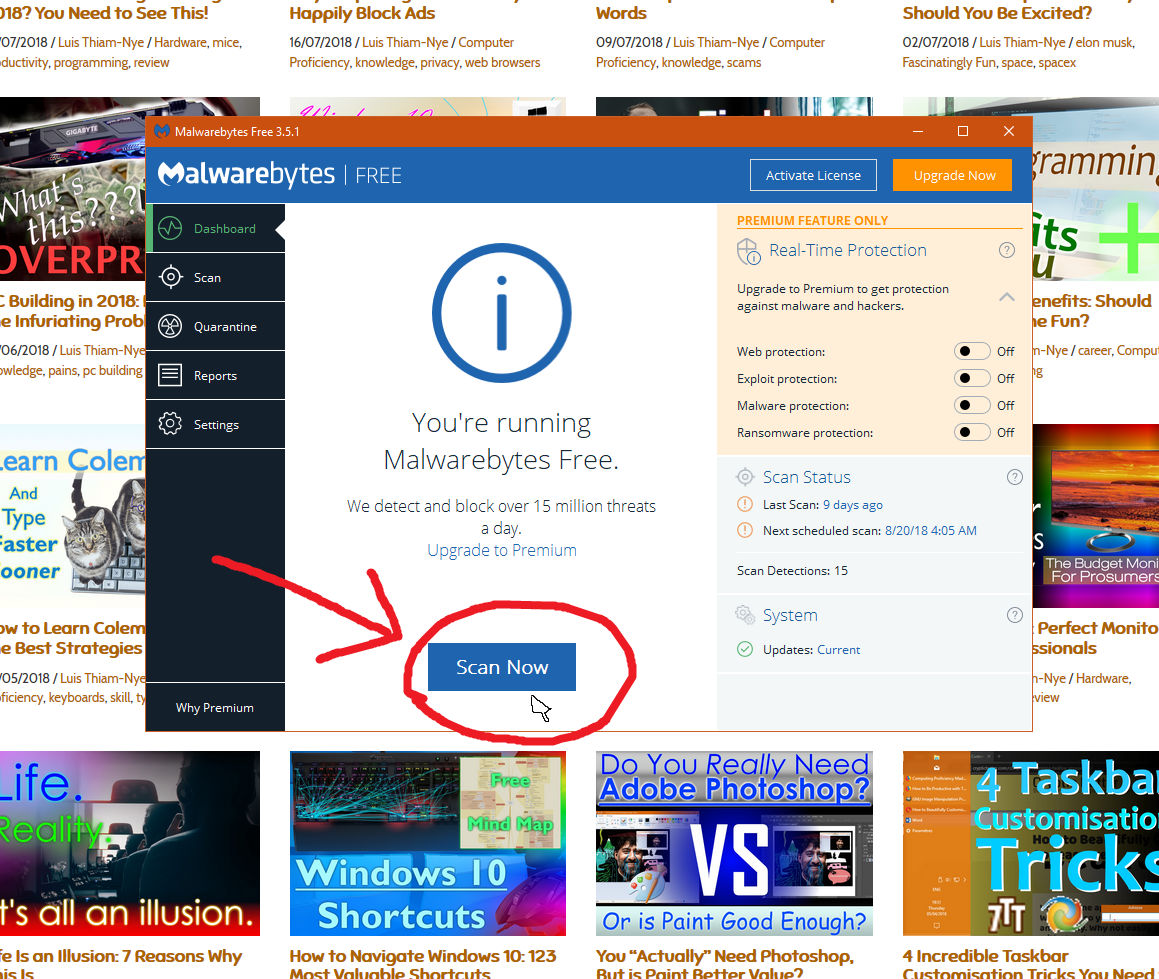
- Malwarebytes (a fantastic free anti-malware programme for manual periodic scanning)
- Avast (one of the best free anti-malware programmes I’ve used)
- 7-Zip (occasionally helpful when compressing files and extracting archives such as
.rarextensions)
Moreover, feel free to get anything else you might find handy. LibreOffice, for example, may take your interest as a free Microsoft Office alternative.
A fascinating argument: Do You Really Need Photoshop, or is Paint Better Value?
Proceeding to click the big blue button, Edge will give you a dialogue, then you can press Run.
insert_linkb. Reclaim Your Privacy in Windows 10
Like I mentioned before, Windows 10 is notorious for poor privacy. Consequently, we will need to fix that in this Windows 10 setup process.
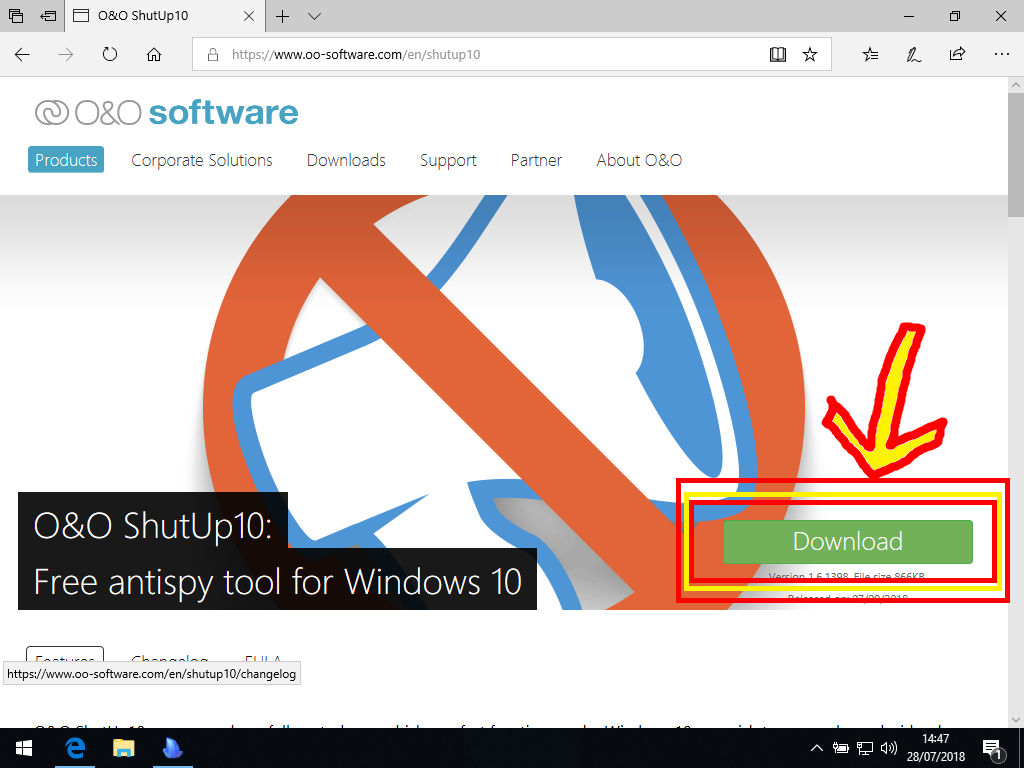
Despite being many tools to help you achieve privacy in Windows 10, I suggest you use O&O ShutUp10. This is a seemingly, deeply reliable and safe (i.e. it won’t break your Windows 10 installation) application from my experience.
Trust my words; O&O ShutUp10 is definitely not the first tool of its kind that I’ve taken for a spin.
In order to use this application, download it from the website and subsequently save it somewhere you’ll remember. For you see, unlike before, this is a portable application, meaning it is not installed.
Conversely, just run the file you’ve downloaded whenever you need to conduct a Windows 10 setup for privacy.
Now it’s simply the case of going through each setting and deciding whether it should be enabled or disabled. Remember that green represents privacy and security, whereas red is clearly bad.
However, to make life, easier, you can go to Actions and enable all recommended settings. These, as implied, are the safest settings to trigger. For more information about a particular setting, you can straightforwardly click on the text.

Also, the application will ask you to make a restore point, which I recommend. This is because if you do make something go wrong, you can always revert the changes in the future, essentially.
insert_linkc. A Windows 10 Setup with Security and Privacy
In this guide, we’re doubtlessly going for privacy. And one of the greatest ways to doing this online is by attaining yourself a quality, private VPN.
I can guarantee you that you will not be disappointed with either IPVanish or NordVPN. Go with whichever one works for you best, with NordVPN being the cheaper option.
Ha! Not anymore—leaving plenty of space for Private Internet Access to enter onto the stage (it's a budget VPN option). For more info, go this way.
Related Comparison: Private Internet Access vs NordVPN? The Best Deal (Aug 2018)
Unlike the questionable, free VPNs which sell your data, you can have confidence in these VPNs; for they are the best way to stay secure and private online after having completed your Windows 10 setup.
We're going for privacy. And one of the greatest ways of doing this is a quality, private VPN.
insert_linkd. Get Windows 10 Setup for Typing Proficiency
Thus far, doing this Windows 10 setup on my virtual machine has been exceedingly exasperating. And whilst you are asking, “How come?!?!??!” I would like to direct your attention towards the original Cryptic Butter post.
Learn the secrets: Typing Proficiency: How to Boost Your Productivity
Be sure to read that article first—before proceeding. There, I teach you why it is that QWERTY is the suboptimal keyboard layout. In fact, Colemak is an immensely faster, and more ergonomic layout—one which I’ve gotten used to.
I will now, as an outcome, deeply encourage you to download Colemak for the ultimate Windows 10 setup for productivity. Also, note that you could install it with and without caps lock as backspace, as well as the portable version.
If you’re convinced and want tips on how to learn Colemak effectively, go here. As a bonus, I have guidance on configuring the portable version to match your keyboard’s nationality.
For example, the UK keyboard has “ above the number 2, but Colemak, by default uses the US version (with “ as @).
Get Productive Now: How to Learn Colemak Effectively: The Best Strategies
insert_linke. Some More Applications to Install
While we’re in the mood of installing applications, we might as well attain apps we are going to need later.
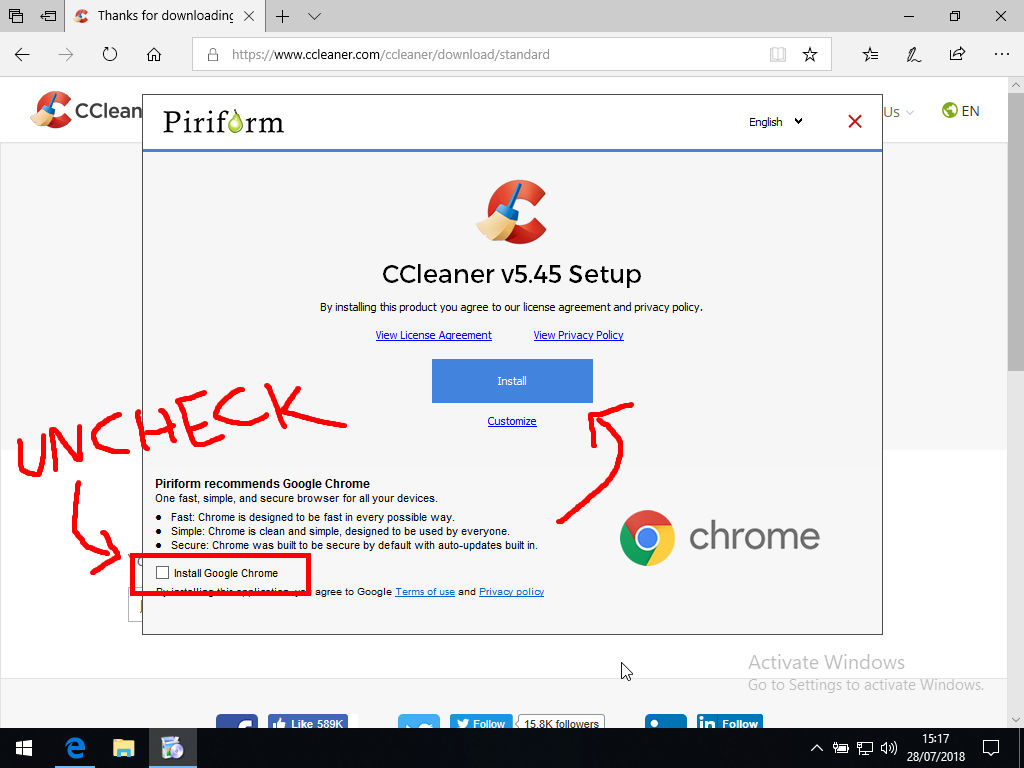
Firstly, obtain CCleaner and run the download, though, make sure to untick the Install Google Chrome box. Additionally, the “Customise” buttons allow you more control over the installation process.
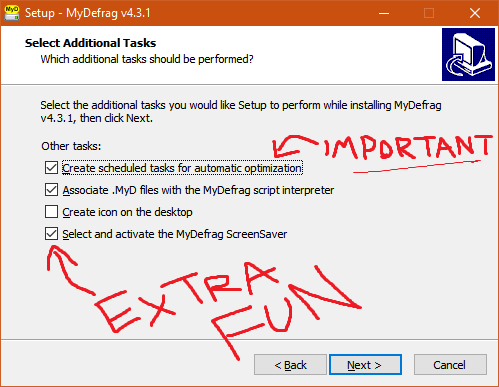
Secondly—if you have a hard drive—download and install MyDefrag. Do not follow this step if you have an SSD (solid state drive), since defragging SSDs is needless and harmful.
Furthermore, check “Select and activate the MyDefrag ScreenSaver” if you want to see the beautiful defragment process as a screensaver. Enable scheduling, too—that’s important.
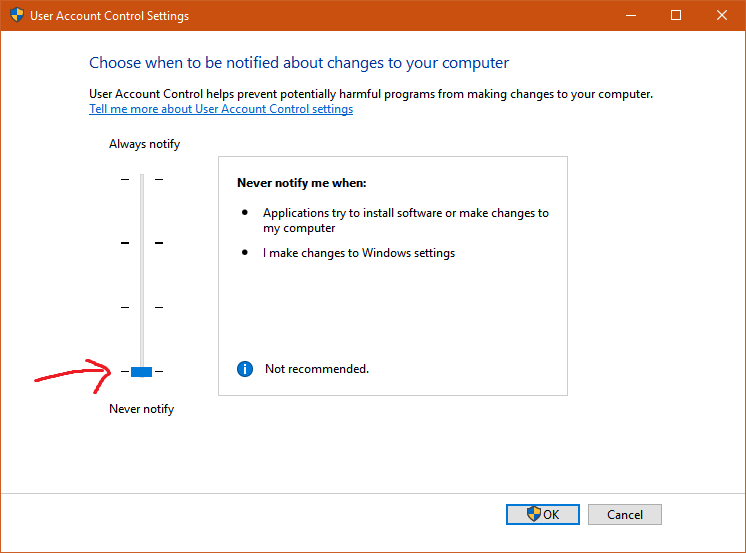
However, this requires UAC (User Account Control) to be turned off, so type uac into Windows’ search (Windows Key + S). Succeeding that, turn the slider right down to Never notify—press OK.
Great—now that application is all set up and ready to go.
insert_link4. Install Drivers to Properly Setup Windows 10
Graphics drivers are necessary in order to fully take advantage of your GPU.
One of the most critical steps of successfully setting up Windows 10 with your hardware is drivers. These enable fluid communication between the software and the hardware, thus it is not to be missed in a Windows 10 setup session.
Alas, I am unable to provide sufficient resources for you, due to the fact that we don’t all have the same computer; it would be horribly unrealistic to list the drivers for absolutely everything.
Therefore, I advise, for people with a pre-built system, to go to their manufacturers’ support website. Typically, you find the appropriate drivers for the specific model. That being said, try to avoid the potential bloatware offered by the manufacturer that you don’t need.
For self-built PCs like mine, search for the individual components’ drivers online for the most up-to-date versions. There may additionally be useful software such as the Samsung Magician (tells me when my SSD is about to brick).
Should you build your own PC? PC Building in 2018: How to Defeat the Infuriating Problems
Furthermore, graphics drivers are necessary in order to fully take advantage of your GPU. If you have an AMD GPU, get the latest drivers here. On the hand, if you use an Nvidia GPU, go here.
In my opinion, the Nvidia GeForce Experience software is convenient for notifying you of the latest drivers. (Staying up to date is undeniably a wonderful way of making the most of your GPU). It offers other features such as quick, lightweight screen-recording, too.
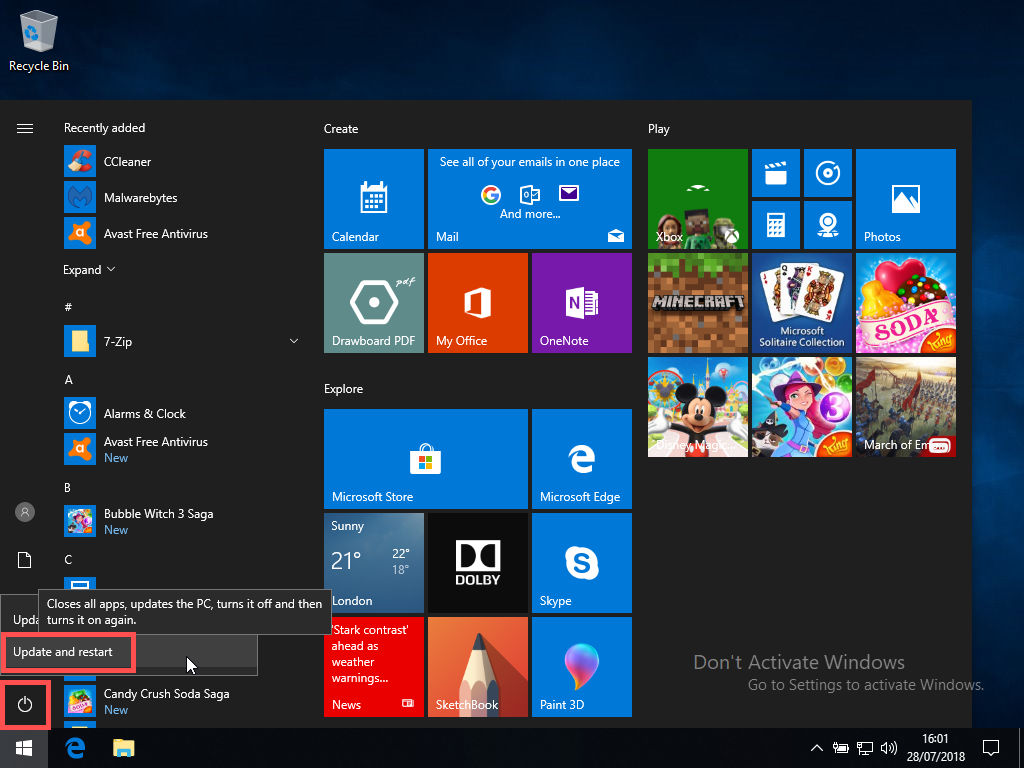
insert_link5. It’s Time to Reboot
By now, hopefully, the updates have finished (begging for a reboot), and all programmes and drivers have installed. This is good, but everything is bugging you to restart Windows 10 immediately.
So, after ensuring you have, in fact, done the above steps, restart the computer. Retain in memory, though, that the rebooting process will take a lot of time, especially if you don’t have an SSD.
As a consequence, you’re probably better-off cooking yourself a cup of warm croissant in the toaster. And don’t forget the butter!
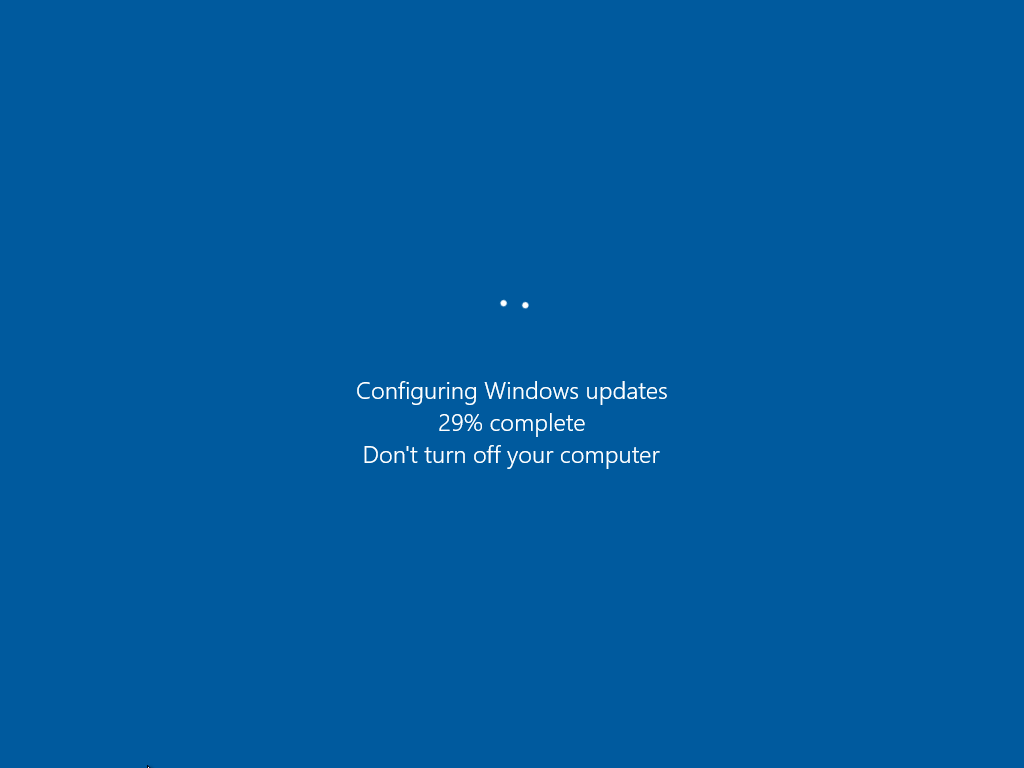
insert_link6. Install More Updates!
Did that take a while? If so, you’ll absolutely love this part! Go back into Settings, then Updates, and, finally, check for more updates.
In all likelihood, further updates are required; despite the computer having Windows 10 setup once more with what seemed like the latest updates.
If it prompts you to restart again, do so. We want to make sure our new Windows 10 setup has the latest updates before continuing.
insert_link7. Cleaning-up and Optimising for Speed
In spite of being a fresh Windows 10 setup, we can easily find ways of optimising your performance, hence experience.
insert_linka. Do Some Effortless Cleaning
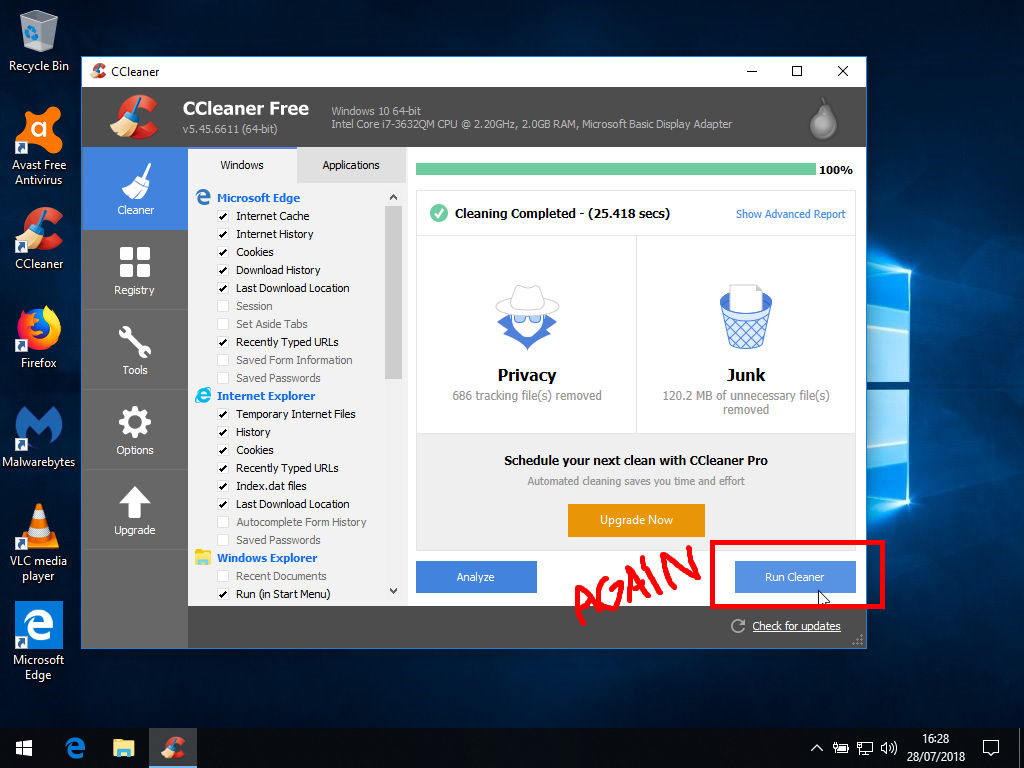
For my next trick, run CCleaner (wherever it is) such that you can see the Run Cleaner button of the Cleaner page. You, of course, now want to smack that button as hard as you mow your lawn.

Next, give that same button another, firm push for the sole purpose of being thorough.
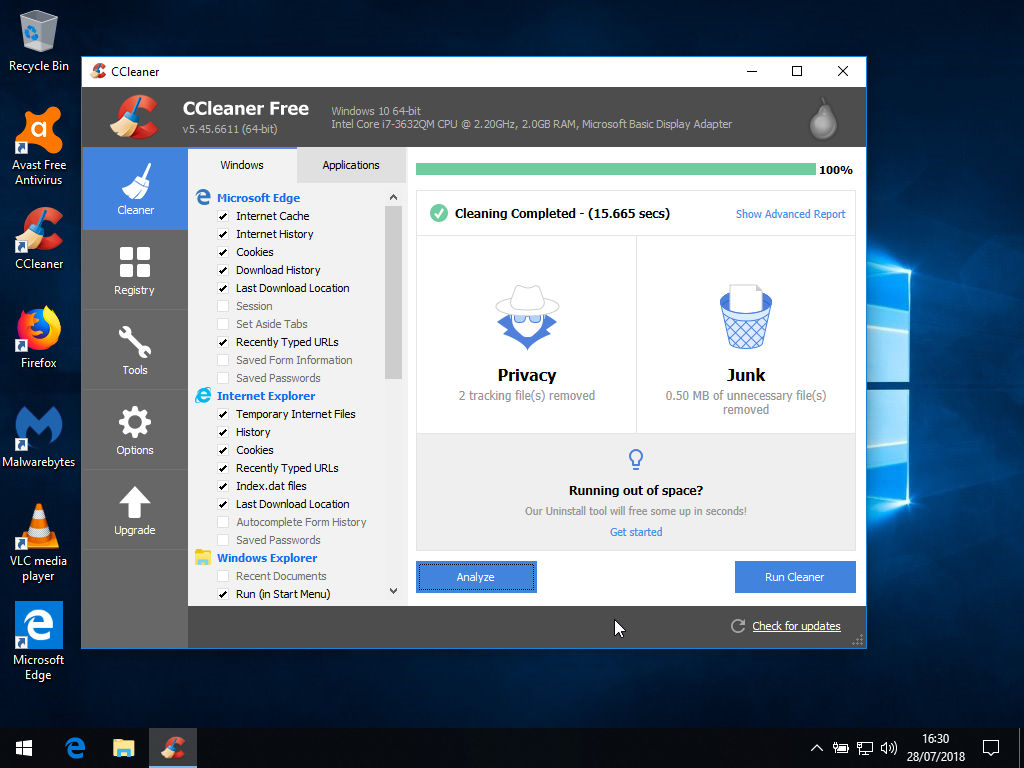
Having gone through that, it is time to click Registry (left) and then Scan for Issues, preceding “Fix Selected Issues…”.
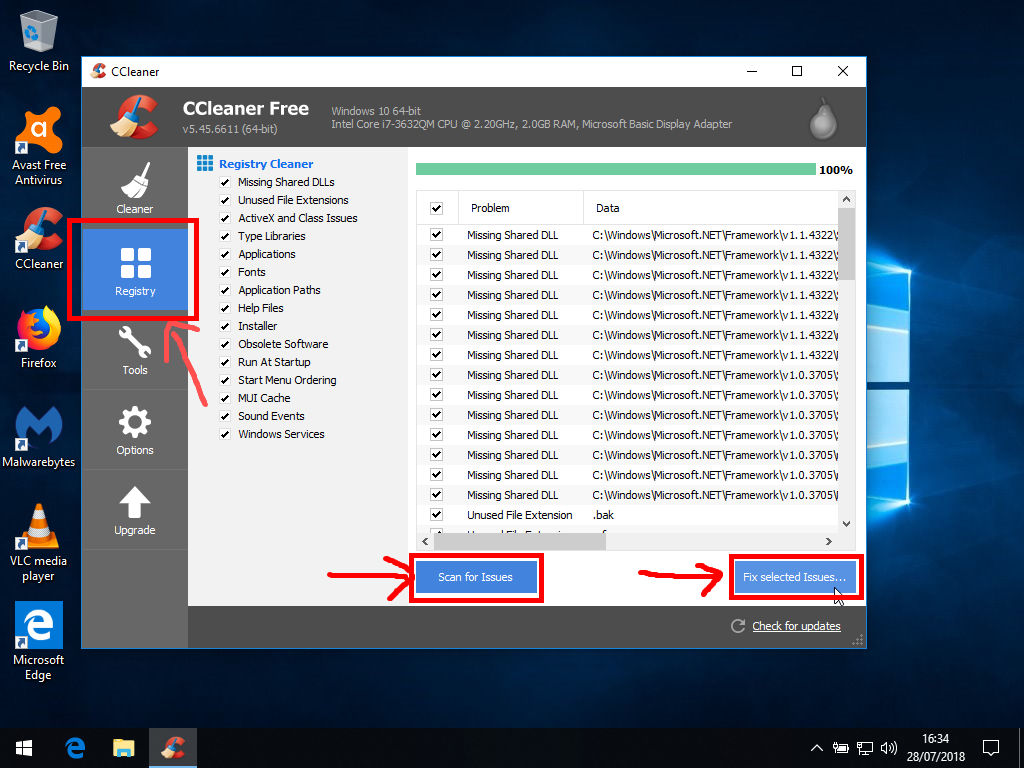
Subsequently, don’t backup changes to the registry and click Fix All Selected Issues.

And then, like we did before, repeat the process just to be sure.
insert_linki. Getting Our Application List Under Control
It is necessary to accept that most apps [installed] will probably be completely useless to you.
Although that was rather nice, we aren’t exactly done yet, so go into Tools. You will now be greeted with a list of applications to uninstall.
Thinking of doing nothing else, go through this list and uninstall all unneeded applications. These predominantly include unwanted, pre-installed Windows Store apps and can be removed with the huge blue Uninstall button.
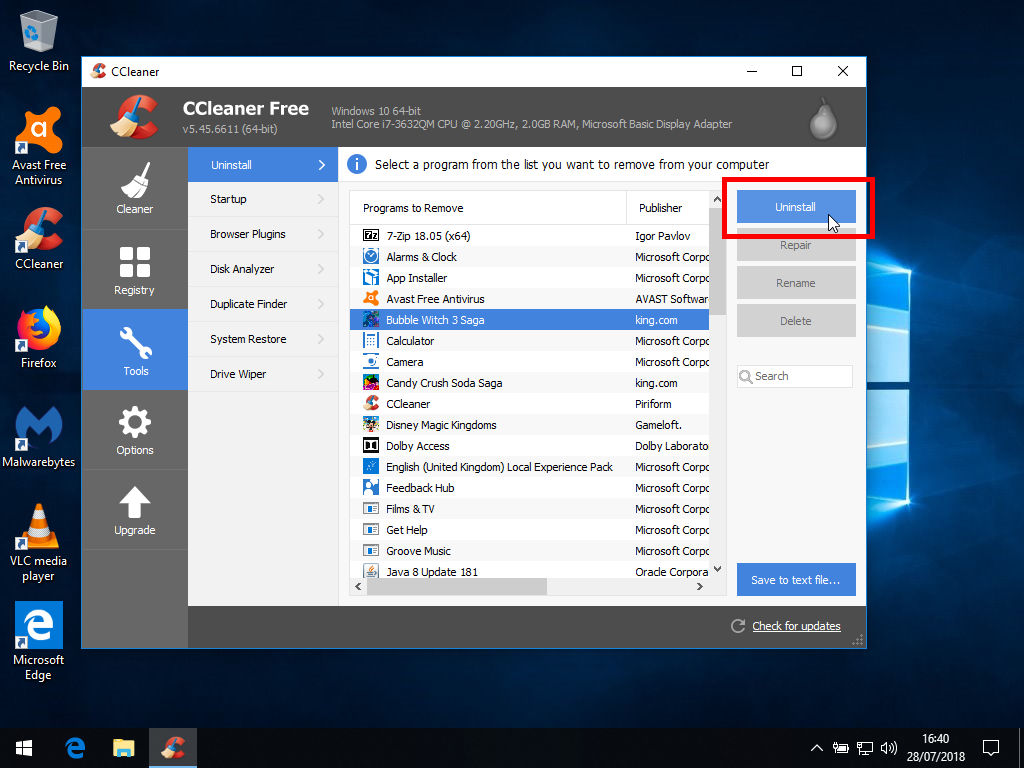
Moreover, I love this tool as you can uninstall apps like Xbox—which Windows doesn’t allow you to uninstall normally. After having gone through my list, I would have totally uninstalled:
- Rubbish Windows Store games which are not worthy of my mention
- Dolby Access
- Feedback Hub
- Films & TV (VLC is better for playing media)
- Get Help (who needs help when you have butter?)
- Groove Music (we have VLC)
- Maps
- Mail and Calendar
- Messaging
- Microsoft OneDrive
- Microsoft Pay
- Microsoft Solitaire Collection
- Microsoft Sticky Notes
- Mixed Reality Viewer
- Mobile Plans
- My Office
- News
- OneNote
- Paint 3D
- People
- SketchBook
- Skype
- Tips
- Voice Recorder
- Weather
- Xbox (as well as anything else with Xbox in its name)
Obviously, you might want something in the list above (like OneDrive) and that’s okay. However, it is necessary to accept that most apps above will probably be completely useless to you.
This is not exactly dangerous (removing unremovable Store apps), provided that they can easily be reinstalled through the Microsoft Store app; thus, don’t remove that.
insert_linkii. Restraining Our Applications
Keeping to the Tools tab, navigate to the Startup subsection, where we will now disable unnecessary start-up items. The truth of the matter is that programmes, which start when you log on, slow down your computer.
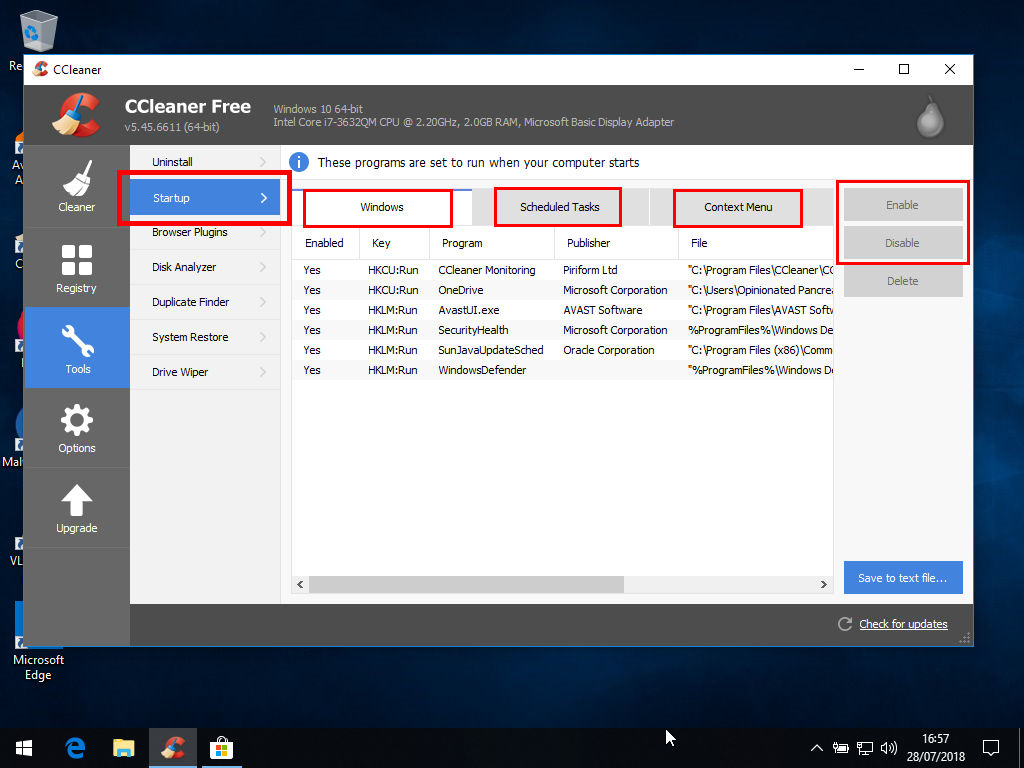
This is primarily when logging in, albeit useless start-up apps will always add needless performance drops. Simply go through and disable anything you don't need.
Malwarebytes, for instance, is unnecessary after the 2-week free trial as the free version does not perform scans automatically. Equally, there is no real-time protection—it’s just hogging your computer resources.
Also, don’t forget to visit the Scheduled Tasks and Context Menu tabs.
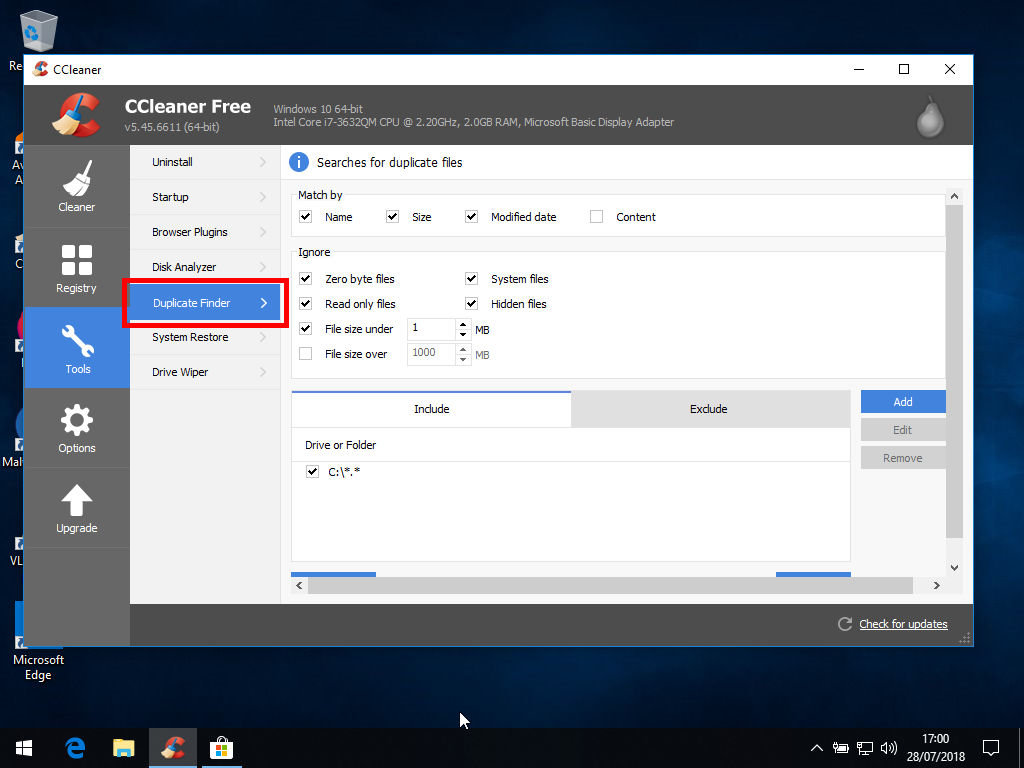
Note, too, that there is a tool for finding duplicate files (Duplicate Finder)—useful for saving disk space. There is also a tool to create restore points with substantial ease.
At this present moment, we will not be needing these. That said, however, feel liberal to come back once your computer has underwent the abuse of your usage.
insert_linkb. Get Cleaning Yourself
I’ve hope you’ve enjoyed the automation of CCleaner, but now we’re about to get hands-on ourselves.
Firstly, pay your Start Menu a visit and get it sorted to how you want it. This entails unpinning unwanted items, pinning wanted ones, grouping them, and resizing them etc.
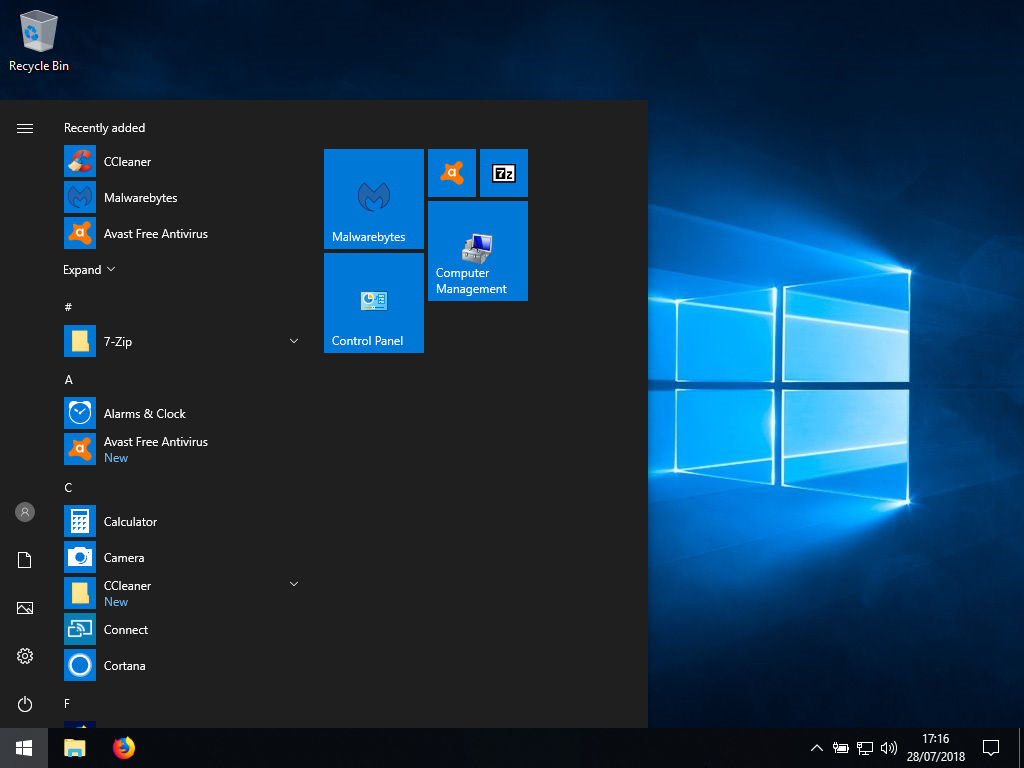
You can pin frequently used applications (such as Firefox) to the taskbar, besides.
Likewise, clean your desktop by deleting the desktop shortcuts created during the application installation phase of the Windows 10 setup.
Next, open File Explorer and navigate to the C: directory:

As you can see, my C: drive is looking pretty clean. Nevertheless, there may be some temporary installation folders from your Windows 10 setup process.
Your responsibility is to permanently delete (Shift + Delete) folders including but not limited to: Intel and AMD. Files—for example, one with “Install” in its name—could equally be a candidate for deletion.
Thus, be vigilant.
insert_link8. Configuring Your Shiny, New Applications
You’ve now got Windows 10 setup with applications so shiny they could blind you. Let’s configure them!
For the purpose of this checklist, I’m only going through the ones I recommended you download. You, however, are free to set up the application you installed of your own accord.
insert_linka. Firefox
Beginning with Firefox, open the browser and, if you want, create an account. I absolutely worship having a Firefox account because it automatically syncs your settings wherever you go—Linux and beyond.
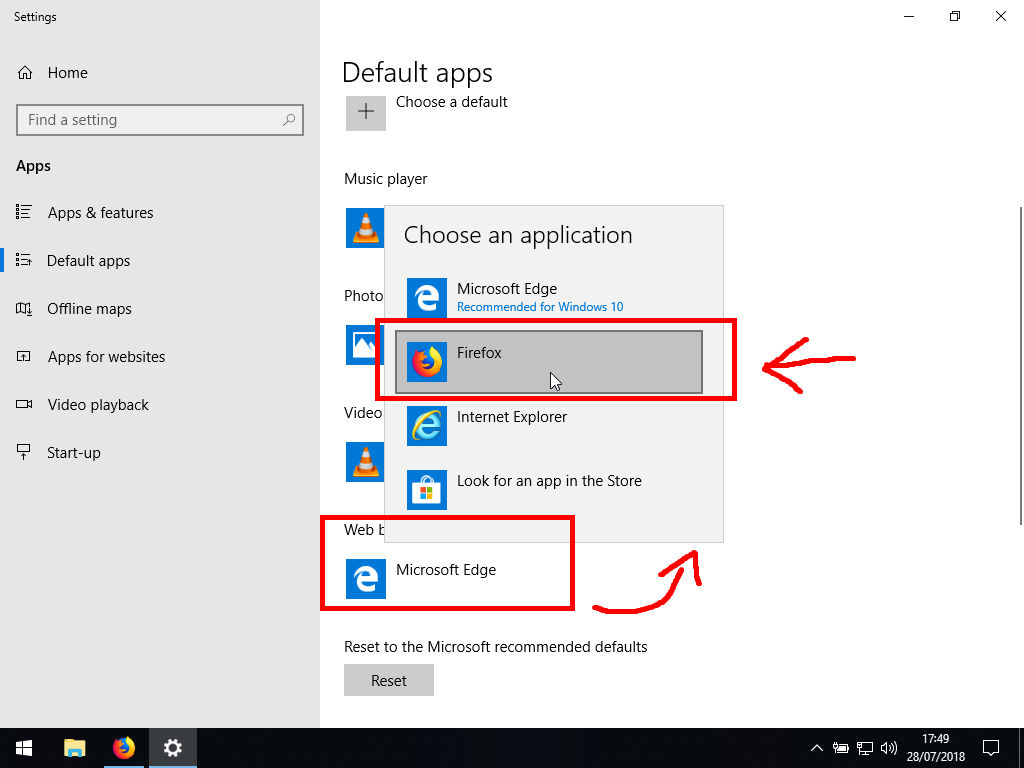
Additionally, Firefox will ask you to make it the default browser, so do it now! Scroll down to Web Browser, once the Settings window has opened, then select Firefox.
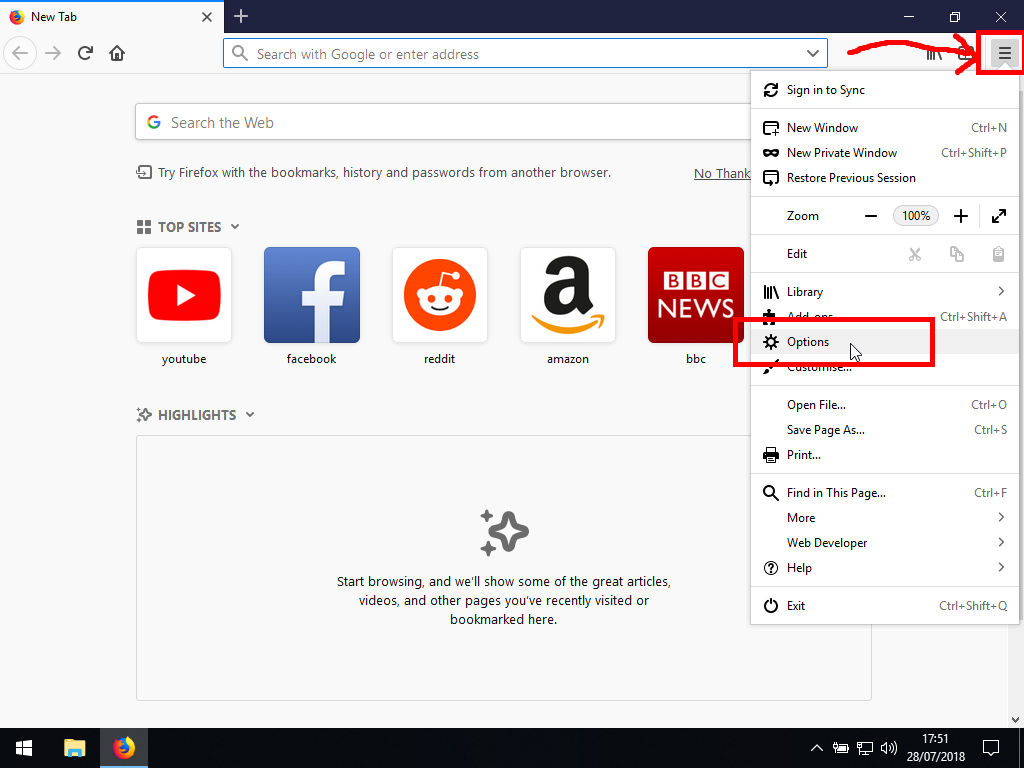
Back to the browser, click the three horizontal lines in the top-right and select Options.
Ultimately, the following preferences are up to you, albeit I do have some noteworthy, sneaky tips. In Home, you can choose to set the homepage as well as modify the default home’s contents.

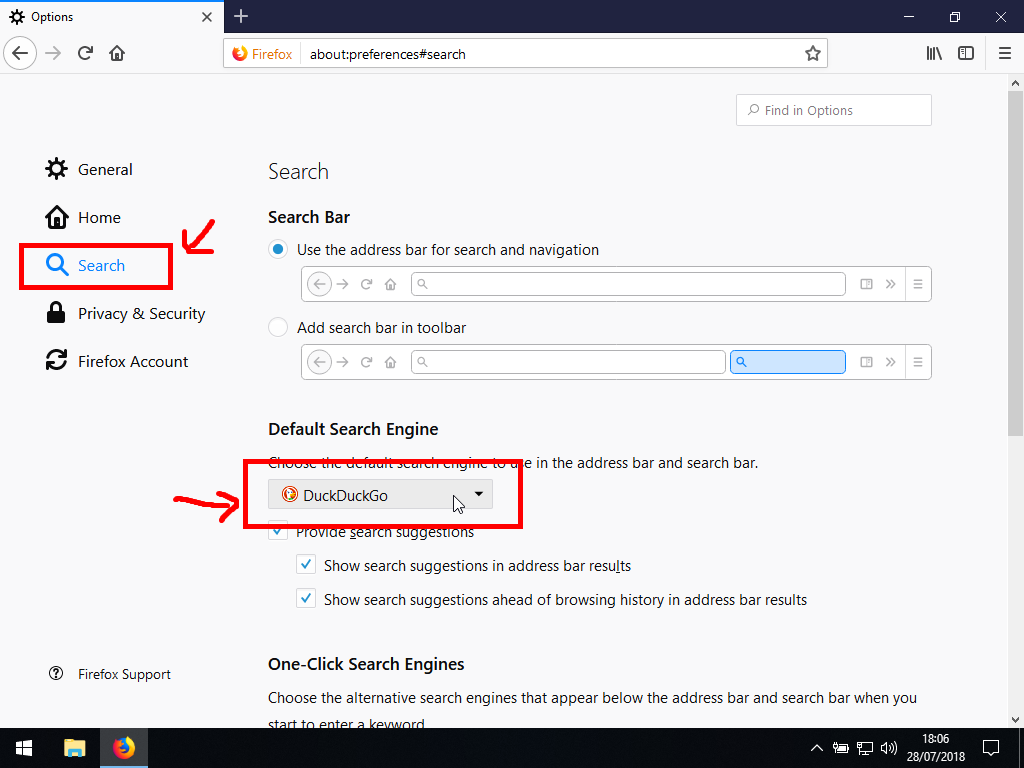
Now into Search, change your search engine to a privacy-concerned one like DuckDuckGo.
Be smart: What is The Best Way to Search the Internet?
Finally, more privacy and security related settings can be found in the respective tab.
As far as browser extensions go for privacy and security for this Windows 10 setup: Ghostery (tracker blocker), uBlock Origin (ad blocker), and Dashlane (secure password manager). Succeeding that, we are going to go back into the top-right menu and select Customise, where you’re genuinely in charge.
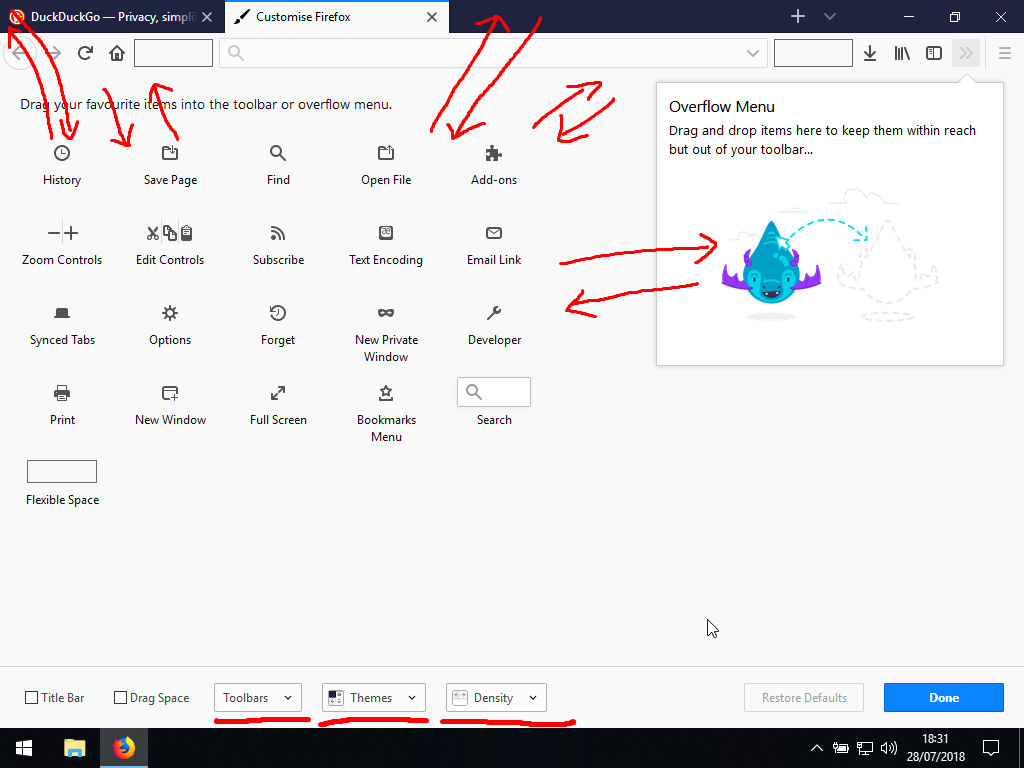
Did you know that, for instance, you can put items adjacent to tabs and on the menu bar?
Essential Knowledge: 5 Eye-Opening Reasons Why I Happily Block Ads
insert_linkb. Avast
Admittedly, this may be immensely laborious but stick with me until the end.
When I first opened Avast, I had to press a “Restart Service” button, exit it, then re-open the application.
If you are experiencing this same problem repeatedly, uninstall Avast and download it again here. Don’t forget to notify me of this too.
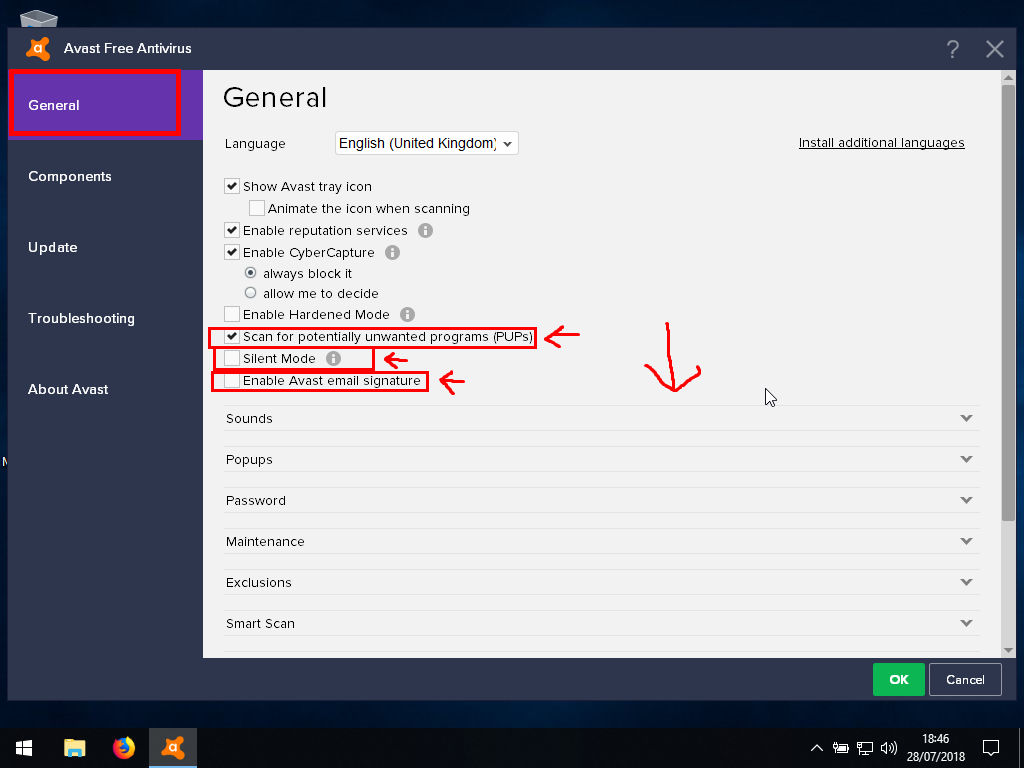
Currently, although you are protected, Avast is not in a satisfactory state. Therefore, go to settings (Menu → Settings) and, in General, do the following:
- Enable: Scan for potentially unwanted programs (PUPs)
- Enable: Silent Mode (if you don’t want the pop-ups, but you don’t get alerts either)
- Disable: Avast email signature (purely for advertising)
You may also want to look under the headings below, especially Sounds (Avast uses voiceovers which may plausibly be infuriating). Under Privacy, disable “Allow usage data to be shared with 3rd parties for analysis”.
“Participate in the community” can be disabled as well if you are super-conscious of privacy. Although, in that case, you might as well upgrade to a paid plan, which offers far more privacy.
insert_link9. A Final Security Measure
Nobody else but you can gain access to your precious computer.
Some of us, for security reasons, may want to have Windows 10 setup with Windows Hello: a way of having you log into your account using biometrics—a secure way, too.
Windows Hello can rightfully be considered secure due to the fact that biometrical data is only stored locally. That is to say, your face or fingerprint etc never leaves the dusty realms of your computer.
(By the way, suffering from dust? I came across this extremely successful and effective solution that I’m using.)
If you, on the other side of chance, have a device supporting Windows Hello natively, you’re good. Simply navigate to the Settings, Accounts, then Sign in Options.
On the other hand, those without a supported device can go with external solutions. These include Windows Hello compatible webcams in addition to compatible fingerprint readers.
This will ensure nobody else but you can gain access to your precious computer.
insert_link10. That’s It! Except, No It Isn’t
You must perform another checklist at regular intervals.
Even though we are done setting up Windows 10 at the minute, there are still steps to take; you presumably will continue to use your fresh Windows 10 installation, so let the maintenance begin!
After all, Windows is infamous for deteriorating in terms of performance, as its heavy life drags on…
This is the very reason for which I would prefer it if we all used Linux.
Alas, that won’t happen, so you must perform yet another checklist (albeit a significantly smaller one) at regular intervals. Say, for instance, every week—or fortnight, if you’re really that lazy.
Every week/fortnight:
- Run a scan using Malwarebytes
- Do a clean-up and fix registry errors with CCleaner (as we’ve done earlier)
- (If not weekly/fortnightly, this is perhaps better done once every month, or after every major update.) Open O&O ShutUp10 and update it with the link on the bar at the bottom (overwrite the older application file). Subsequently, check to see if the programme is telling you about changes (due to updates), and consider reverting them.
As long as you’ve got the disk defrag software on a schedule, and Avast installed, that should theoretically be all! Windows 10 also conducts its updates automatically—with force—unless you disabled them (in which case, you’re being suicidal).
That concludes the ultimate Windows 10 setup guide, though, tell me in the comments if you think I’m missing anything.
Don’t put your computer to waste: Mining Profitability 2018—Is it Easily Worth Your Time?
Don’t forget to get the best mouse for programming 2018 as well as sandbags to stay safe from the flood!