Update: This post now has a complementary video with more details. It's well worth the watch, I promise:
insert_linkThe Secret to Making Everybody Like You
Perhaps, I am being a little too bold by claiming a good-looking taskbar improves your social status. On the other hand, when you customise taskbar appearance in Windows, it stands out of the crowd; nobody can ignore taskbar customisation because it is simply too cool.
Whenever your friends visit you at that “sick” party, they always ask you the very same question:
“How ‘sick’ is your taskbar customisation? Is it ‘sicker’ than slick?”
Every single time, you fail to impress. You lose more friends than you gain. Therefore, you’ve made the smart choice to come to me for your relationship struggles.
Here, at Butary-Smoothe Raletionships, we offer a multitude of clean, quality advice ranging from:
- Make your Windows computer taskbar aesthetically pleasing for your party guests.
- That’s it.
The sales pitch does not lie, though. With TranslucentTB, you are free to improve the appearance of your taskbar. To be specific, you can:
- Make the taskbar blurry.
- Customise taskbar colour, separately from your Windows accent colour.
- Customise taskbar transparency anywhere from entirely transparent to intensely opaque.
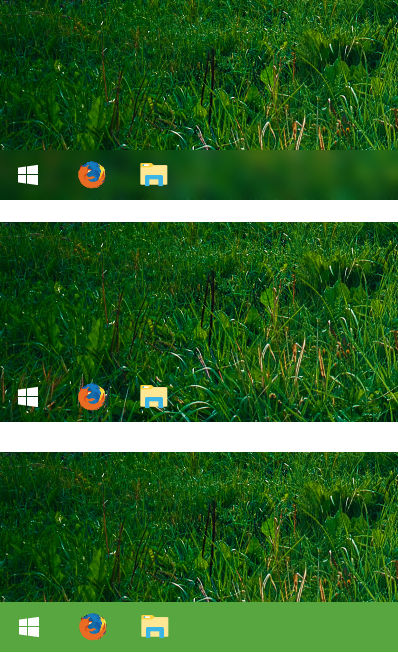
- Only make the taskbar blurry/opaque/tinted when a window is maximised, otherwise transparent. Also, applications can be excluded from this rule.
- Uniquely use your taskbar customisation settings when the Start menu is closed.
- Actively customise taskbar appearance settings using the tray icon.
Admittedly, you could just read a revolutionary book and be done with it, but taskbar customisation is more fun.
insert_linkHow to Win Back Your Friends
Unfortunately, TranslucentTB isn’t as straightforward as it could be; primarily, there is no graphical interface for easy management of the application’s functionality. So, be prepared whilst we venture deeper into taskbar customisation layers…
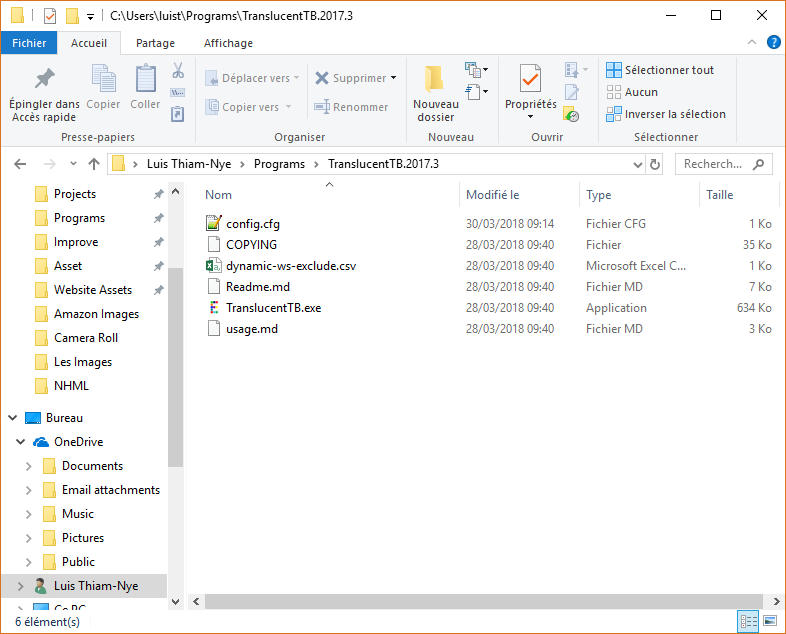
Firstly, download the application from GitHub here. Ensure you’re not downloading the source code and the file extension is .zip unless your computer can open .7z files.
Secondly, open the downloaded file and extract the all of the contents, which include the executable (“TranslucentTB.exe”) as well as “config.cfg,” to a folder somewhere you’ll remember.
By the way, you can acquire the proper usage documentation. Nevertheless, I will provide a concise guide here with everything you need to know.
insert_linkCustomise Taskbar Configuration
Next, it is time to configure the application. You must subsequently open the extracted “config.cfg” in a text editor such as Notepad. The following process will inevitably consist of you trying different taskbar appearances until you like it.
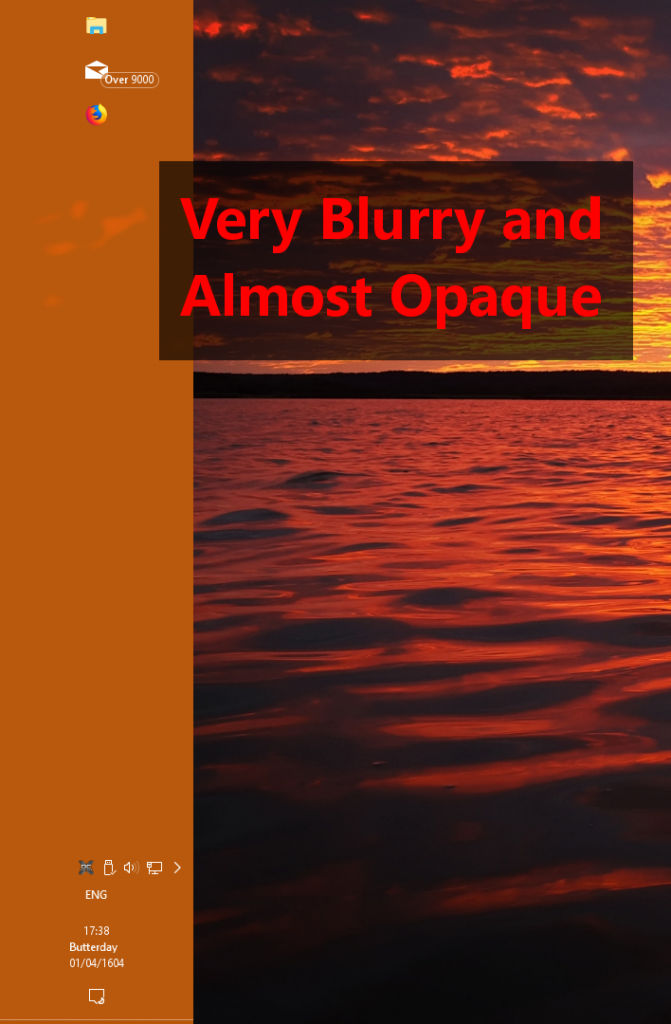
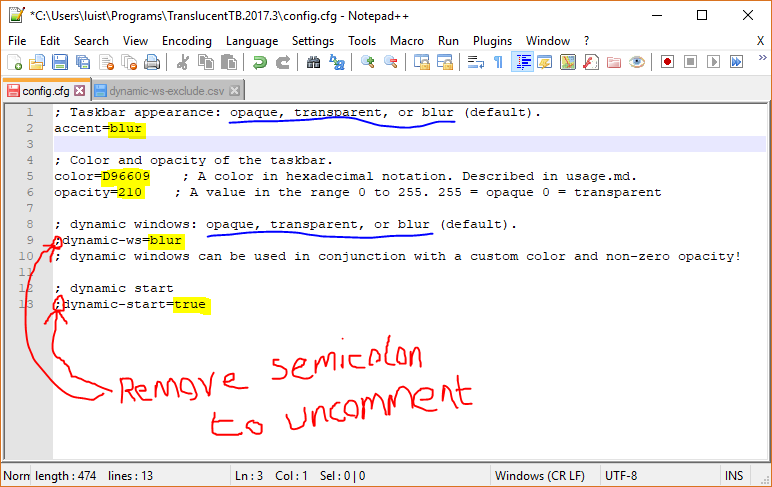
You should see, on the second line, accent= where you can set the following setting to one of three. As outlined in the comment above this line, the setting can be opaque, transparent, or blur.
insert_linkColour
Provided you chose the opaque or blur appearance, you may want to specify a custom colour. Remember: you’d want dark colours behind the taskbar to contrast the white text and logos. As a result, if you’re using autohide, don’t make the taskbar overly transparent or of a bright colour, since that won’t look butter-sweet over white windows.
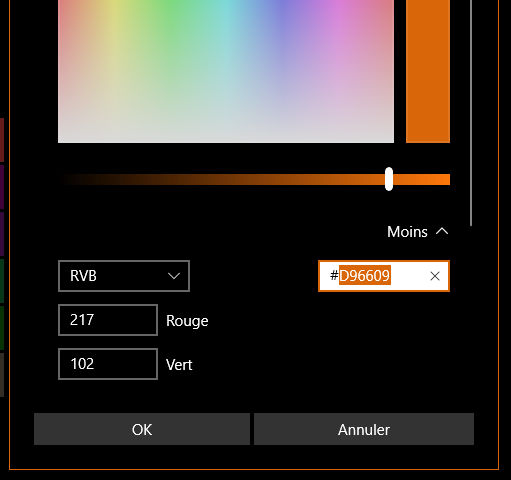
If you’d like to use your Windows accent colour, go to the Settings application → Personalisation → Colours → Personalised Colour → More. Copy the 6-figure hexadecimal number that follows the hash (#).
On the contrary, you might favour a distinct colour from your accent colour. Go to this website, to start with, and use the HTML5 colour picker to choose your desired colour. Like last time, copy the 6-figure hexadecimal number in bold—without the hash.
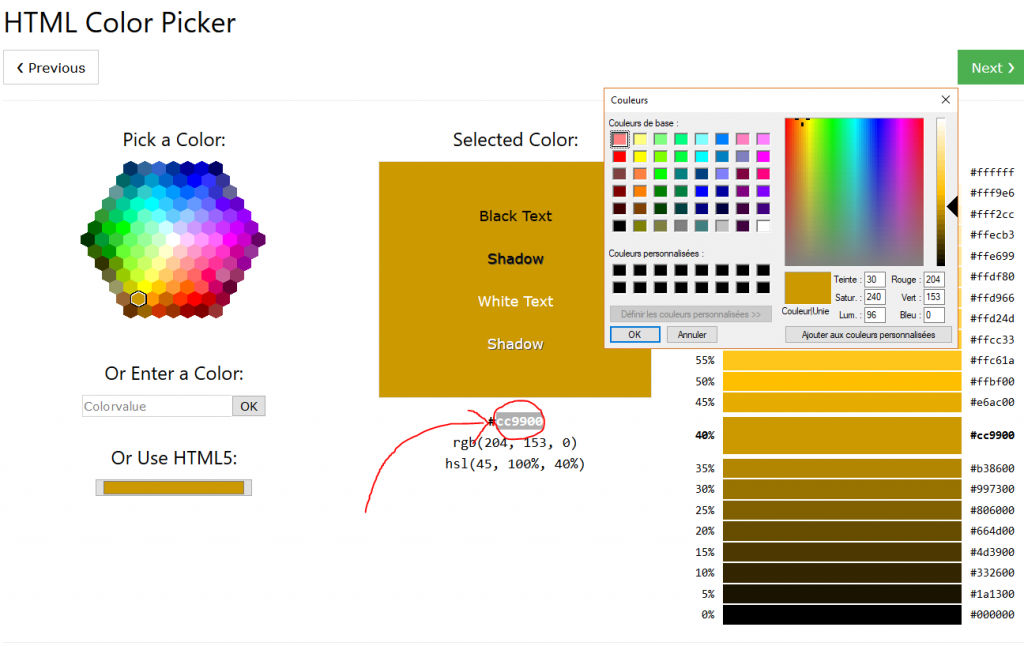
Now you’ve got your colour on your clipboard—congratulations! Proceed to paste it after the color=.
insert_linkOpacity and Dynamics
Subsequently, after opacity=, choose a number between 0 and 255, where 0 is completely transparent and 255 is utterly opaque. This will customise taskbar transparency.
You could also modify dynamic windows and dynamic start settings by removing the ; in front of dynamic-ws= and dynamic-start=. Next, change the following value after the “=” like before.
Dynamic start reverts the taskbar to normal when the Start menu is opened. Whereas, the dynamic windows feature makes the taskbar transparent when no windows are maximised. The latter of which, in spite of the comment shown below, has a tint mode, not a transparent one.
insert_linkTest and Test Again
Given that you haven’t yet seen your customised taskbar, I doubt you’ve found the ideal settings; the only exception to this would be a very simplistic (e.g. black, opaque) taskbar. So, in order to test your settings, save the config file and open “TranslucentTB.exe” by double-clicking.
If it happens to be that amendments are necessary, modify your config file and test it again. Although, don't get too excited if you've singled out the most beautiful taskbar of 2018; we're not done yet.
insert_linkWin Back Your Friends Every Time
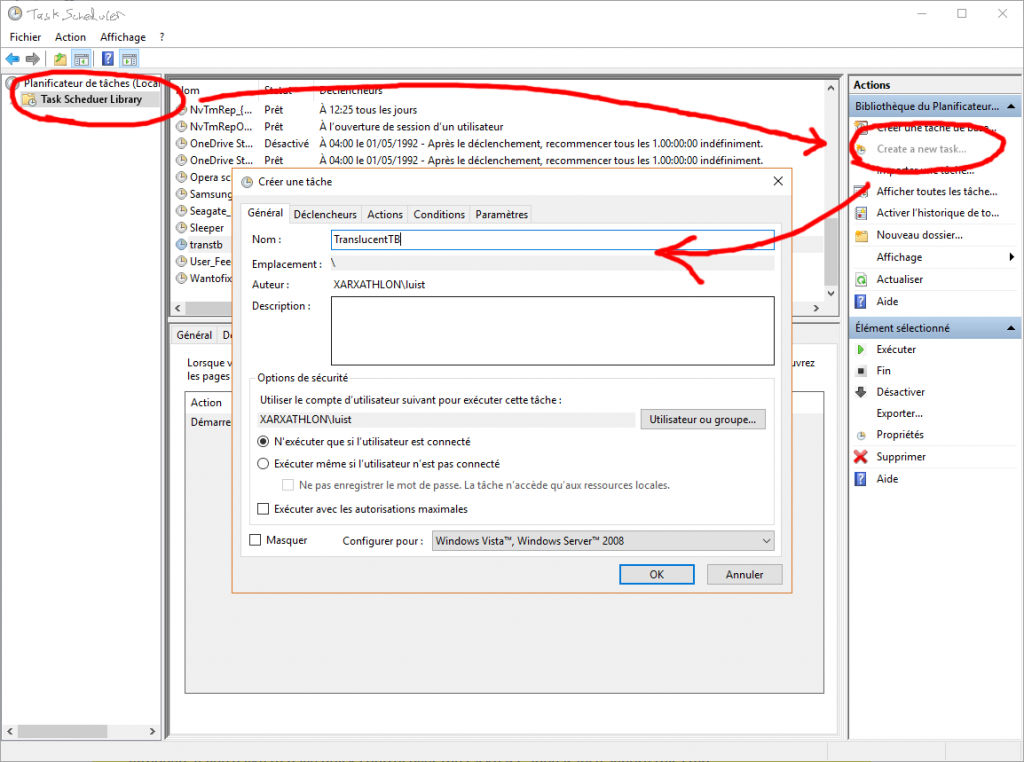
I assume you'd want your taskbar to be nice and shiny every time you initiate your Windows device. So, we'll open the Task Scheduler by opening start, typing task scheduler or taskschd.msc and annihilating the enter button.
insert_linkThe 9-Step Process
Now, if your computer isn't as messed up as mine, a big box should pop up. Well done, you’re now ready to follow these steps:
1. Click on “Task Scheduler Library” in the left pane.
2. This time, in the right pane, click “Create Task…” and name the task whatever you wish.
3. Go to the “Triggers” tab and create a new trigger, set it to begin “At log on,” then press “OK.”
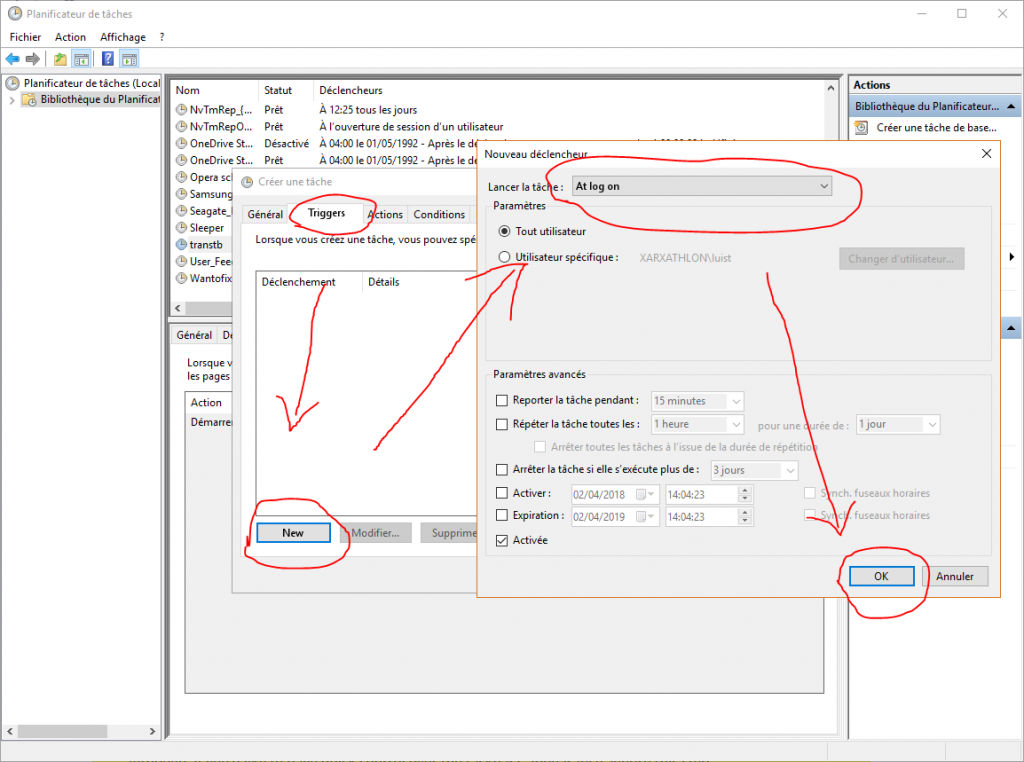
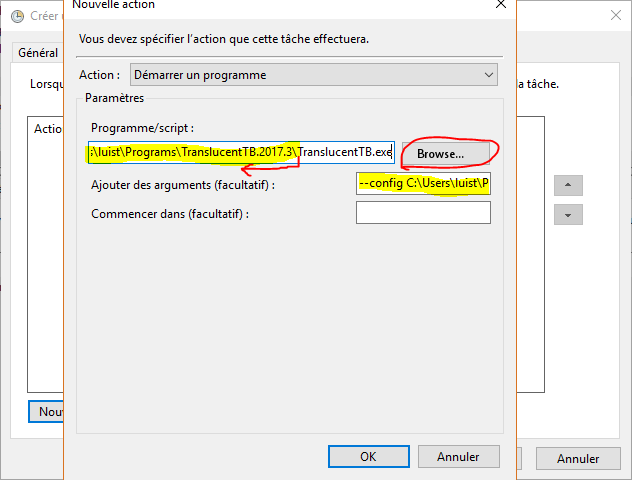
4. Go to the “Actions” tab and create a new action, then use “Browse…” to select the TranslucentTB programme.
5. Copy the directory, excluding TranslucentTB.exe at the end, (CTRL+C) and paste it (CTRL+V) into the arguments text box following --config with a space in between each.
6. Assuming you haven't modified the name of the file, append config.cfg to the previously pasted directory—with no space in between. By the way, if there are spaces in your directory, it must be in speech marks.
7. Also, if you don’t want to show the tray icon and clean up your taskbar, add --no-tray (proceeding a space). Although, if you’d like to have quick control over the taskbar’s appearance, ignore this step.
For example, this could be the contents of your arguments text box:
--config "C:That Taskbar Programmeconfig.cfg" --no-tray
8. Next, press “OK” to close the actions window and subsequently press “OK” on the task properties window.
9. With your task selected in the centre pane, test it by clicking “Run” in the right pane. If all is good, your taskbar should look spot-on meanwhile the status should be “Running.”
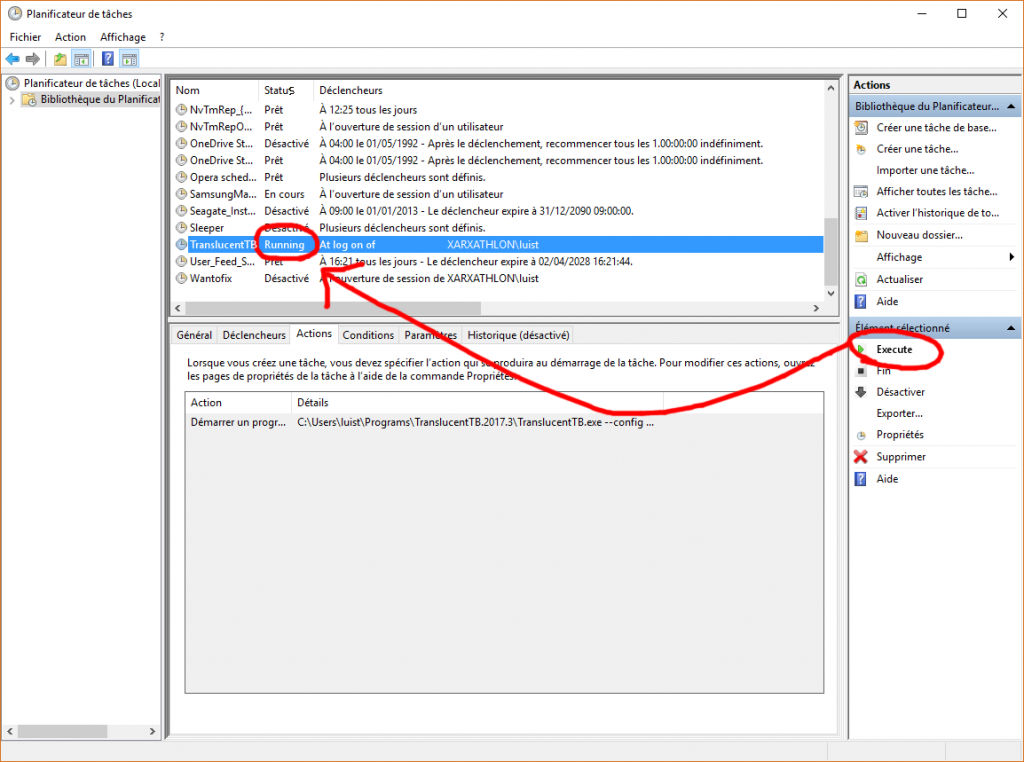
Doing this will automatically execute the TranslucentTB application every time you log in. Remember, see the GitHub page here for more details and usage instructions.
Get More Out of Your Taskbar: 4 Incredible Taskbar Customisation Tricks You Need to Know
insert_linkExit
Hopefully, by now, you know how to customise your taskbar appearance. Therefore, you can now be more likeable.
For more computer proficiency tips and trix, subscribe to email updates.
And buy some sandbags to stay safe from the flood.
Also, support me by checking out my resources page.