insert_linkHow to Use Windows 10 Productively, Effectively
Perhaps you're a beginner to the productive wonders of your Windows 10 computer. Then this is the place to be: there are plenty of Windows 10 productivity features for all of the family to enjoy.
In my eyes, there are two ways one could approach work on a computer of any operating system. That is to say, not exclusively Windows 10.
- Sit down at your computer and use what you know to get stuff done. It doesn't matter how (even if the method is inefficient), as long as it works.
- On the other hand, you could first invest the time learning Windows 10's productivity features beforehand. As a result, you'll save time in the long-term, and be happier and more confident in using Windows 10.
Also, you'd be delighted to hear that these 9 Windows 10 productivity features will increase your work output—no doubt.
Even if you feel confident and experienced using Windows 10, I bet there's something here you're not exploiting.
After all, productivity is all about exploiting techniques. Thus, if you truly want utmost productivity, you'll always be in the search for handy little tips and tricks.
The secret is going fast, and when you can go fast, you go productive.
Luis Thiam-Nye 2018
Having made my pitch that this article truly is relevant—for you—on Cryptic Butter, let's dive in immediately. Starting with the basics…
Stay safe, protect yourself: How to Spot a Scam in 3 Simple Words
insert_linkEnough of That, Let Us Commence the Operation!
(Info for absolute beginners. I never know how much knowledge the reader has, you see.)
Just in case, here is somewhat of an overview of the Windows 10 desktop. If you aren't already, it would be an excellent idea to get yourself familiar with it.
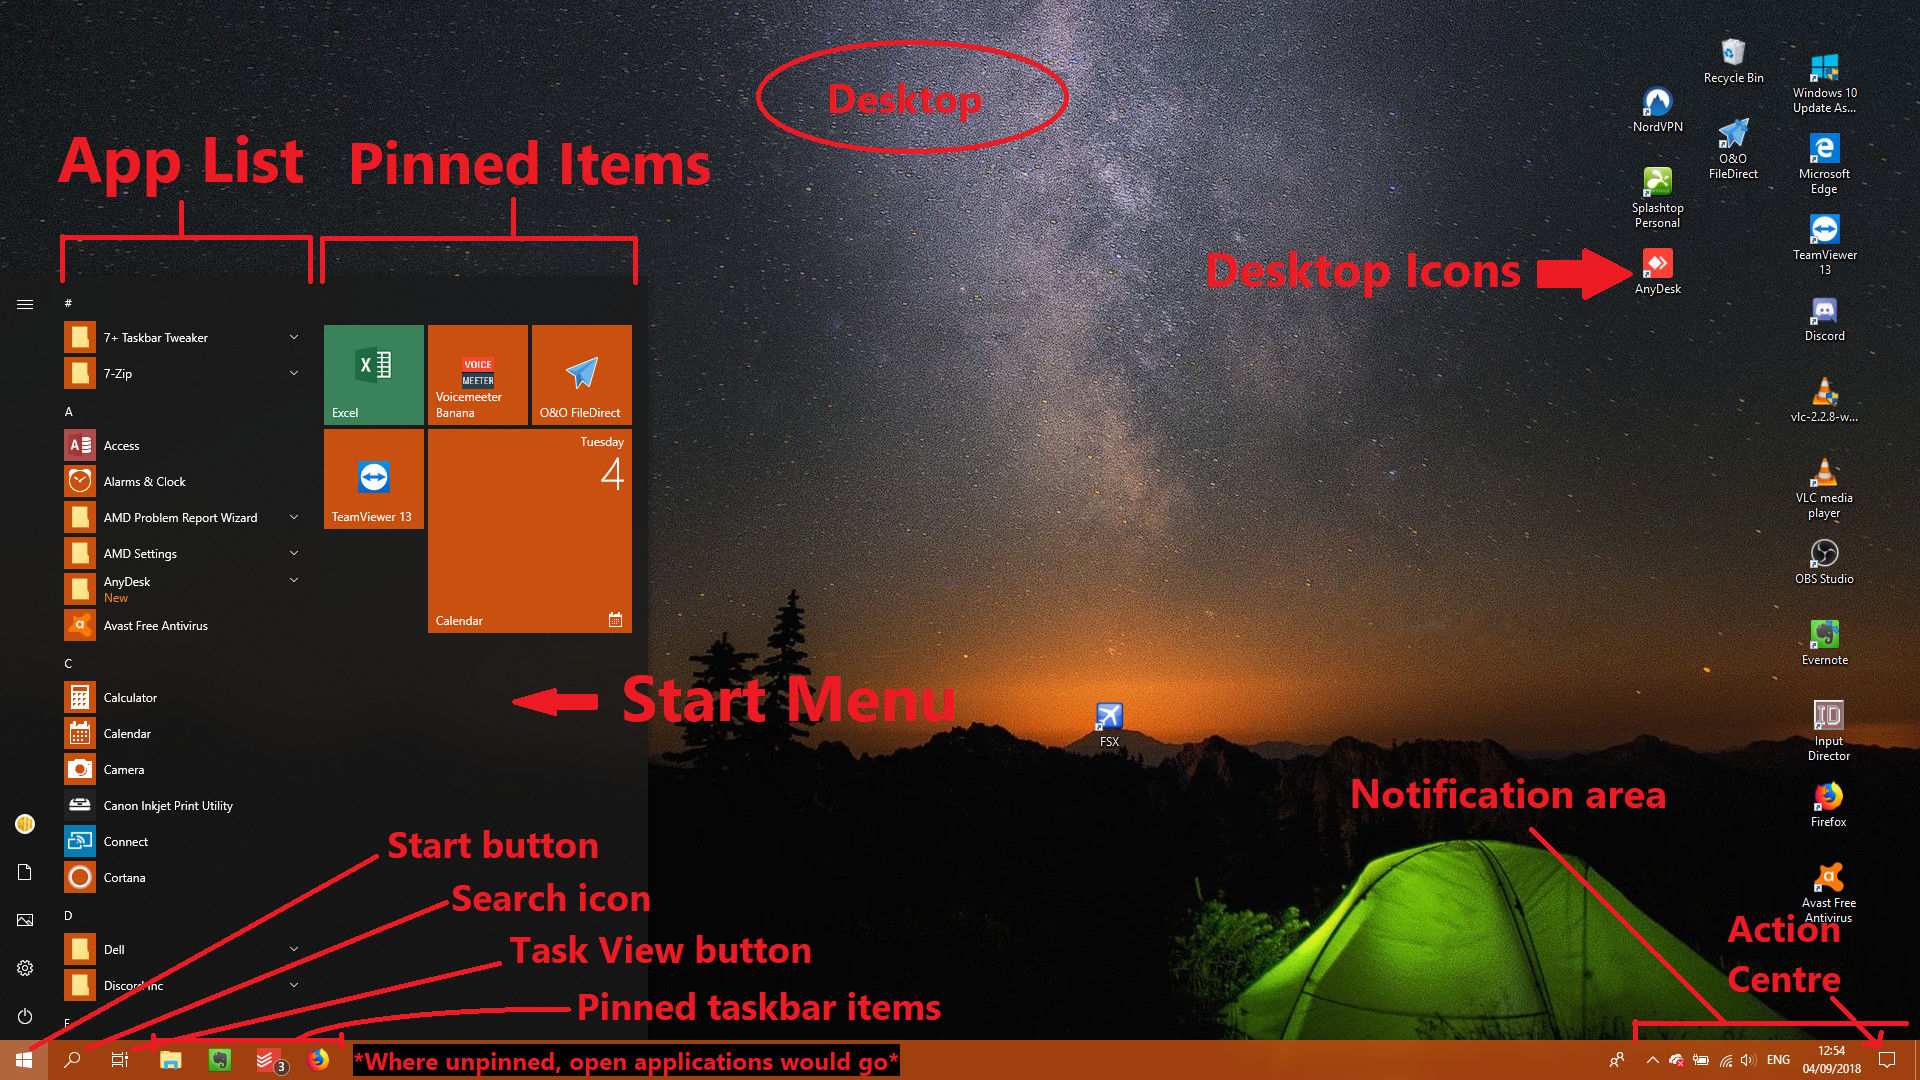
A few of the key components of the Windows 10 interface include:
- The Taskbar: the bar displaying all open applications, the time, and the Start button (normally at the bottom of the screen).
- The Start Menu: the resulting display after pressing the Start button (looks like four squares like a window) in the taskbar.
- The desktop: indeed, it can become confusing when you use the word "desktop" in numerous, distinct ways. In this case, however, I'm referring to the area behind everything, displaying the background image with the icons on top.
insert_link1. Do More (Faster) with Keyboard Shortcuts
Hands down, this is one of, if not, the most powerful Windows 10 productivity feature you can leverage. Except it's not a feature restricted to Windows 10—since shortcuts are used in Linux, macOS, and more!
If you aren't aware of this already, keyboard shortcuts are quick ways of performing a certain function, using your keyboard. And your keyboard only.
Put simply, this entails pressing a combination of keys.
Typically, you would first press down keys that act as "modifiers", then the key that finally triggers the desired action. For instance, take the [keybt]Ctrl[/keybt] + [keybt]Alt[/keybt] + [keybt]Delete[/keybt] shortcut.
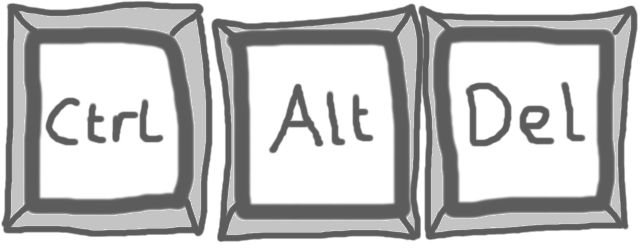
In this case, the control (Ctrl) and Alt (for alternate) keys act as modifiers, while pressing delete executes the action. Of course, shortcuts aren't always 3-keys long, they could comprise 2 keys, 4 keys, and many more keys.
The first lot of shortcuts you'd want can be learned here—these are shortcuts specific to the Windows 10 OS. In other words, they perform functions related to the Windows 10 desktop environment, for more efficient use and navigation.
How to Navigate Windows 10: 123 Most Valuable Shortcuts (With bonus tips and info)
Immensely more efficient.
In fact, many of the upcoming productivity features in this article have corresponding shortcuts, so don't miss them out!
insert_linkEdit Text Quickly, and Contentedly
In addition to that, there is a separate batch of hot, steaming shortcuts that want your attention; they are the shortcuts to help you navigate and edit text more proficiently.
You've likely heard of the well-known, commonly used [keybt]Ctrl[/keybt] + [keybt]C[/keybt] and [keybt]Ctrl[/keybt] + [keybt]V[/keybt], for example. But do you know about the hidden plethora of empowering text-editing shortcuts only a few people use?
Especially for the purpose of spreading the word, I've compiled the enjoyable, enlightening, relevant article.
Aid your typing skills further: Little-Known Ways to Quickly and Effortlessly Edit Text
insert_link2. Distribute Your Apps Across Virtual Desktops

One of the most exciting features of Windows 10 when it was being announced, for me, was virtual desktops. But what are virtual desktops?
Virtual desktops are a nifty Windows 10 productivity feature that allows you to segregate your working environment. More specifically, you can divide your running applications between however many desktop spaces as you like.
To demonstrate, you can only view one virtual desktop at a time. In fact, if you're using Windows 10 right now, all the open programmes are what you'd consider a virtual desktop.
This is where things get spicy—subsequently switching to another virtual desktop. The result of doing so?
- Your currently open applications will no longer be visible, not even in the taskbar.
- New applications can additionally be opened, which will stick to their own virtual desktop.
What's more, the application windows can be moved, rather straightforwardly, between these virtual desktops.
So, how do we do it?
insert_linkHow You Can Operate Task View
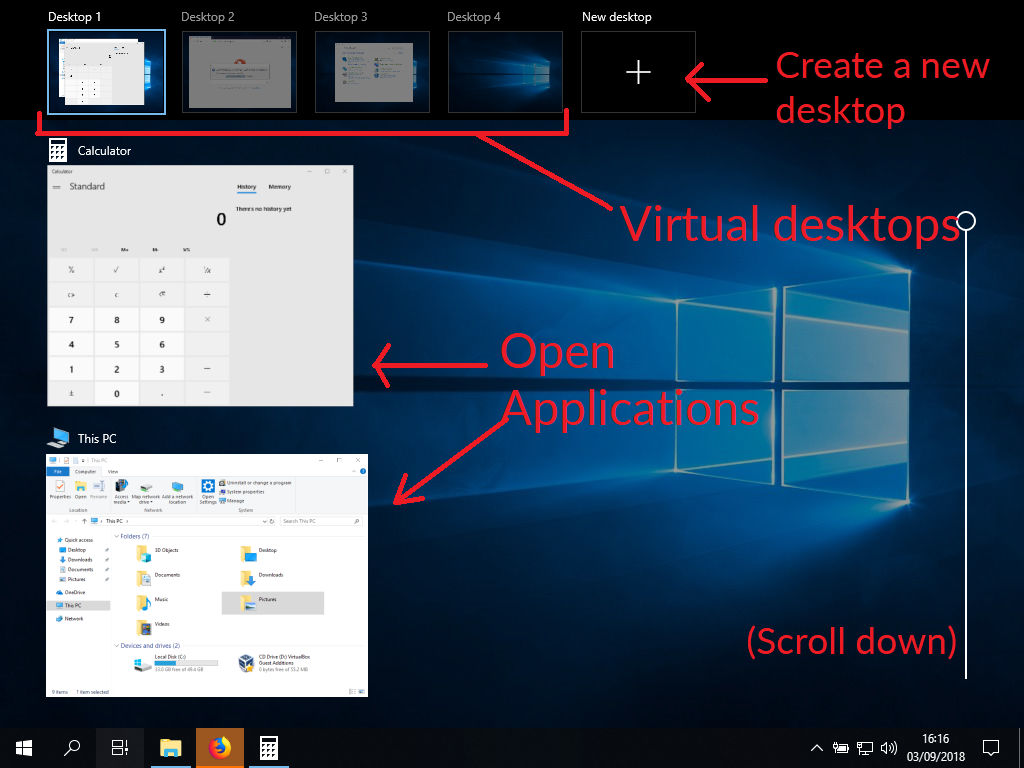
Well, the secret lies in the Task View—a core Windows 10 productivity feature. In order to enter this view, click on the icon which (by default) sits to the right of the search bar/icon.
Otherwise, simply press [keybt]⊞ Windows Key[/keybt] + [keybt]Tab ↹[/keybt] such that you see an overview of your open applications. This is, by the way, a powerful Windows 10 productivity feature in itself—for painlessly switching to the application you want.
It even enables you to quickly close applications in this view, too.
Utilising virtual desktops, however, click on the "New Desktop" button at the top of the task view. (If you're using an older version of Windows 10—which is unideal—this will be at the bottom-right.)
Now, feel free to create as many virtual desktops as you want; there's no harm in surplus, as it turns out.
Using this fancy Task View feature massively boosts your productivity, and here's how:
- Switch between virtual desktops by clicking on the target desktop in the Task View. Also, take advantage of the corresponding shortcuts: [keybt]Ctrl[/keybt] + [keybt]⊞ Windows Key[/keybt] + [keybt]←[/keybt]/[keybt]→[/keybt]
- In the Task View, see the programmes of a specific desktop by hovering over it with your mouse. Therefore, there's no need to leave the Task View—saving precious units of time.
- Move applications between virtual desktops by dragging them in the Task View to the intended desktop.
insert_linkUsing Task View to Your Advantage
To exemplify a case where Task View would be of tremendous assistance, imagine you're working on a project; you're researching the chemical composition of butter in order to write up an insightful document for your manager.
Prior to Task View, there were two ways of going about this: you could either set up the browser and word processor (for writing the document) side-by-side or overlap them.

In the latter case, you'd have the inconvenience of switching between each application. Granted, this can be done pretty fast.
Or, better yet, you could have your browser in one virtual desktop, and the word processor in the other. Accordingly, you'll get a full-screen view of each programme and an uncomplicated way to switch between them (exploiting shortcuts).
Furthermore, virtual desktops provide a convenient way to have all of your windows laid out how you want. These layouts can subsequently be put out or back into view.
For example, your virtual desktop for research could have 4 browser windows laid out perfectly. Each one could potentially present a different information source.
Evidently, the opportunities are endless.
Just give it a whirl!
insert_linkWhat It Isn't
What the virtual desktops productivity feature isn't, however, is a way to effortlessly switch between different looks and feels. Rather, think of virtual desktops merely as a way to compartmentalise all of your applications into discrete workflows.
It divides your windows, and nothing else. While this is a bit unfortunate, it is a worthy productivity tool nonetheless.
(Unique background images per virtual desktop would have been nice, though.)
insert_link3. Organise Your Apps Using Windows Snap
Keeping to one virtual desktop, how do you lay out your windows in the most productive way possible?
I think you'll find the answer in Windows Snap—another beautiful Windows 10 productivity feature. As with virtual desktops, I got tremendously enthusiastic over this!
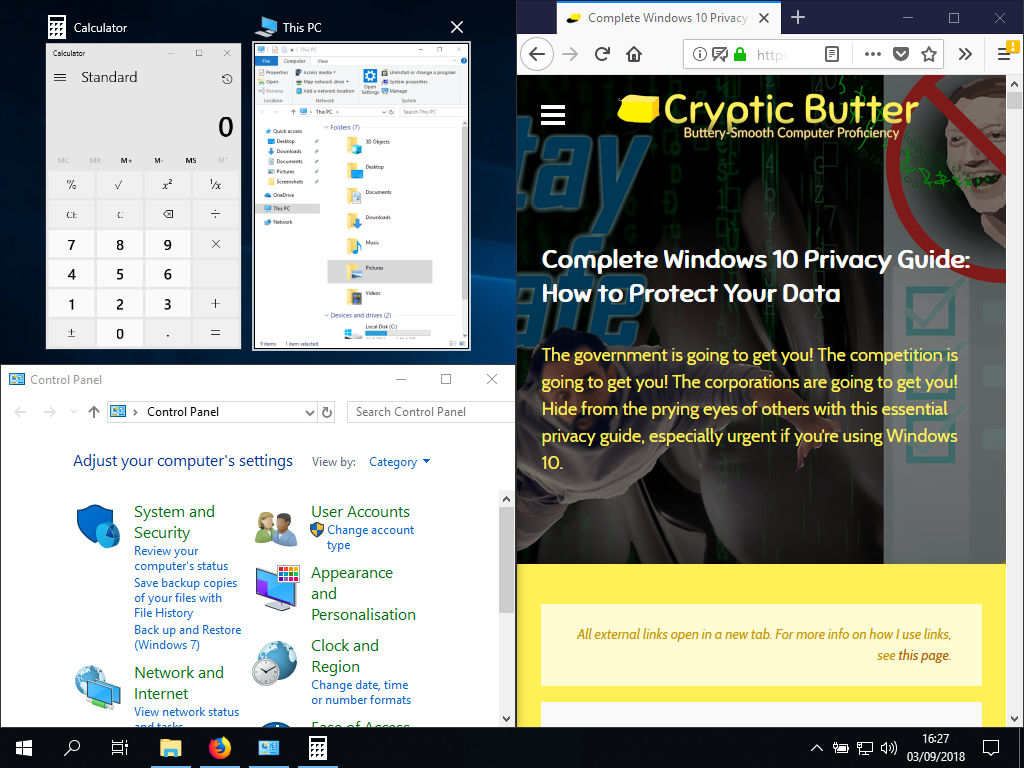
To explain, Windows Snap does precisely what it sounds like, that is, snaps your windows; it essentially provides the most trouble-free way of organising your windows on your desktop.
As a result of dragging a window to various sides of your screen, your window will snap accordingly:
- Drag the window to the top to maximise it.
- Shove it to the left/right in order to occupy half of the screen.
- Push it towards any of the four corners to extend the window over a quarter of the screen.
- If appropriate, Windows will allow you to choose another window to snap next to your snapped window. To refuse this offer, click basically anywhere else.
- More cleverness comes into play with regards to filling all the available space, too.
So, you could use this technique and have up to four windows arranged nicely for you, the productivity addict.
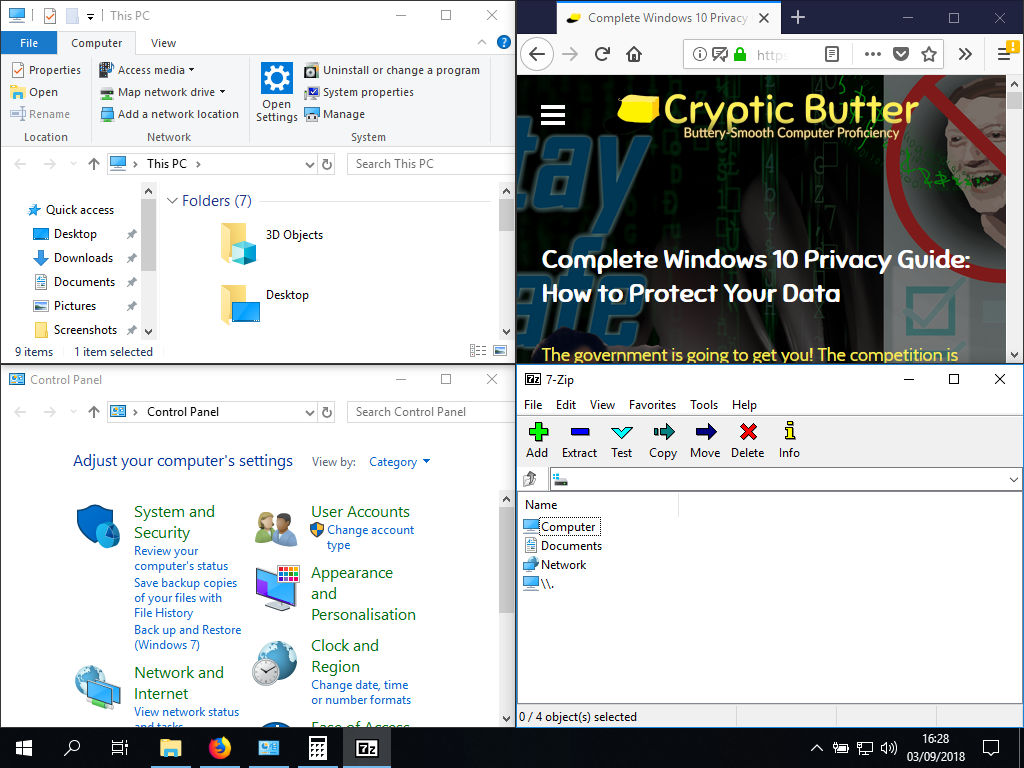
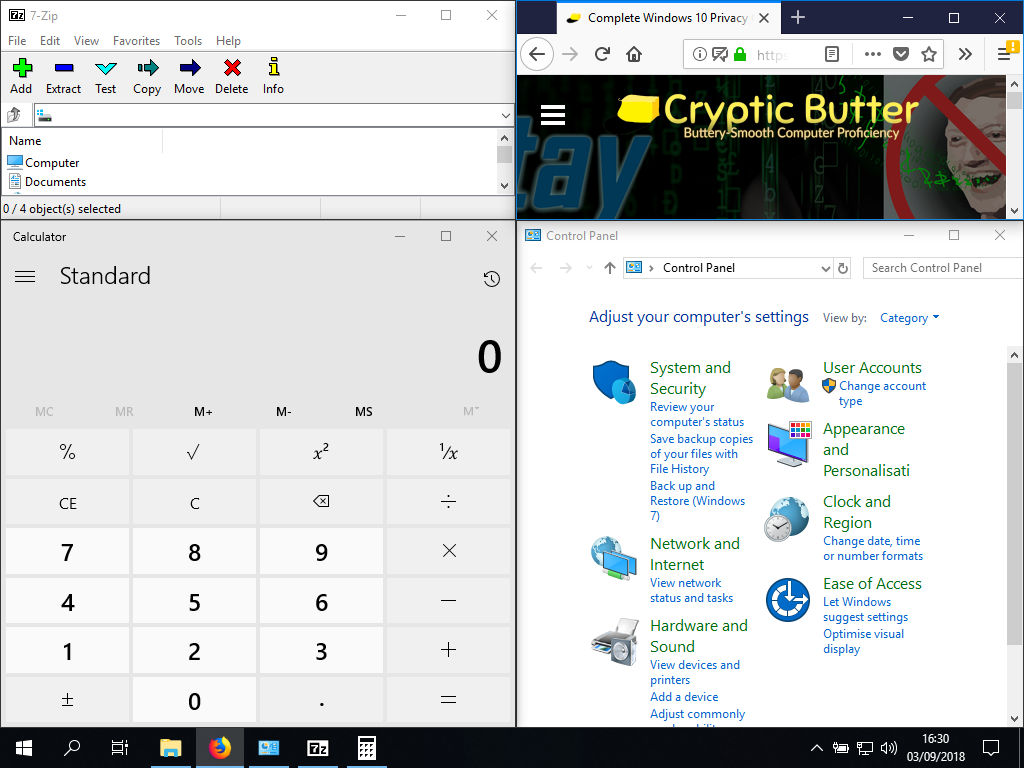
Furthermore, in a half-half configuration, you can drag the edges of both windows in the middle of the screen at once
But—as we all know—there is no productivity addict without the appropriate shortcuts.
Expansive stuff, like a balloon: These 15 Computer Shortcuts Explained Will Make Your Day
Don't forget, too, that you can still resize these windows by dragging the window borders.
Speaking of resizing windows, experiment with dragging the top/bottom border of a window to the top/bottom of the screen: that window will automatically—and quite cleverly—adjust to take up the entire height of the desktop!
insert_link4. Pin Your Favourite Apps for Swift Access
Indeed, being able to organise apps that are already open is indisputably advantageous. But what about before even opening the applications—how can productivity increase there!
Well then, let's go back to a straightforward Windows 10 productivity—or rather, convenience—feature that's certainly not new.
And you guessed correctly (perhaps from the heading) that you can pin commonly-used apps to quickly-accessible places.
insert_linkPinning to the Start Menu
Starting with the Start Menu in Windows 10, I'll draw your attention to the big application tiles (rectangles). Firstly, right- (secondary-) clicking each tile will give you the options to unpin and resize the tile.
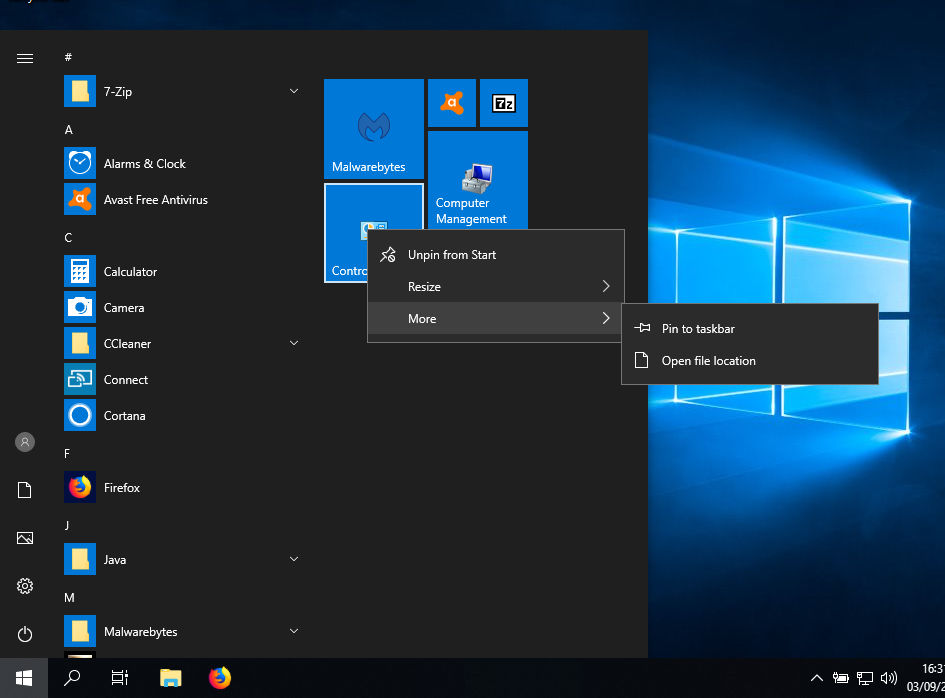
As well as that, there are plenty more functions that may appeal to your tender ear, child.
For anything that you don't really use as often, I'd recommend unpinning it. Therefore, you won't see it there and it'll clean up the Start Menu for more important things.
After all, anything that isn't pinned to the Start Menu can always be accessed from the app list there.
Right-click on your commonly-used applications in that app list, while you're there. Then you will be given the option to pin those to your Start Menu.
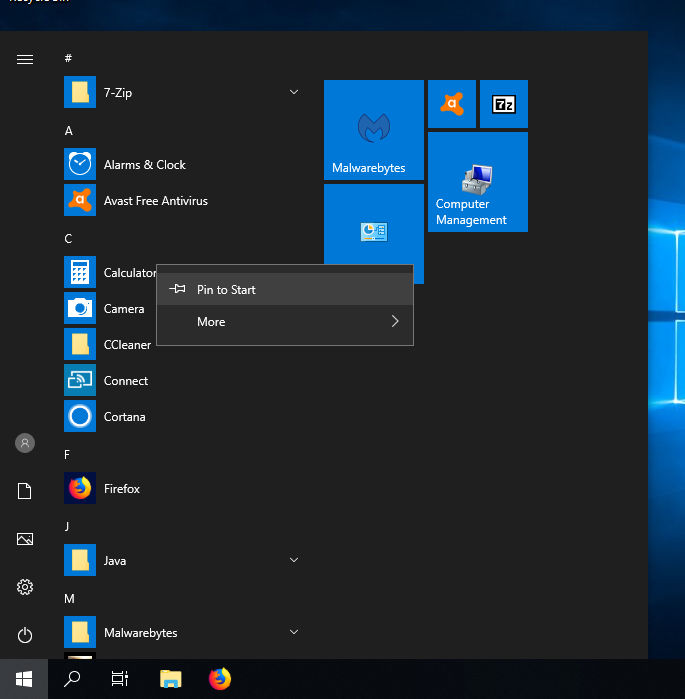
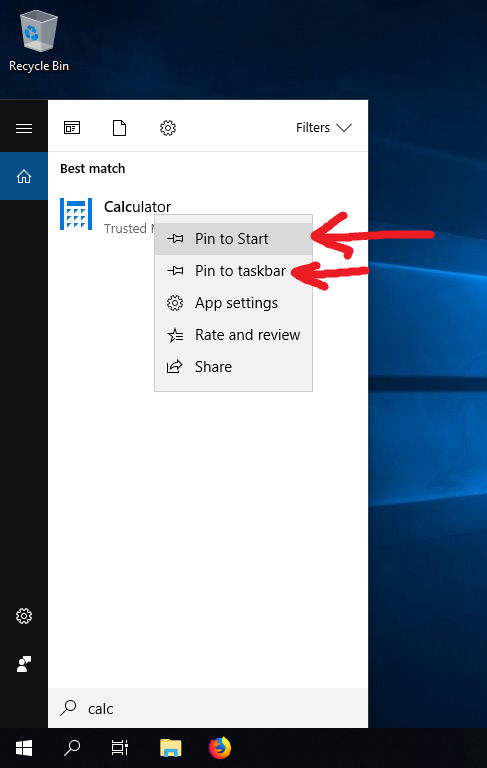
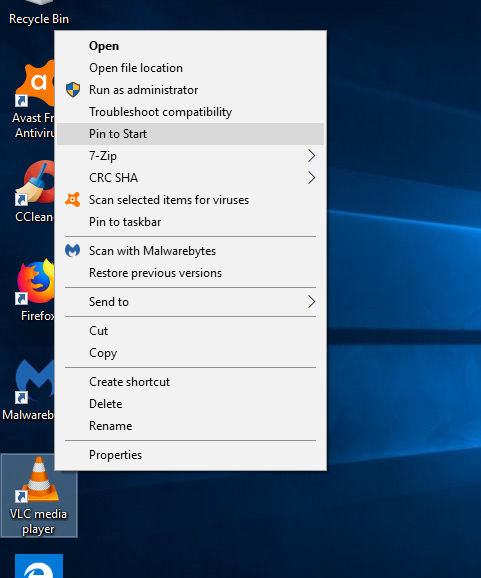
(Bear in mind, though, that there are other ways of pinning these items, like right-clicking desktop icons and Windows Search results.)
Then they are yours to move around, resize and even group. (For achieving the latter, simply drag a tile onto another one, as you would on an iPhone).
insert_linkPinning to the Taskbar
Equally, you could pin apps that you frequent, as much as that one pub, to the taskbar, using right-click. These items will never leave your taskbar, so you can quickly open them whenever.

Right click on them again, in the taskbar, to unpin them. I suggest pinning your browser to the taskbar since that generally gets substantial usage.
Using similar techniques discussed here, you can hide the Task View button, Search, and Peoples button from the taskbar. Hence, you'll profit from the bonus space for all the more programmes.
insert_link5. Find Almost Everything Using Windows Search
Yet another method for rapidly opening programmes is using the wonderful Windows Search. In truth, I use this Windows 10 feature way too often—because productivity is key!
See if you've kept the Windows Search/Cortana icon or search box next to the Start button. In the event that this is present, it's as plain-sailing as clicking on it and typing your query.
However, my preferred method—the faster method—is to straightforwardly open the Start Menu and start typing. Even though there is no text box, pressing a letter will immediately deploy Windows Search/Cortana.
Why QWERTY is wrong: Typing Proficiency: How to Boost Your Productivity
Life becomes fairly easy, accordingly, as this is all you need to do to search:
- Press the Windows key on your keyboard
- Type your query directly after
- If necessary, use the arrow keys to navigate and select the relevant item
- Press enter to open the selected item
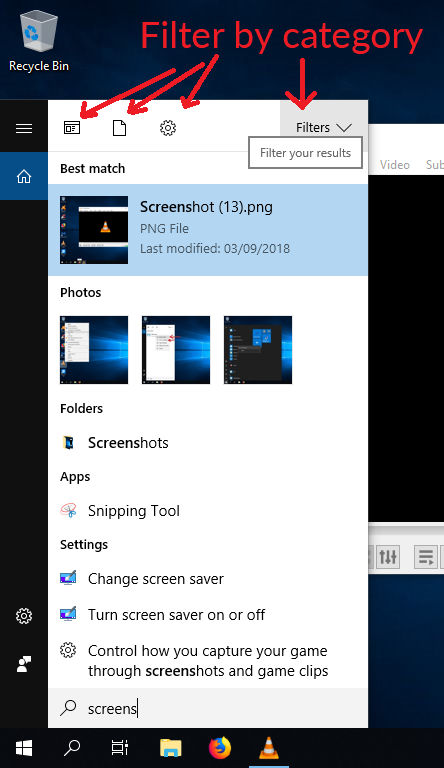
You'll profit from Windows Search's ability to search a multitude of items in your computer, including:
- Applications
- Settings
- Your files i.e. music, documents, photos, and videos, as well as folders
insert_link6. Care for the Desktop like It's a Cuddly Little Kitten
Whenever I glance at some desktops—full to the brim—I become a rotting banana, shrivelling up in every direction.
insert_linkWhat Are Desktop Icons?
The icons on your desktop basically represent the files in your "Desktop" folder, in your user folder. To clarify, the desktop is a mirror of that folder.
Also, that icon you press to open your application is not actually the application. Typically, this is a mere shortcut, as shown by the miniature arrow in the bottom-left of the icon.
As such, the real application file (the executable) is buried somewhere within Windows 10's filesystem. So, in order to save you the time finding it, you can create a shortcut.
Installing applications normally creates the shortcut and puts it on your desktop for you.
Upon clicking on this shortcut, you will open the referenced application—which is somewhere else. Therefore, deleting shortcuts from your desktop does not uninstall the application from your computer.
Similar things can be said about pinned items on the Start Menu or taskbar etc.
For some, a generous serving of desktop shortcuts on their desktop is strangely utilitarian. Me, though, I don't favour using the desktop in this way.
By contrast, I believe desktop shortcuts are madness; putting endless heaps of files on the desktop only creates a mess.
Not to mention, you end up obstructing your exquisite desktop background.
I personally do not use the desktop for temporarily storing files, too—there are better ways.
On top of that, desktop icons are covered by windows, unlike the Start Menu, which is more rapidly accessed. That is, most of the time. And most of the time is more vital than some of the time.
With that in mind, my solution is to right-click on the desktop background, go to "View", then untick "Show desktop icons".
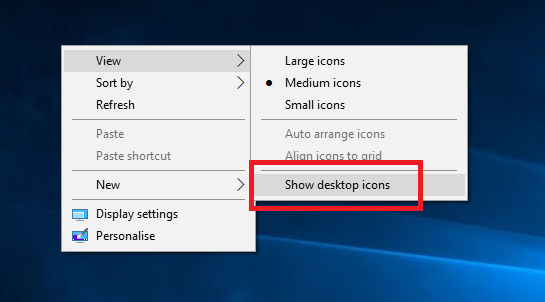
What was thought to be a brilliant productivity feature is, in my opinion, completely useless…
insert_link7. Enhance Your Concentration with Focus Assist
More clearly a Windows 10 productivity feature—Focus Assist—because it wants you to succeed.
To the surprise of no one, distractions are the primary killer of productivity, hence the breeding ground for procrastination.
In this modern age, though, these distractions often manifest themselves as notifications—namely on your phone. For example, these consist of emails, text messages, critical security alerts, and other info-nuggets from your apps.
While handy for staying in-the-know, these are far from critical when you actually want to get stuff done.
Take a bite out of my system: How to Be Productive with This Powerful Tool—Guaranteed
For that reason, you may easily disable these lethal notifications by enabling Focus Assist in the Action Centre. (The Action Centre is found at the end of the taskbar, otherwise, press [keybt]⊞ Windows Key [/keybt] + [keybt]A[/keybt])
Focus Assist will probably be one of those rectangular buttons towards the bottom of the Action Centre Pane. If not, you may have to press "Expand", or, you've hidden the button yourself.
Great! Now you're being productive!
In addition, don't miss out on the host of settings relating to Focus Assist; so, right-click the button, and press "Go to Settings".
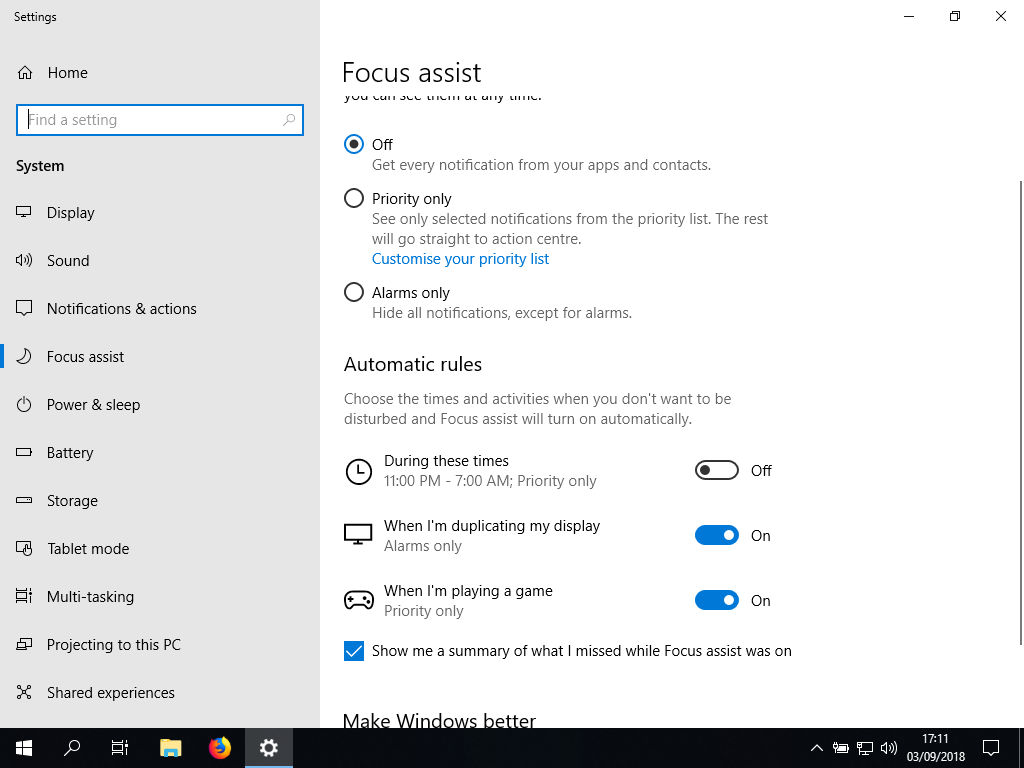
For instance, you can set the feature to enable itself automatically during specific times. This can be exceedingly helpful when you have allocated work hours.
insert_link8. Use Night Light for the Best Night's Sleep (Equals Productivity)
Similar to use, Night Light, a Windows 10 feature, can genuinely aid your productivity. Albeit, even if this one does so in a slightly unique way.
Thus far, we have covered Windows 10 productivity features that help productivity in the current moment. These make doing things faster for you, whereas Night Light aims to make you faster at doing things.
Essentially, the feature causes your screen to display warmer colours at night, thus reducing the blue light emitted. Your screen will begin to take on a tint of orange, in other words.
Like before, you can enable this feature on-demand from the Action Centre, or it can be scheduled. For the second-mentioned, just access Night Light's settings—it's exactly the same process as with Focus Assist.
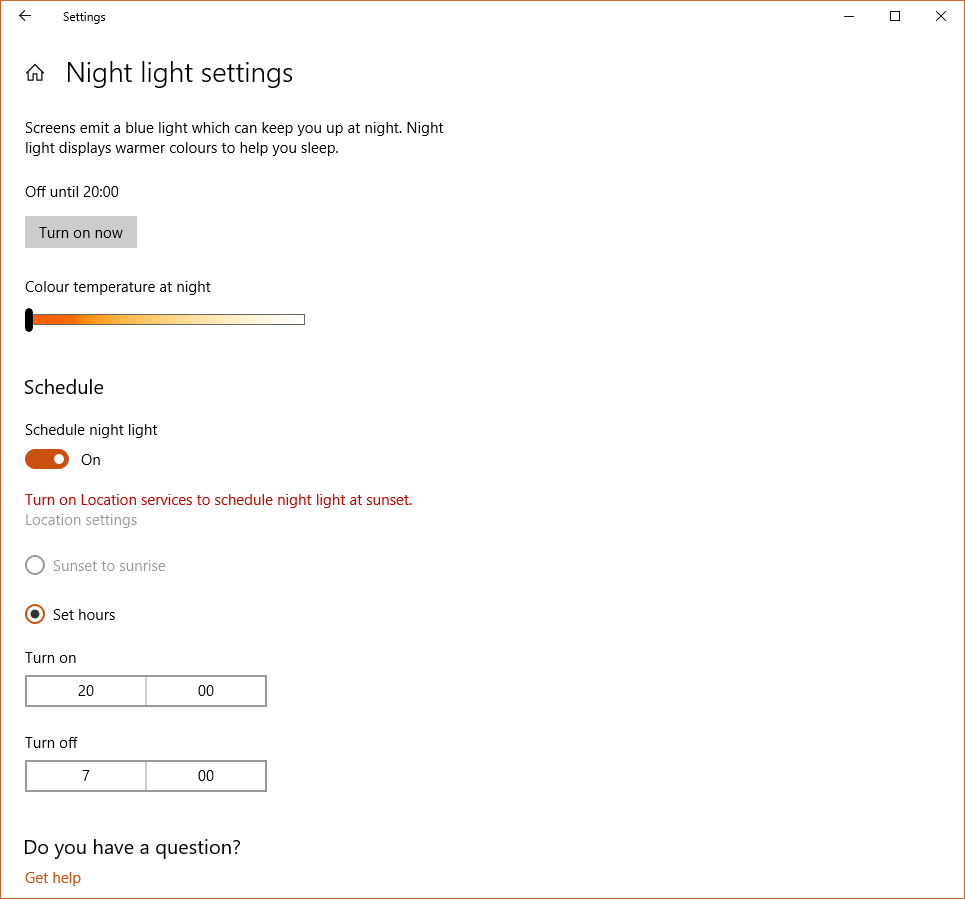
Next, you can choose the colour temperature Night Light uses, as well as the hours for which it comes on. What's more, Night Light can use your current location to automatically come on from sunset to sunrise!
insert_linkWhat is the Point of Night Light?
"That enters my ear warm, Big Joe, but what is the purpose of reducing my blue-light consumption?"
Well asked. Exposure to blue light, put simply, prevents falling asleep with ease.
Makes sense, right? The sky is blue during the day and humans don't sleep during the day (well, most of us, that is).

However, if you're using electronic devices with a screen in the evenings, you're exposing yourself to blue light. Hence, you are going to have more difficulty falling asleep.
Night Light—coming to the rescue—wants to make the process of falling asleep far more effortless.
For you see, sleep is immensely important, especially for your productivity. Likewise, sleeping less and working more doesn't necessarily mean more work gets done; it may, in fact, mean less work gets done.
If you want to learn more about this topic, I highly advise that you read this book.
insert_link9. Conveniently Clean up Clutter with Aero Shake
Why do I mention this last on my list of 9 Windows 10 productivity features? To be concise, the reason is that this feature doesn't get a whole lot of use from me.
Nevertheless, I thought it would be a marvellous idea to outline it here—then we get an odd-numbered list.
We love odd numbers—and so do you—but Microsoft and Apple do not.
Without any further hubbub, introducing "Aero Shake", a feature that you might find invaluable for productivity. The entirety of the real deal consists of shaking a window. That's it.
Grab onto a window, as if you're going to move it, then wobble your mouse/cursor; shake the window back and forth in any direction, that is to say.
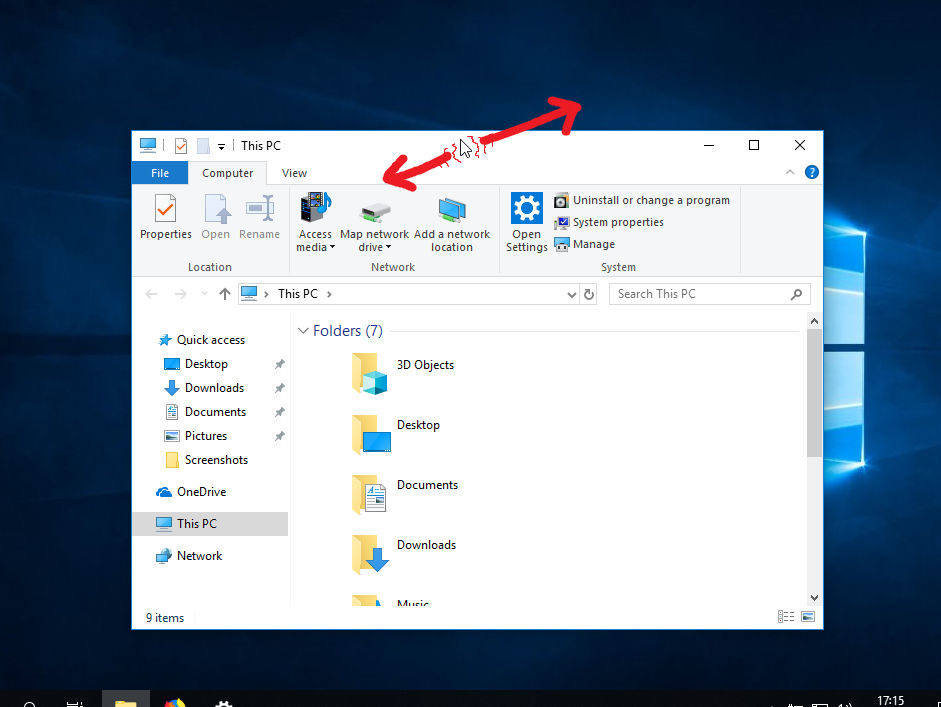
As a matter of fact, you may have done this accidentally in the past (like me): the result minimises all other windows but the one you shook.
Therefore, it's safe to say this is an effective way to clear your workspace once in a while—free yourself from distractions.
Afterwards, you can shake the window again to restore the other applications. On the other hand, it's fine to open each app individually using the task manager, Task View, alt + tab, etc.
insert_linkThese Are Merely a Few Tips
Of course, I have to end this somewhere—using Windows 10 productively entails far more than what a single article's worth.
This is merely scratching the surface.
As that being the final note, stay tuned for more computer-proficiency tips and insights (you won't regret it).
The productive person is always learning, productively.
Read Next: Ultimate Checklist for the Best Initial Windows 10 Setup 2018


